Image
Load bitmap file
|
|
Bitmap toolbar |
| Menu Insert > Image |
This function is used to load an image in bitmap format.
The dialog field Load bitmap appears after activating this function. The desired bitmap image can now be selected and positioned. Whilst positioning it, other possibilities such as stretching, mirroring, etc. are available in the manipulation property bar.

The manipulation of bitmap images such as stretch, mirror etc. can also be performed later with the normal edit function.
In ELITECAD Architecture the renovation planning state can be selected.
Tip
Available bitmap formats for import are TIFF, JPEG, BMP and PNG.
Delete bitmap image
|
|
Bitmap toolbar |
| Menu > Modify > Edit bitmap > delete |
This function is used to delete one or multiple bitmap images.
When the function is activated, the existing bitmap image is deleted.
Deleting bitmap images is also possible by selection.
Tip
If multiple bitmap images can be found on the plan, you will be asked which bitmap image you wish to delete.
Crop bitmap image
|
|
Bitmap toolbar |
| Menu > Modify > Edit bitmap > Crop |
This function is used to crop an image section. The rest of the bitmap image is automatically deleted. After activating the function, the desired cut-out is defined by the entry of two points (defining a rectangle) or a free polygon.
Tip
If multiple bitmap images can be found on the plan, you will be asked which bitmap image you wish to edit.
Invert monochrome bitmap
|
|
Bitmap toolbar |
| Menu > Modify > Edit bitmap > Invert colour |
You can use this function to swap the monochrome (B/W) bitmaps in the background with those in the foreground. The white pixels will turn black and vice versa.
Tip
If multiple bitmap images can be found on the plan, you will be asked which bitmap image you wish to edit.
Delete bitmap range
|
|
Bitmap toolbar |
| Menu > Modify > Edit bitmap > Delete range |
This function is used to cut a defined range of bitmap images. The ranges of the bitmap images, which are not needed, can be deleted with this function.
After activating the function, the cutout to be deleted is defined by the entry of two points (defining a rectangle) or a free polygon.
Tip
If multiple bitmap images can be found on the plan, you will be asked which bitmap image you wish to edit.
Copy range
|
|
Bitmap toolbar |
| Menu > Modify > Edit bitmap > Copy range |
If multiple bitmap images can be found on the plan, you will be asked which bitmap image you wish to edit.
The copy can only be pasted into the bitmap image out of which the copied range was selected.
Tip
The background of the set copy is no longer visible after it has been placed. If multiple bitmap images can be found on the plan, you will be asked which bitmap image you wish to edit.
The copy can only be pasted into the bitmap image from which the copied range was selected.
Copy range transparent
|
|
Bitmap toolbar |
| Menu > Modify > Edit bitmap > Copy range transparent |
You can use this function to copy transparent ranges from monochrome (B/W) bitmap images whose background is inverted to black where necessary by means of the pixels. After activating the function, the range to be copied over is defined by the diagonal of a rectangle.
Tip
If multiple bitmap images can be found on the plan, you will be asked which bitmap image you wish to edit.
The copy can only be pasted into the bitmap image from which the copied range was selected.
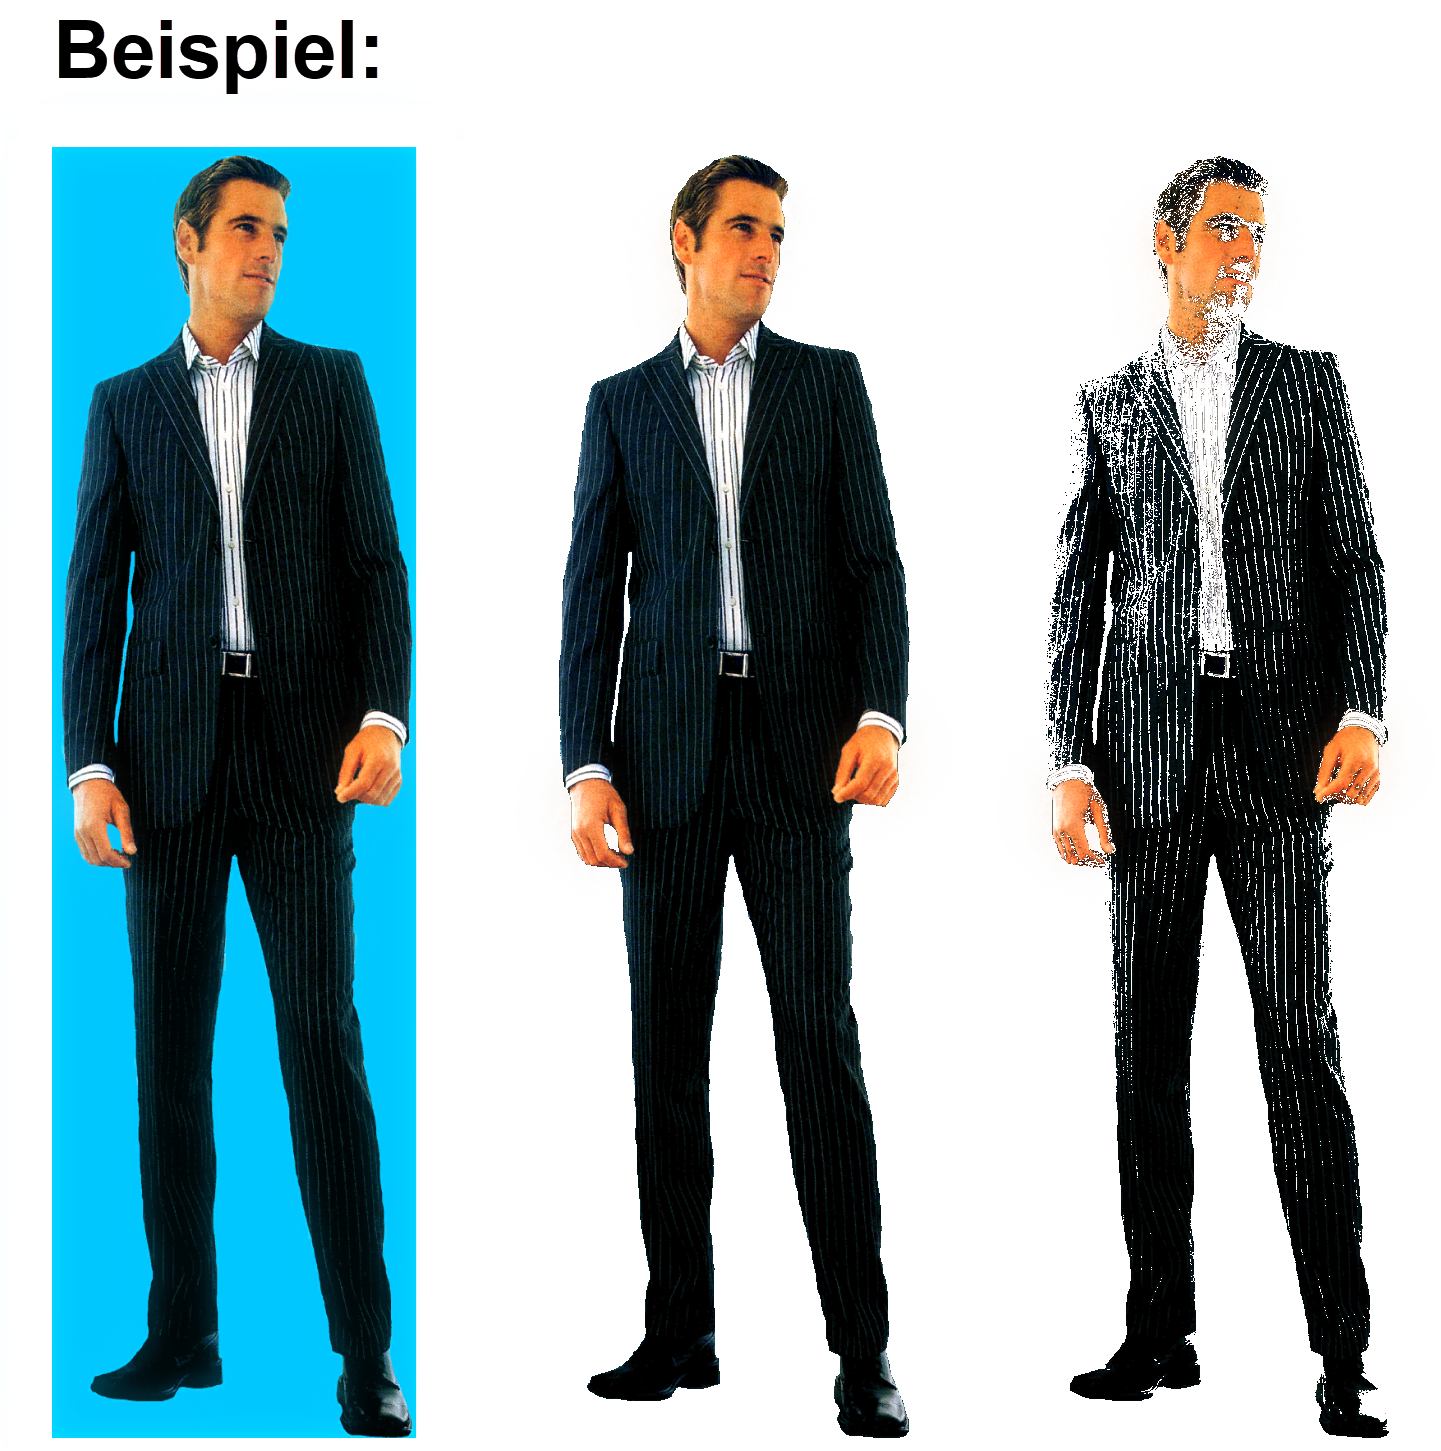
High quality on/off
|
|
Bitmap toolbar |
| Menu > Modify > Edit pixel > High quality on/off |
This function is used to convert monochrome bitmap images into greyscale.
After activating the function, all monochrome bitmap images are depicted in either greyscale or back to monochrome.
Tip
For colour images, this function does not have an effect, as colour images are always depicted in high quality. If there are both monochrome and colour images on the screen, the monochrome images are not converted either.
Assign transparent colours
|
|
Bitmap toolbar |
| Menu > Modify > Edit pixel > Assign transparent colours |
You can use this function to switch on the transparency of a particular colour of a bitmap image. After activating the function, the cursor becomes a pipette icon and the appropriate colour can be selected.
The tolerance value can subsequently be entered into the input line. You can then control the intensity of the transparency colour. The higher the value, the more transparent is the colour.
Tip
If multiple bitmap images can be found on the plan, you will be asked which bitmap image you wish to edit. The transparency can be deleted with the DELETE TRANSPARENCY function.
Transparency gradient
|
|
Bitmap toolbar |
| Menu > Modify > Edit pixel > Transparency gradient |
A bitmap image is allocated a transparency gradient with this function. After activating this function, you will be asked for the start and end transparency as well as the start distance (gradient starts at 0-50%). The values are each separated by a comma. The angle of the gradient is subsequently requested.
| Example: | ||
|---|---|---|
| Transparency: 0-100 | Transparency: 80-80 | Transparency: 0-100 |
| Start distance 0 | Start distance 0 | Start distance 0 |
| Angle 0 | Angle 0 | Angle 90 |
 |
 |
 |
Tip
If multiple bitmap images can be found on the plan, you will be asked which bitmap image you wish to edit. The transparency can be deleted with the DELETE TRANSPARENCY function.
Delete transparency
|
|
Bitmap toolbar |
| Menu > Modify > Edit pixel > Delete transparency |
If multiple bitmap images can be found on the plan, you will be asked which bitmap image you wish to edit.
Tip
If multiple bitmap images can be found on the plan, you will be asked which bitmap image you wish to edit.
Bitmap image: export to file
|
|
Bitmap toolbar |
| Menu > Modify > Edit pixel > Bitmap image: export to file |
This function is used to export a bitmap image from an ELITECAD drawing into a file. The dialog field "Bitmap image: export to file" appears after activating this function. A new file name can be entered here or an existing one chosen and confirmed with "Save". If a pre-existing name is selected, a confirmation prompt then appears which needs to be confirmed with either  or
or  .
.
The following data formats can be written: TIFF, JPEG, BMP and PNG.
Tip
If multiple bitmap images can be found on the plan, you will be asked which bitmap image you wish to edit.
Bitmap image: delete from file
|
|
Bitmap toolbar |
| Menu > Modify > Edit pixel > Bitmap image: delete from file |
This function is used to replace an already existing bitmap image with another whereby the dimensions of the existing image are applied.
Tip
If multiple bitmap images can be found on the plan, you will be asked which bitmap image you wish to edit.