Measure
Show dimension values
|
|
Measure toolbar |
| Information menu > Show dimension values | |
| Context menu (right mouse button) > Measure |
This function opens the dimension values dialog window.
Dimension values
The measurement functions can be called up at any time via the MEASURE context menu (right mouse button).
In addition to the measurement functions, there is a list, a calculation line and calculation operations.
This window is a docking menu and behaves in the same way as the layer, storey and views manger windows.
List
The 20 most recently measured values appear in this list; it does not matter whether the dialog window is open or closed. The most recently measured value is always at the bottom and highlighted in blue. The unit of the values is the unit set in the status window. When you double-click a value, the number is copied to the calculation line. The rounding of the figures in the list can be set in the SETTINGS menu > OPTIONS > WORK PARAMETERS > GENERAL.
Tip
To copy a value from the list to the input line or a field in a dialog window, the value must first be copied to the calculation line.
Delete list
![]()
This function deletes all values from the list.
Copy selected value from list
![]()
This function transfers the active value (highlighted blue) from the list and copies it to the calculation line.
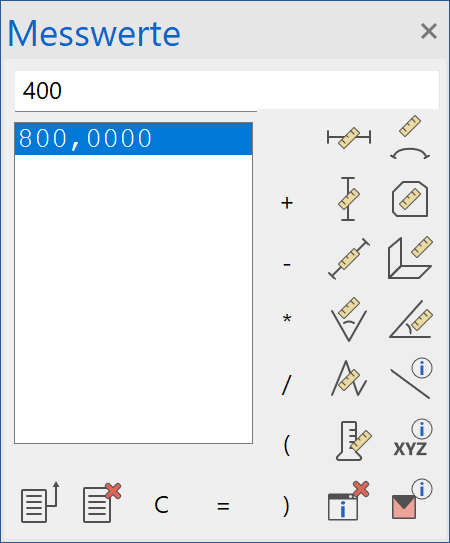
Calculation line
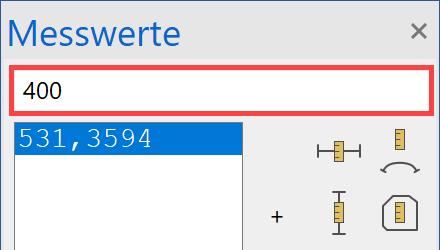
The values from the list can be transferred to the calculation line by double-clicking them, or you can enter new values here using the keyboard. The calculation operations can be entered with the relevant button or using the keyboard. Clicking the buttons always enters the operations at the end of the line. In order to enter an operation subsequently, the input cursor must be in the correct position and the operation entered using the keyboard.
Rounding to a number of decimal places can be set in the OPTIONS.
Equals
=
The equals button shows the result of a calculation.
Clear
C
The clear button deletes all values in the calculation line.
Add, subtract, multiply, divide, bracket open, bracket close
+ - * / ( )
The main operations are available as buttons so that you can enter a calculation operation in the calculation line. The operations can also be entered using the keyboard, but you must make sure that you put the input cursor in the correct place first. Clicking the buttons always enters the operations at the end of the line.
Behaviour of measurement functions
The behaviour of the measurement functions differs depending if a function was active when a measurement function was selected or whether the measurement function was started within another function.
E.g. > only applies if the measurement function is called up via the dimension values dialog window.
No function active:
The measured value is shown in the status bar for information and added to the list in the measurement dialog window for further processing. It makes no difference whether the measurement window is open or not.
This measurement function remains active.
Within a function:
The measured value is shown in the status bar for information and filled directly into the input line in the measurement window. The value can therefore be used immediately.
This measurement function does not remain active.
Measurement functions
The measuring functions can be called up via the menu or the measured value window.
Measure horizontal
|
|
Measure toolbar |
| Information menu > Horizontal | |
| Context menu (right mouse button) > Measure |
This function measures the horizontal distance between two points in the drawing.
After the function is activated, the two points in the drawing can be specified.
See the Behaviour of measurement functions chapter for information about where the dimension values appear and how they can be further processed.
Tip
The two points you enter do not need to be at the same horizontal height.
Measure vertical
|
|
Measure toolbar |
| Information menu > Vertical | |
| Context menu (right mouse button) > Measure |
This function measures the vertical distance between two points in the drawing.
After the function is activated, the two points in the drawing can be specified.
See the Behaviour of measurement functions chapter for information about where the dimension values appear and how they can be further processed.
Tip
The two points you enter do not need to be at the same vertical height.
Measure direct
|
|
Measure toolbar |
| Information menu > Measure direct | |
| Context menu (right mouse button) > Measure |
This function measures the direct distance between two points in the drawing.
After the function is activated, the two points in the drawing can be specified. See the Behaviour of measurement functions chapter for information about where the dimension values appear and how they can be further processed.
Measure arc length
|
|
Measure toolbar |
| Information menu > Arc dimension | |
| Context menu (right mouse button) > Measure |
This function measures an arc length, either in part or entire arc length. The arc must be a drawing element.
Once the function is activated, the arc to be measured must be selected. The element capture function is activated for selecting the arc.
If you confirm with Enter , the entire arc length is measured. Instead of confirming, you can also set a start and end point on the arc to allow for a partial measurement of an arc.
Measure polygon length
|
|
Measure toolbar |
| Information menu > Polygon length | |
| Context menu (right mouse button) > Measure |
This function measures the length of a drawn 2D polygon.
When this function is activated, you are prompted to select a contour, which has to be measured. The measured polygon starts with the selected element, the search of subsequent elements can be done in two directions. The direction depends on the side on which the polygon was selected. The graphical preview shows the measured polygon.
Measure area
|
|
Measure toolbar |
| Information menu > area | |
| Context menu (right mouse button) > Measure |
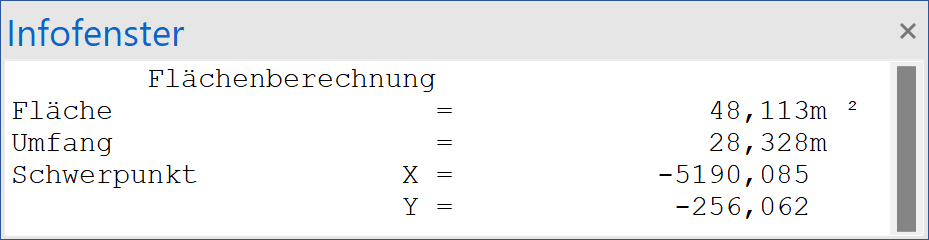
This function measures the specified area, calculates the circumference and positions the crosshair in the centre of gravity of the area.
Property bar

The toggle button "hatches" defines if hatches or 2D contours may be selected for area measurement. The polygon functions allow you, to draw a contour manually. The graphic preview of the area can be deactivated with the "Preview area" switch. If cut-outs are to be extracted within the area, the "Include cut-outs" switch must be activated. The unit for the measurement results can be defined separately.
Closed contour
When this function is activated, you are prompted to position the crosshair on the required contour. The circumference of the contour, the area and the centre of the area are calculated. The reference point is set at the centre of the area. The calculated values are shown in the info window. The centre point coordinates relate to the current reference point on the drawing.
Tip
This function adheres to the branching parameters of the contour search under SETTINGS > OPTIONS > WORK PARAMETERS > GENERAL.
Open contour/polygon functions
Additional polygon functions are available in this property bar. These polygon functions allow you to track along even imaginary surfaces that do not have a contour, to follow contours that have open points, or to determine a profile length.
See the Polygon chain chapter for information about what the polygon functions can do.
Measure angle between 2 surfaces
|
|
Measure toolbar |
| Information menu > Angle between 2 surfaces | |
| Context menu (right mouse button) > Measure |
You can use this function to determine the angle between two surfaces.
After you activate the function, you are prompted to specify the surfaces between which the angle is to be determined. The value appears in the info window.
If a surface is curved, the tangent plane is used in the specified point.
Measure angle between 2 lines
|
|
Measure toolbar |
| Information menu > Angle between 2 lines | |
| Context menu (right mouse button) > Measure |
You can use this function to determine the angle between two lines (element or auxiliary-line).
After you activate the function, you are prompted to specify the lines between which the angle is to be determined.
Tip
The relevant angle is calculated when you click the inside or outside of the elements with the crosshair.
Measure angle of a line
|
|
Measure toolbar |
| Information menu > Angle of a line | |
| Context menu (right mouse button) > Measure |
You can use this function to determine the angle of a line (drawing element or auxiliary-geometry) that it forms with the horizontal.
After you activate the function, you are prompted to specify the line for which you wish to determine the angle.
The angle units DEGREE, GRADIAN or RADIANT can be set in the OPTIONS.
Coordinates of point
|
|
Measure toolbar |
| Information menu > Coordinates of point | |
| Context menu (right mouse button) > Measure |
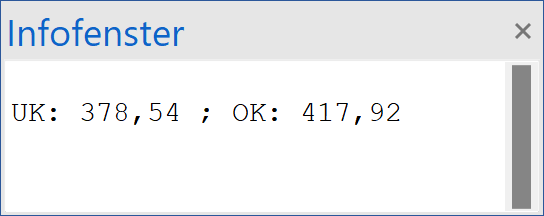
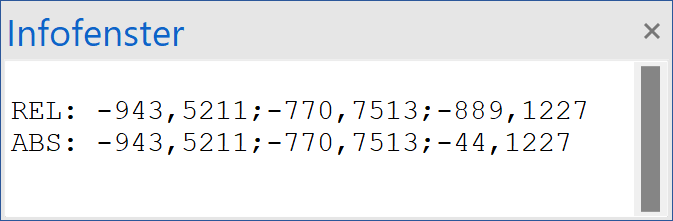
This function allows you to display the absolute and relative X, Y, and Z coordinates of any point on the drawing. The coordinates are displayed in the info window.
After the function is activated, the point in question is marked. The coordinates are displayed as follows:
REL/ABS: X value, Y value, Z value
Tip
The relative Z value is always measured from the current work plane and the absolute Z value is measured from project null.
Element information
|
|
Measure toolbar |
| Information menu > Element information | |
| Context menu (right mouse button) > Measure |
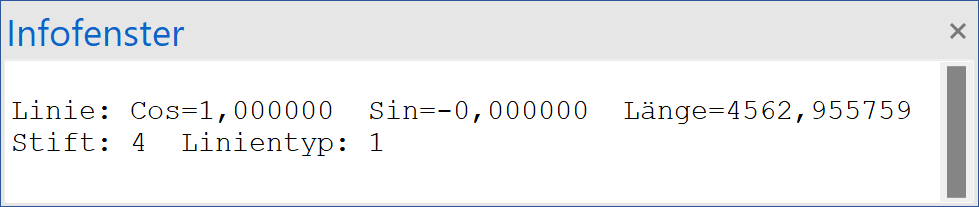
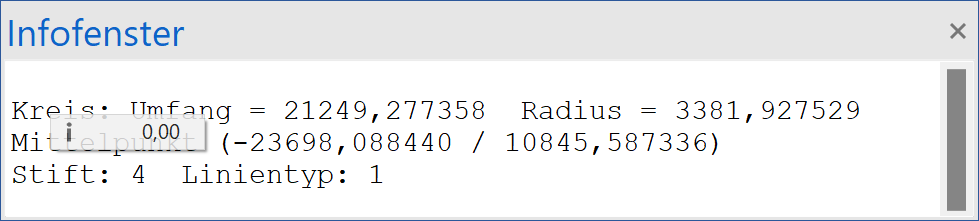
This function allows you to list the geometry information for an element shown on the screen.
When you select the command, the required element is then to be marked with the crosshair.
The following information is shown in the info window:
Line
Circle
Tip
If an element attribute is available, this is also shown in the info window.
Model information
|
|
Measure toolbar |
| Information menu > Model information | |
| Context menu (right mouse button) > Measure |
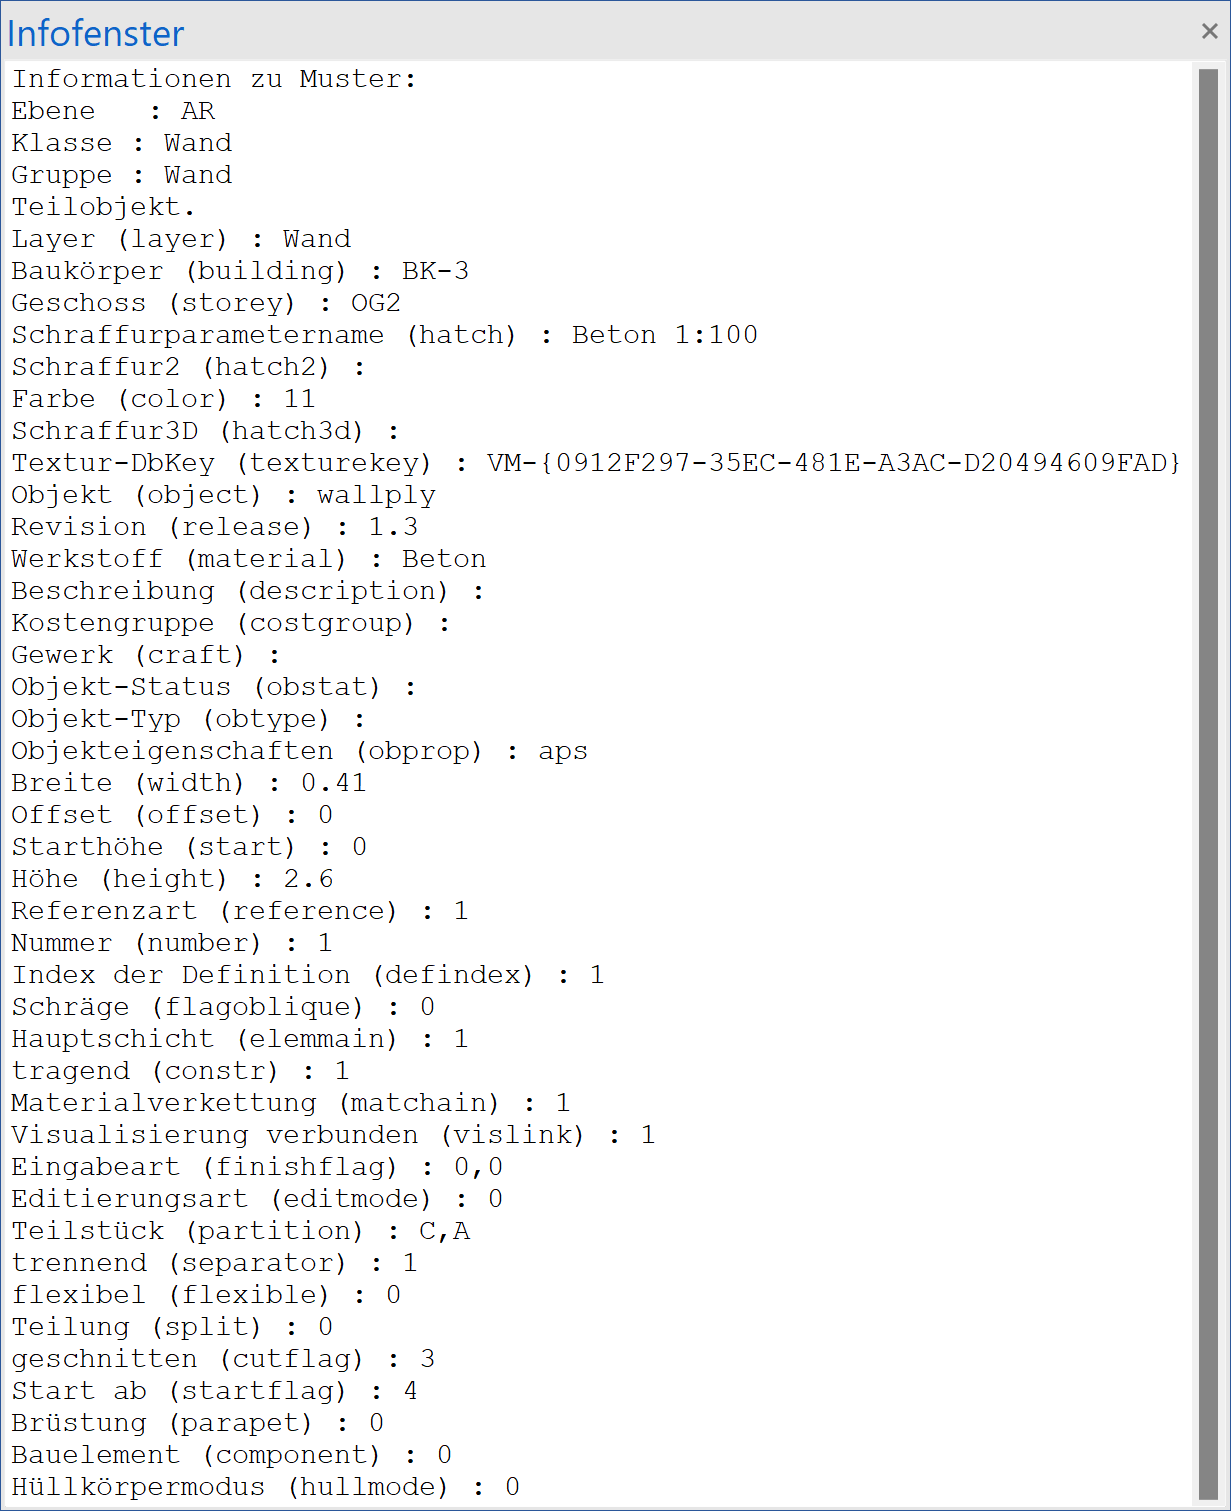
This function lists the details of a selected model. This information includes model name, all attributes, number of points, groups, classes, levels, and so on
When you activate this function, the information is listed in the info window.
Example of a wall:
Volume calculation
|
|
Measure toolbar |
| Information menu > Volumes… |
This function allows you to calculate the volume that is enclosed by the currently constructed surfaces.
When the function is activated, the settings dialog window on the left appears.

- Tolerance [%]: The value entered here corresponds to the specified precision of the volume in per cent.
- Volume: The calculated volume is displayed here.
- Surface: The calculated surface is displayed here.
- Calculate: This button starts the calculation. The calculated volume is also shown in the info window in the current cubic user unit, litres and millilitres.
- Cancel: This button allows you to cancel the calculation process at any point.
The progress bar in the status line shows the progress of the volume calculation. The indicator starts every calculation at 0%.
Tip
The volume is precisely calculated for boxes with any contour. All other objects are calculated approximately. The calculation is repeated with increasing precision until the desired tolerance is achieved.
If the tolerance is zero, the calculation is repeated with increasing precision until the CANCEL button is used to end the process.
The new approximation is shown in the dialog window and in the info window after each run. Only closed objects without protrusions can be calculated. Recesses are possible.
Height in point
|
|
Measure toolbar / Roof / Extended roof functions |
| Information menu > Height in point |
This function is only available in ELITECAD Architecture.
It is used to measure the height inside the roof. Click any point in the roof area and upper and lower edge of the roof point is shown in the info window in reference to the top floor level.