Hatch
General
The hatch is a supplemental element.
Visible/invisible
![]()
The hatching can be temporarily switched off using the image control functions.
Switch on/off
VIEW menu > SWITCHES
If you switch off the hatching using this check box, the hatching is not saved during "Save as" unless the subsequent dialog window is confirmed with "visible selection".
Supplement scaling
SETTINGS menu > SUPPLEMENT SCALING on/off
If supplement scaling is switched off, the hatching is not enlarged or reduced when scaling or modifying the scale.
Print sequence
A newly created hatch is automatically placed in the foreground, but this can be changed using Control foreground/background in the context menu. Under the SETINGS menu > OPTIONS > DEPICTION > 2D/3D, you can also select a check box specifying that elements are always in front of infill hatch. This check box is automatically selected if plans are loaded from versions earlier than V11.
Create hatch
Auto hatching
|
|
Toolbar * Create new |
| Lay-out menu > Hatch > Automatic hatch |
Use this function to launch a hatch process where existing contours and texts/dimension texts are automatically recognised as gaps.
Manual hatch
|
|
Toolbar * Create new |
| Lay-out menu > Hatch > Manual hatch |
For manual hatching, you can also select additional contours and define texts/dimension text as gaps. The end of the hatch procedure must be selected.
Hatch property bar


After you activate the function, you are prompted to define the outer contour of the surface to be hatched by clicking on it. The start element will proceed around clockwise from the perspective of the point you clicked. A closed contour is hatched without any additional query. With an open contour, additional functions are available at the cursor in the Input Assistant or by pressing Tab .

Hatch type
Saved hatches.
Hatch type preview
The standard hatches that are provided with the program come with a small preview.
Custom created hatches do not have a preview image.
Assignment layer
The hatch can be assigned to the active layer or to the layer of the selected contour. This selection is only available if the "Selection using Group/Class/Level" switch is deactivated in the OPTIONS.
![]() Hatch to contour layer
Hatch to contour layer
![]() Hatch to active layer
Hatch to active layer
Assignment object
The hatch can be assigned to the active object or to the object of the selected contour. This selection is only available if the "Selection using Group/Class/Level" switch is activated in the OPTIONS.
![]() Hatch to object of the contour
Hatch to object of the contour
![]() Hatch to active object
Hatch to active object
Note
In calculated views or section views, the assignment to the object of the contour has to be handled with care. Objects that are related to the design model are deleted when refreshing the view!
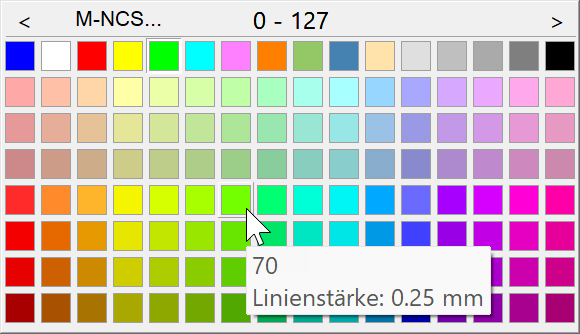
Colour selections
For colour selections, there is a distinction between line hatch and infill hatch. For line hatch, the pen colour must be defined; for infill hatch, the plane colour.
Start hatch
![]()
The function launches the manual hatch process.
The function launches the manual hatch process.
After you activate the function, you must define the outer counter of the surface to be hatched by clicking on it. The start element will proceed around clockwise from the perspective of the point you clicked. When it is closed, you must confirm the contour using END HATCH or Enter . For an open contour, additional functions are available at the cursor in the Input Assistant or by pressing Tab .
End hatch
![]() or Enter
or Enter
Ends the manual hatch process and generates the hatch.
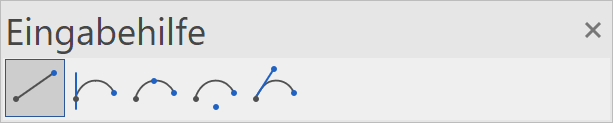
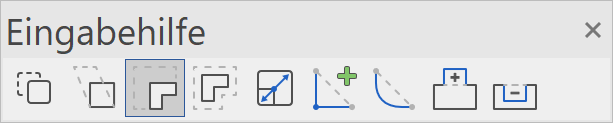
Polygon functions
Using polygon functions, you can complete the definition of open contours or create hatches using only a single polygon, if no contour exists.
![]()
Use the POLYGON function in order to define any contour for the hatch.
![]()
Use the NEXT CONTOUR function if the contour consists of multiple open polygons and you want to connect the contour you clicked first with the next contour.
Tip
The auto hatching function uses the branching parameter that is configured under SETTINGS > OPTIONS > WORK PARAMETERS > GENERAL.
Preview area
![]()
The preview area shows a preview of the selected contour. You can switch this preview on/off, as it uses a large amount of performance for dense plans.
Hatching parameters
In the hatching parameters, you can define all of the hatch's specific parameters and save them as a custom parameter record. There are parameter masks for line hatches, model hatches and infill hatches.
Parameter name
In the RECORD menu, a new function can be created with either the SAVE function or use the DELETE function to delete an existing parameter.
Boundary
The hatch can be generated with a boundary. The boundary has the same pen as the hatch. The line type is solid (no. 1).
Line hatch
The line hatch can be created with one of the first seven types. This is the location of the settings parameters such as inclination, pen number, line type and line spacing.
The SHOW function displays a preview of the current settings in the preview window.
Background

All line hatches have the option to switch to an infill hatch as the background.
The 0 pen is invisible and is used to cover things.
Rotate automatically

Line hatches can be rotated automatically. The hatch is always aligned based on the longest line in the contour. When changes are made to the contour, the hatch is recalculated.
Simple line hatch
Defined by an angle and a line type.
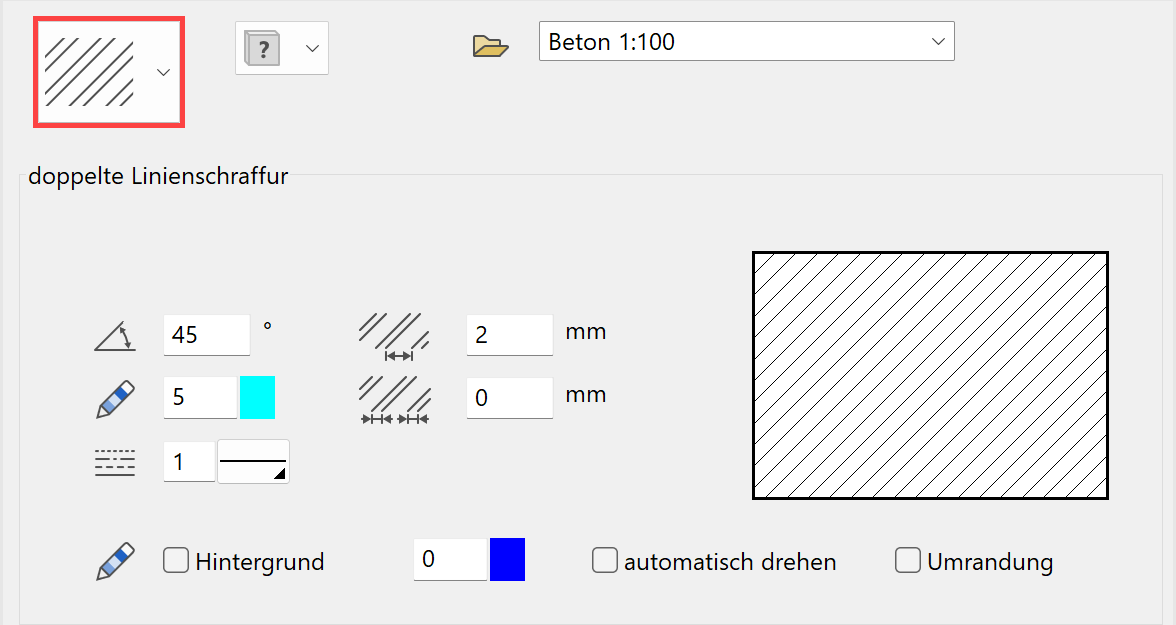
Double line hatch
Defined by an angle and two lines of the same type with a different distance.
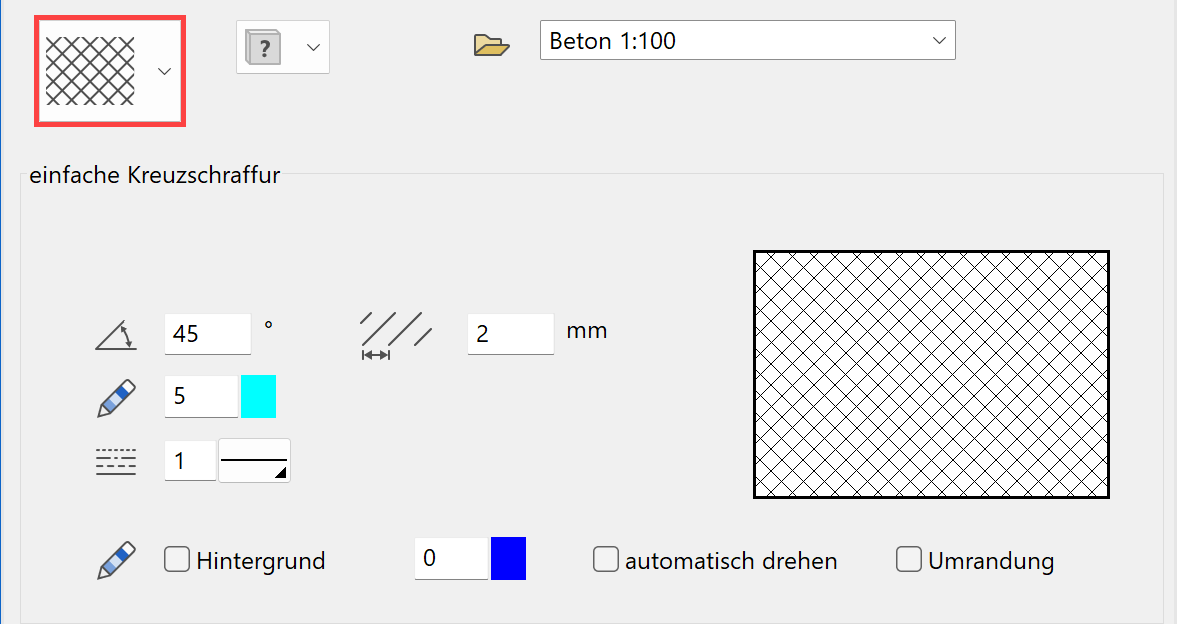
Simple cross hatch
Defined by an angle and a line type.
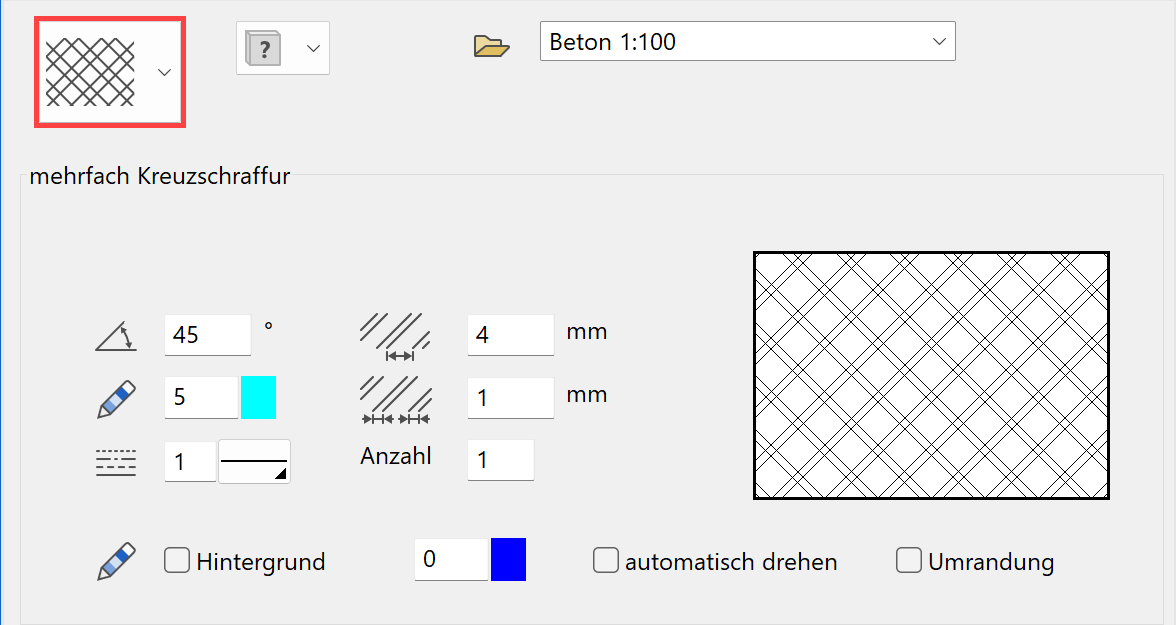
Multiple cross-hatching
Defined by an angle and two lines of the same type with a different distance.
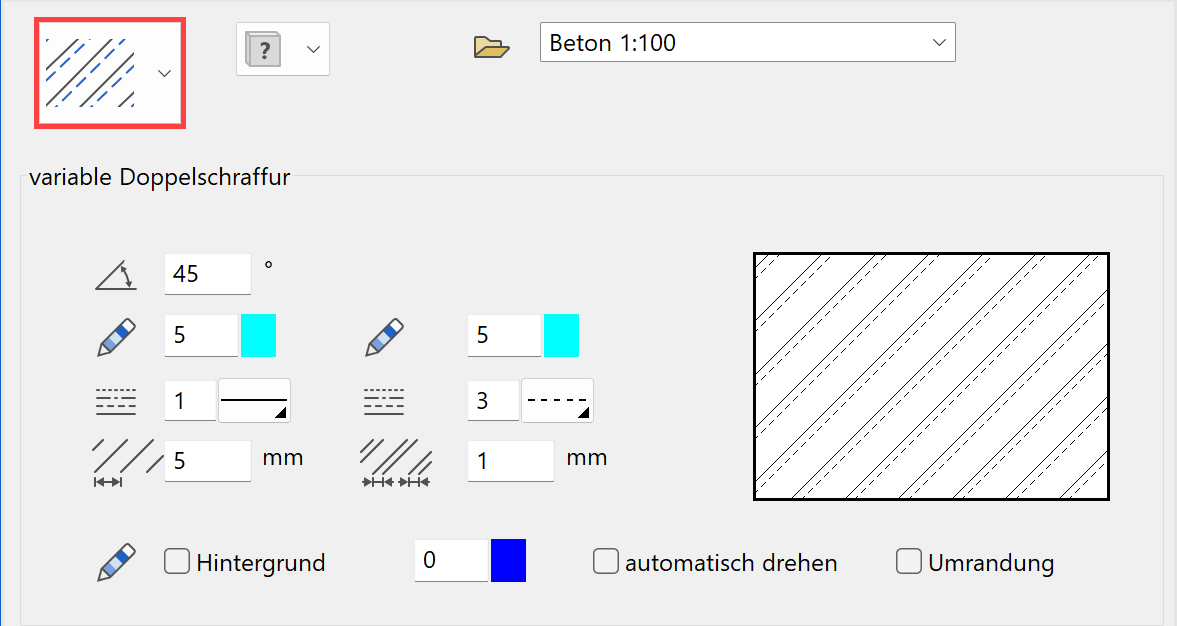
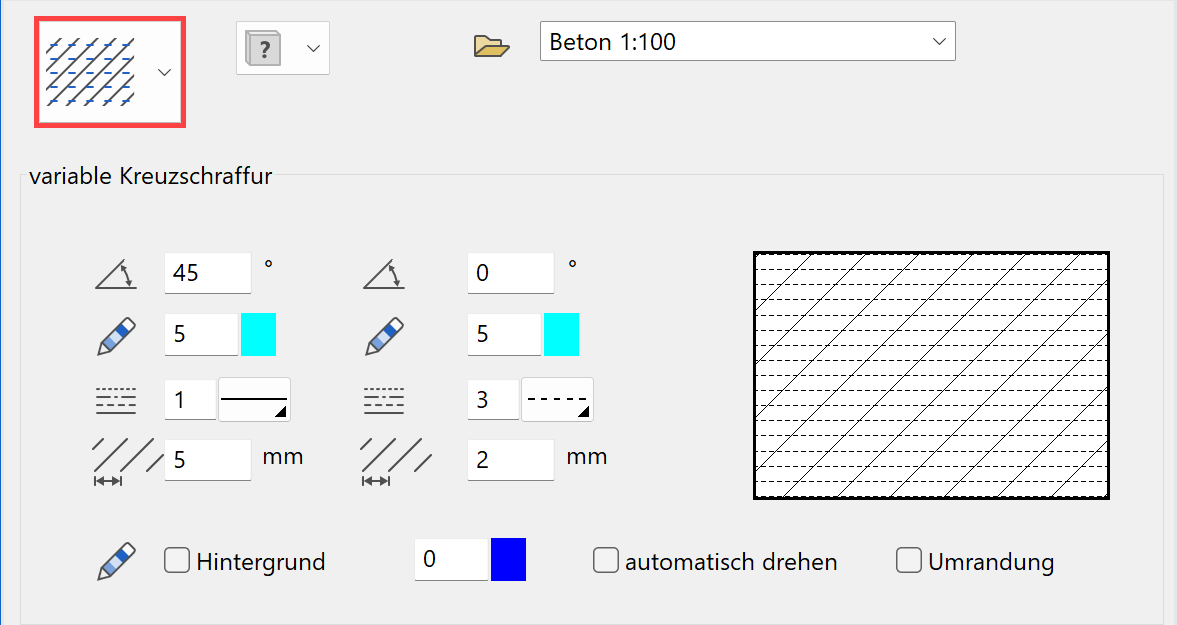
Variable double-hatch
Defined by an angle and two lines of different types with a different distance.
Variable cross-hatch
Defined by two angles and two lines of different types with a different distance.
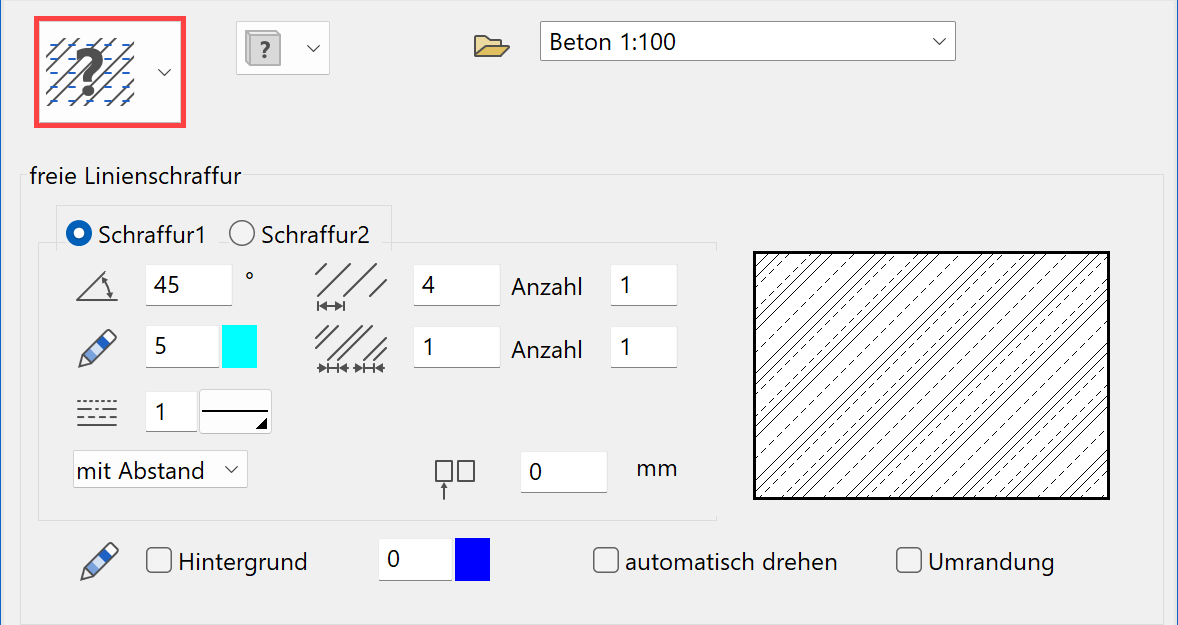
Free line hatch
Consists of two hatches, each defined by an angle and multiple lines of the same type with a distance.
Model hatch
A model hatch consists of a hatch definition (ELITECAD file) that can be used as a tile and distributed across the surface in various ways.
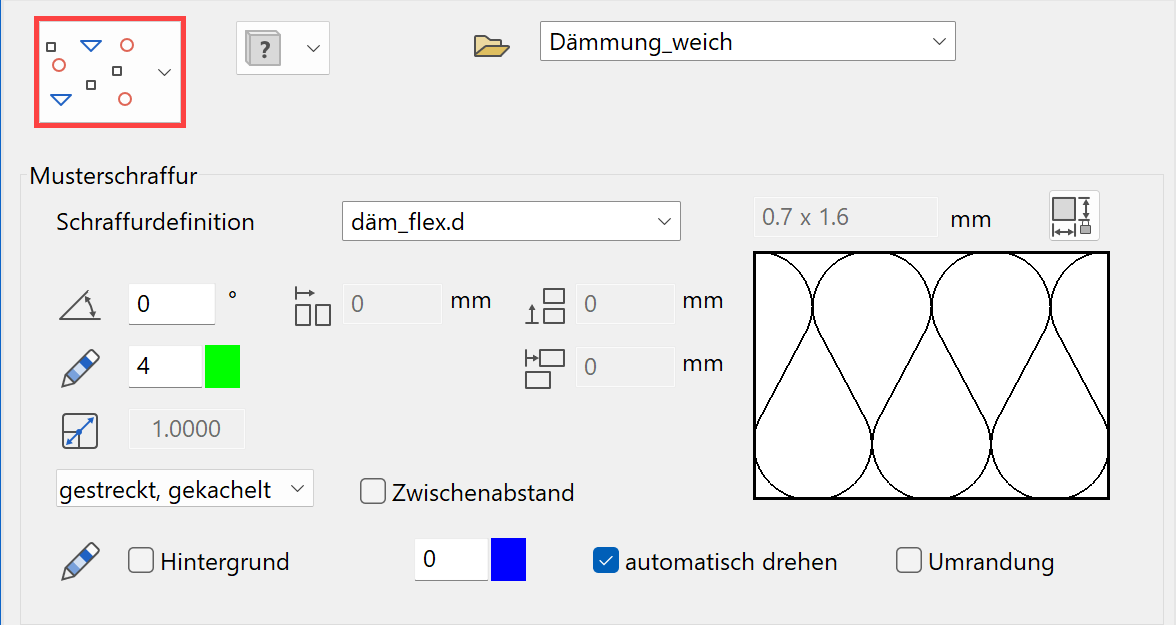
If the 2D elements of the hatch definition consist only of one colour, the colour of settings will be applied. Otherwise, the colours remain unchanged.
Hatch definition
The definition files are located in the path:
<ELITECAD-installation path>\u\<version>\cad\glob\hatch\<region>
Depending on the settings, a different subfolder has to be chosen. In ELITECAD Architecture <region> stands for language_region, e.g. de_de for Germany, de_at for Austria, en_uk for UK. ELITECAD Mechanics <region> stands for language alone, e.g. de for German, en for English.
Example of a hatch definition:
Stonework

Take size
Improved · 16 R1 · Improvements
![]()
This function reads the size of subscribing rectangle from the hatch definition and writes the values into the textfields for the distance.
Intermediate distance
Improved · 16 R1 · Improvements

This toggle can be used to set whether the distance for repetitions is to be interpreted as a total length or as an intermediate distance. For hatches with repeats that follow each other seamlessly, it is easiest to activate the interspace and enter the value 0.
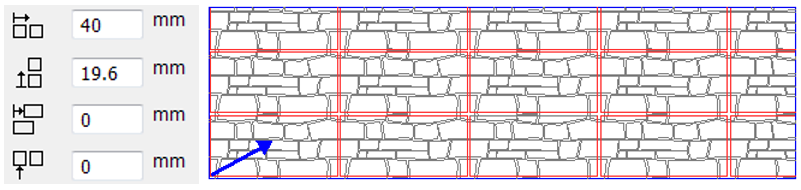
Segmentation – With distance

The tile width and height must be entered. The origin of the hatch lies in the lower left corner of the hatch contour. A vertical distance can be added to the hatch.
Segmentation - Absolute

The tile width and height must be entered. The origin of the hatch lies in the centre of the page. To place multiple hatches seamlessly alongside each other, "absolute" segmentation must be selected for each of them.
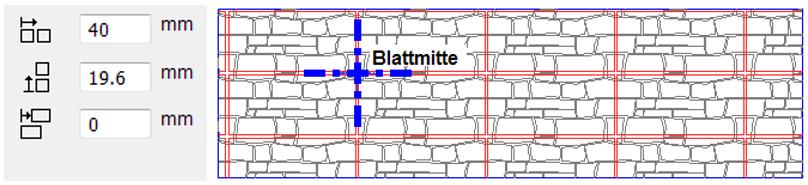
Segmentation – Centred

The tile width and height must be entered. The origin of the hatch is centred vertically and left-aligned. As measured from the centre of the tile.
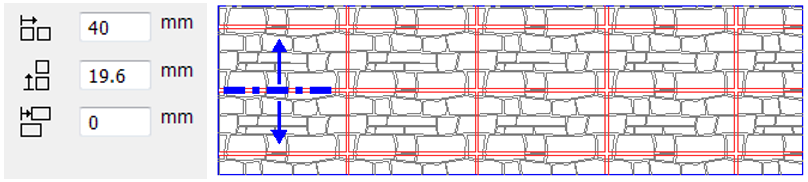
Segmentation - Stretched, tiled

The tile is scaled until it touches the first side of the contour. Then the hatch is tiled in the other direction. The hatch automatically adjusts to the height, and is therefore ideal for hatching layers.
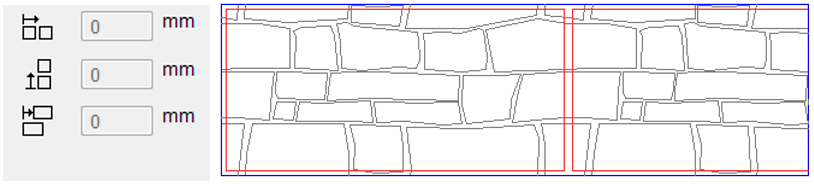
Segmentation – Stretched, 1 tile

The hatch is only placed into the contour once. A rectangle is placed around the contour to be hatched, and the hatch tile is stretched in all directions to fit it.

Workshop
Create new model hatch
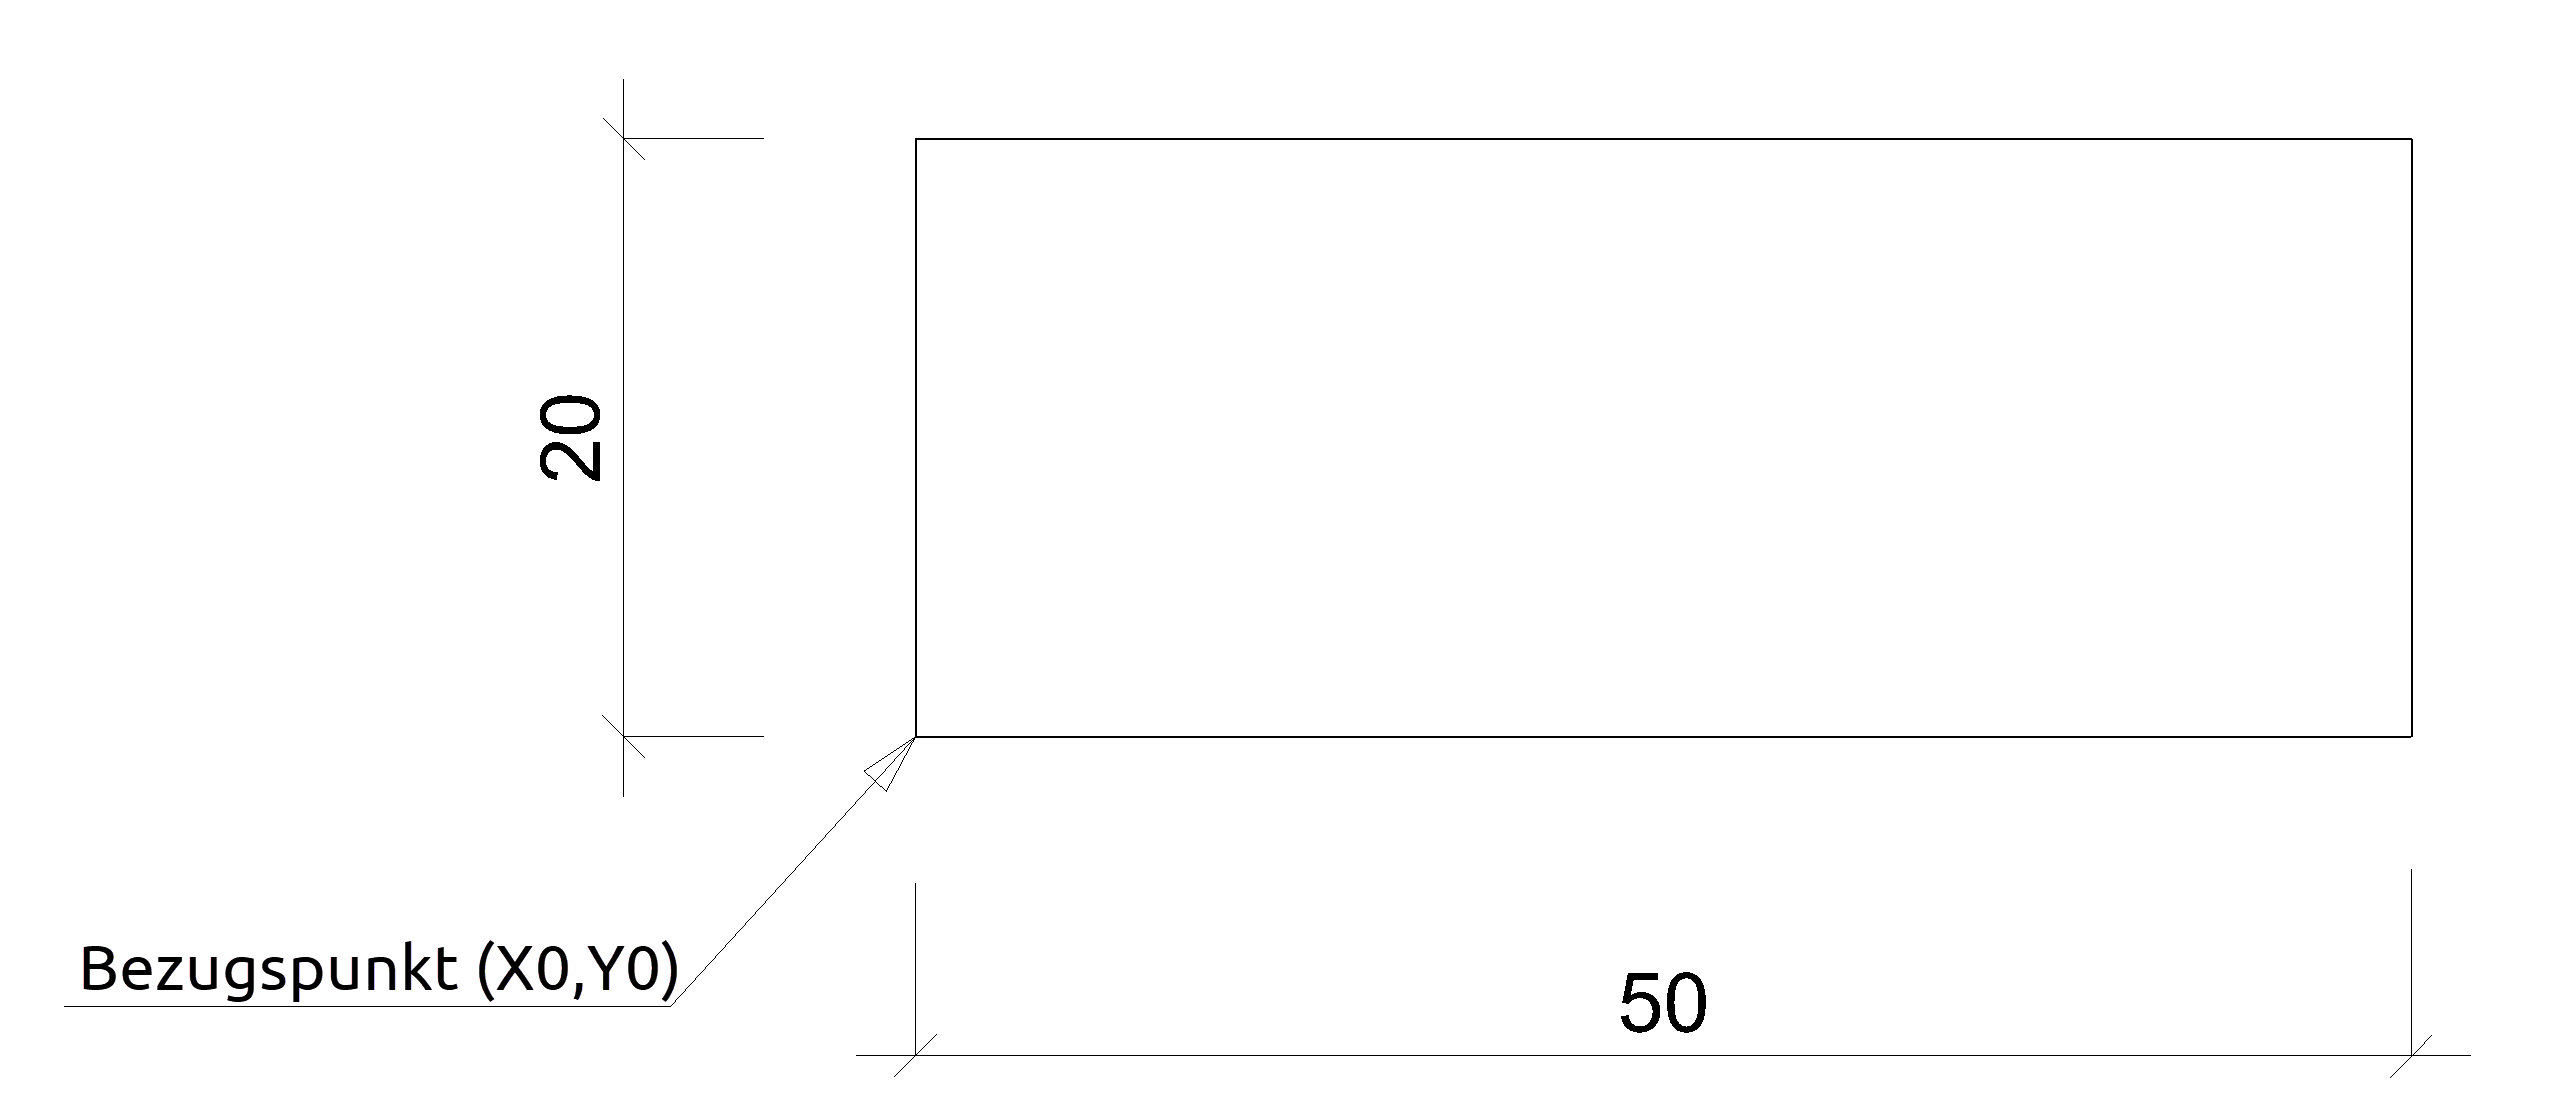
Create a panelling hatch for a 50x20 cm artificial stone panel.
It is best to create the template file on a new plan.
FILE menu > NEW
Select an appropriate scale.

Begin creating a panel at the zero point (X0,Y0).
Tip
Template drawings consist of elements. supplemental elements such as text, hatches and dimensions cannot be used.
Save the file. The file must be saved to the "hatch" directory. This directory contains all template files for model hatches.
FILE menu > SAVE AS
<ELITECAD installation path>\u\<version>\cad\glob\hatch\<region>
Depending on the settings, a different subfolder has to be chosen. In ELITECAD Architecture <region> stands for language_region, e.g. de_de for Germany, de_at for Austria, en_uk for UK. ELITECAD Mechanics <region> stands for language alone, e.g. de for German, en for English.
Navigate to the "hatch" directory and enter "Panel50x20" as the file name.
Draw a 500x400 cm rectangle at 1:100 scale and generate the panel hatch with the following settings for the hatching parameters:
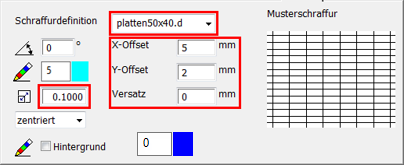
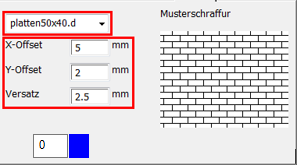
Along with the X and Y offset, you must configure the value for how many times the model drawing should be repeated. The panel is 50 cm wide and should be created to 1:100 scale, so it must be 5 mm on the plan. The alignment can be used to shift the panels.
Tip
Since the original was drawn at 1:10 scale, but the hatch is defined at 1:100 scale, the scaling must be 0.1.
Place the hatch in the outline.

Infill hatch
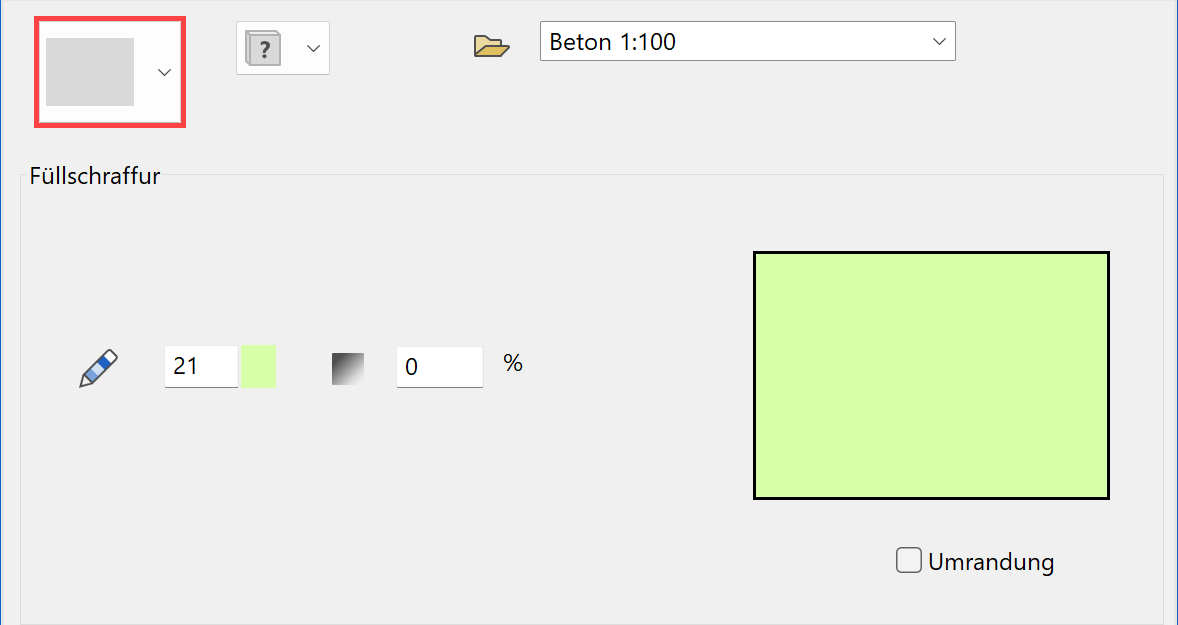
Infill hatch
The infill hatch is defined by colour selection (pen number). The hatch can be extended with a transparency.
Colour gradient hatch
Two infill hatches are mixed together, for which transparency, angle, border distance and centre point can be defined.
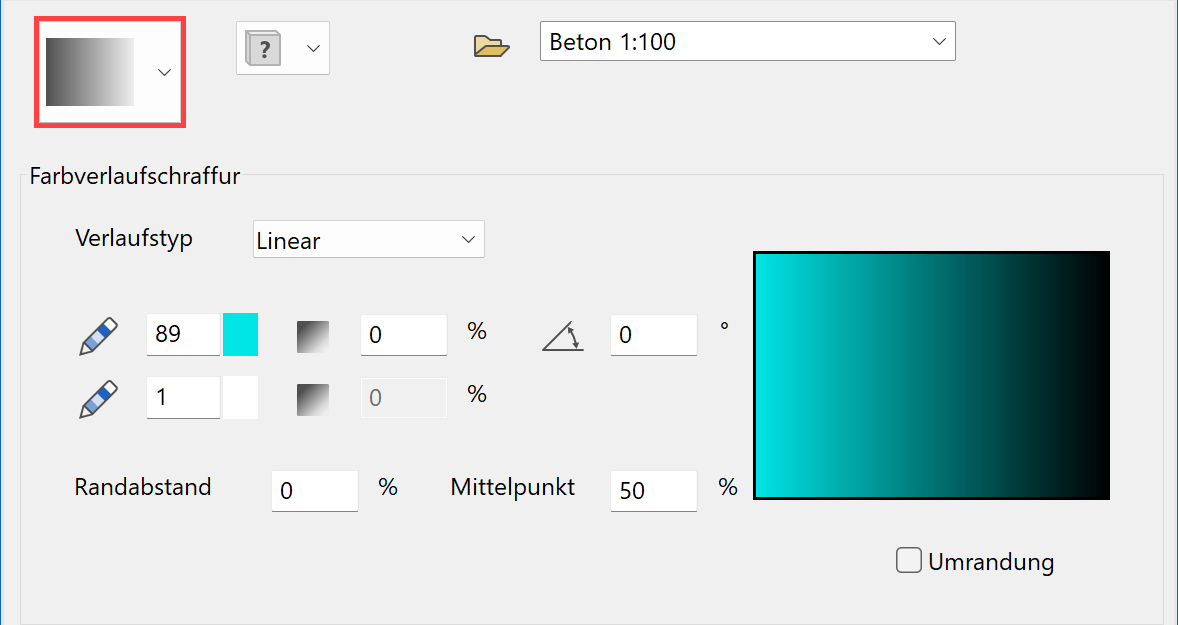
Gradient type
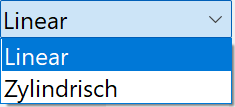
For "Linear", the midpoint of the mixture is precisely midway between the two colours, whereas the midpoint is the second colour for "Cylindrical".
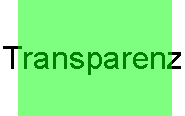
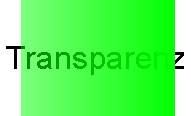
| Example with the midpoint at 50 %: | |
|---|---|
| Linear | Cylindrical |
 |
 |
Transparency
 If two different colours are selected, only one field is free and the value applies to both colours at the same time.
If the same colour is selected twice, both fields are free and you can enter different values, e.g. for a transparency gradient.
 |
 |
 |
|---|---|---|
 |
 |
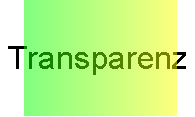 |
Angle
Specify the angle of the gradient direction.
Border distance
Here you can define the border distance, which will apply to both sides equally. In this area, the base colour remains constant before the gradient starts.
| Example with border distance: | ||
|---|---|---|
| 0 % | 25 % | 50 % (Maximum) |
 |
 |
 |
Centre point
Specify here where the midpoint of the mixture should be.
| Examples with different centre points: | ||
|---|---|---|
| 25 % | 50 % | 75 % |
 |
 |
 |
Pen number selection
The SHOW function displays a preview of the current settings in the preview window.
Texture hatch
The hatching area will be filled with a texture from the material database. A texture hatch has the same settings like a model hatch. The only difference is that a texture will be used instead of different type of hatch for filling the area.
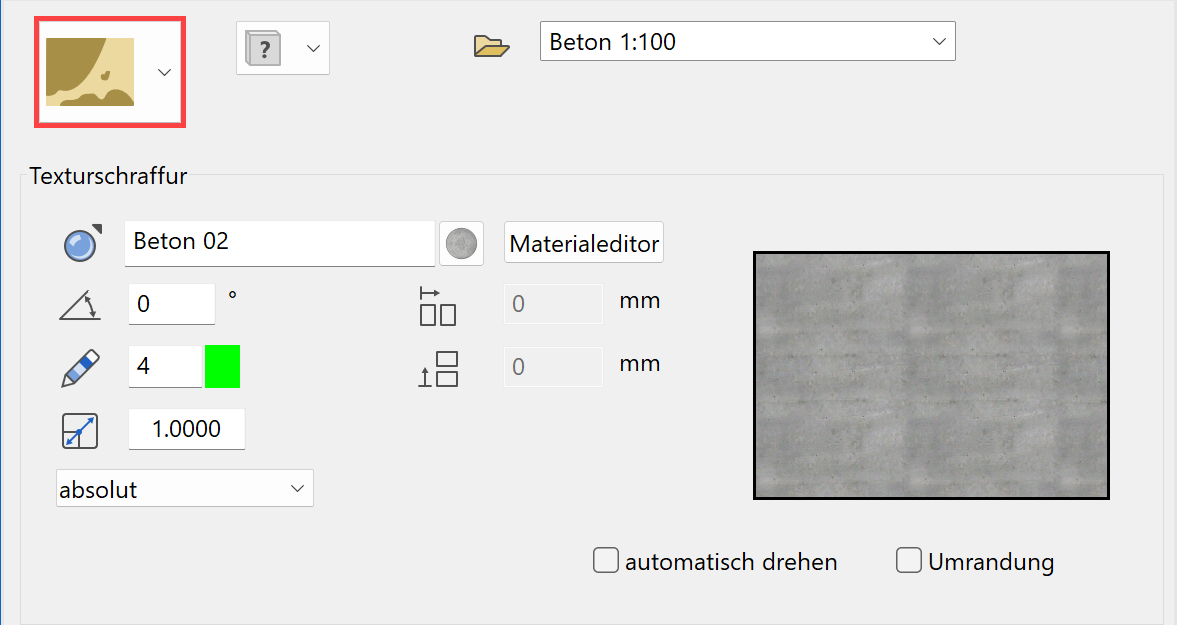
Texture

The texture can be selected from the defined materials. The button materials editor leads to the material parameters.
Tip
The order can be changed using the Foreground/Background control. Hatches that lie on top of one another are not mixed by default.
Edit hatch
Move/copy hatch
The selected hatch can be moved or copied using the context menu (right-click).
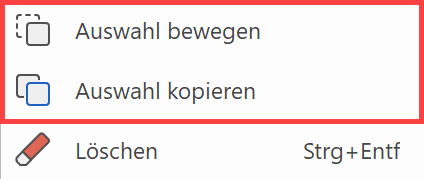
The query Move which point? appears.
After you click a point, the query Position where to? appears.
Place the hatch in the new location.
Modify hatch
When the hatch is selected, the property bar is displayed and the handles and grippers appear on the contour of the hatch. You can modify the hatch parameters in the property bar.
With the handles and grippers, you can modify the shape of the hatch. Move the cursor onto a handle or gripper until the cursor's depiction changes to a four-direction arrow. Click to confirm. The additional functions are available at the cursor in the Input Assistant or by pressing Tab .

| Change shape using a handle | ||
|---|---|---|
 |
 |
 |
Tip
If a polygon is congruent with the hatch contour and is selected, the change affects both items.
Align hatch
The function to align the hatch is launched from the property bar of the hatch. First, an arbitrary point has to be selected. A new location has to be indicated and the elements of the hatch are aligned accordingly.
Hatch Functions
Convert to elements
![]() Hatch property bar
Hatch property bar
The hatch is converted to elements. The hatch is preserved.
Create boundary contours
![]() Hatch property bar
Hatch property bar
The hatch boundary contour is converted to elements. The hatch is preserved.
Delete hatch
|
|
Hatch toolbar |
This function deletes hatches only.
Covering hatch
|
|
Toolbar * Create new |
| Lay-out menu > Hatch > Covering hatch |
This function is used for covering a specific area of the drawing.
Covering hatch property bar

After activating the function, you are prompted to specify the first point of the polygon.
Next, continue moving around the polygon until it is closed again.
Pen colour

Select the pen type to be used to represent the frame. Infill hatch cannot be changed here