Configuration
General
|
|
Camera toolbar |
| Menu View > Camera > Configuration walk mode / input devices / shader |
This dialog window is used to configure input devices in the walking mode. Depending on installed devices, some options may not be visible.
| Function | Description |
|---|---|
| Walking Mode | |
| Rotate/Move | |
| Shader quality | |
| Shader effects | |
| Context menu | |
| Keyboard and mouse | |
| Gamepad | |
| SpaceMouse | |
| Axes | |
| Virtual Reality | |
| Leap Motion |
Reset

This button opens a dialog window where either the setting of the current page or all settings are set to the previous state.
Walking mode
![]()
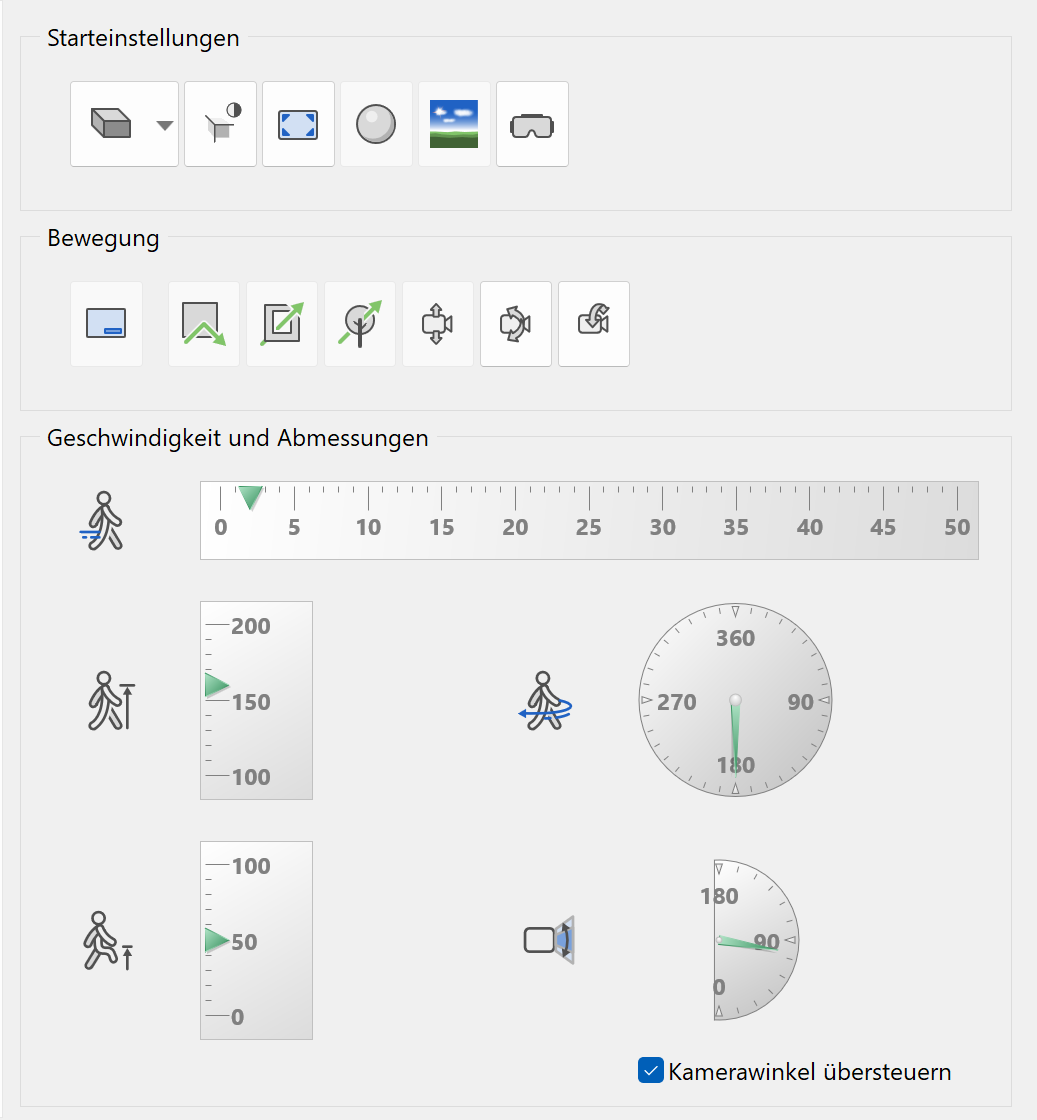
Start settings
The start settings define which settings are automatically enabled upon activating the walking mode.
Solid design model
![]()
Sets the desired depiction mode. If the mode is set to ‘off’, the current mode will be retained.
Edges
![]()
Edges can be either shown or hidden.
Fullscreen mode
![]()
Switches the graphics window to fullscreen mode
Shader
![]()
Activates the shader technology
Panorama environment
![]()
Displays the panorama environment, if one is set.

Virtual reality
![]()
Activates the Virtual Reality mode and configures the graphics output for VR glasses.
Movement
Status display
![]()
When the walking mode is enabled, there is an optional transparent status bar in the lower part of the display. It features various indicators about which state you are currently in.
Collision control
![]()
Virtual objects represent obstacles just like in the real world. They cannot be passed through in walking mode. This is intentional as otherwise one would fall through the floor or would not be able to walk up a flight of stairs. Collision control can be deactivated in order to be able to walk through walls.
Go through openings
![]()
This switch is an additional option for the collision control (only in ELITECAD Architecture). If the option is enabled, it is possible to move through closed doors and windows.
Go through bluescreen objects
![]()
This switch is another additional option for the collision control. If it is enabled, it is possible to move through bluescreen objects like trees and people.
Gravity
![]()
Gravity ensures that during navigation the observer is always walking on the ground. When gravity is active the free fall stops upon the nearest surface. In case there is no surface underneath the current position, free fall ends at the current floor level.
Align viewing direction horizontally
![]()
This option ensures that whenever the user moves up or down, the viewing direction will be aligned automatically with the moving direction. Some users might be sensitive to those automatic movements; therefore, the option is usually disabled.
Roll
![]()
This option locks or activates the rolling of the camera. This kind of movement is rather unnatural and therefore it is usually disabled.
Speed and dimensions
Speed
![]()
Definition of speed during walking mode is in m/s.
Eye level
![]()
Definition of eye level is in cm.
Obstical height level
![]()
Definition of the level that can be exceeded is in cm. If it is set too low, curbs or stairs might pose obstacles. Alternatively, if it is set too high, fences and walls could be passed rather than posing an obstacle.
Angular velocity
![]()
Definition of the speed for changing the direction of view is in degrees/second.
Aperture angle of the camera
![]()
This setting has to be set specifically to override the aperture of the current camera. It defines the aperture angle in walking mode.
Rotate/Move
![]()
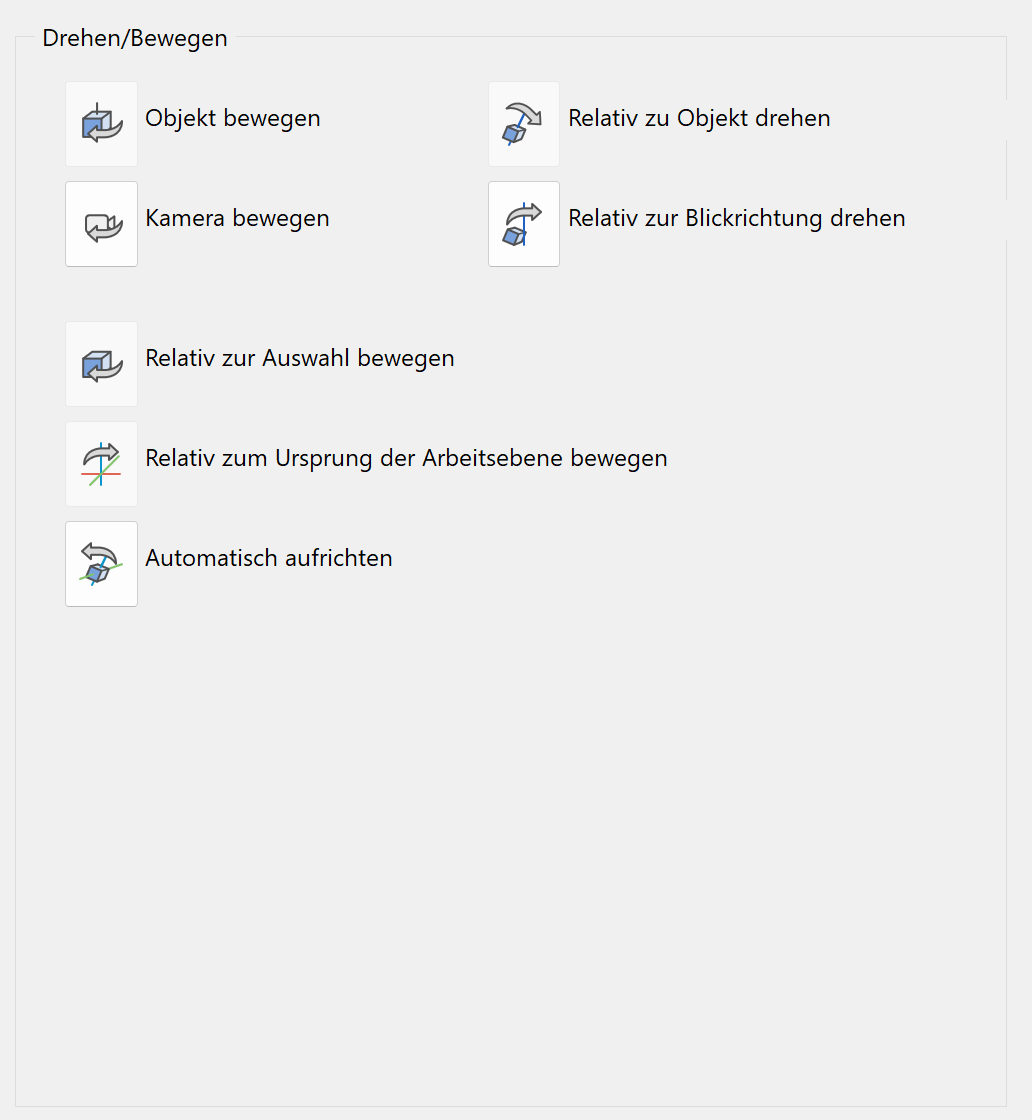
The settings in this mode are valid for the input devices: gamepad and 3D mouse.
Move object / camera
![]()
![]()
Movements are interpreted relative to the object or relative to the camera. There can only be one of these two options active at any given time.
Rotate relative to object / viewing direction
![]()
![]()
Rotations are interpreted relative to the object or relative to the camera. There can be only be one of the two options active at any given time.
Move relative to the selection
![]()
Activating this option means that, in case a selection is active, the centre point of the selection will be used as a fixed point for rotations. Default rotation point is the centre of the screen.
Move relative to the origin of the work plane
![]()
Activating this option means that the centre point of the work plane will be used as a fixed point for rotations. Default rotation point is the centre of the screen.
Automatically upright
![]()
Usually the z-Axis is aligned vertically to the screen. In case this alignment is no longer correct, the z-axis will be uprighted automatically again while being rotated.
Shader quality
![]()
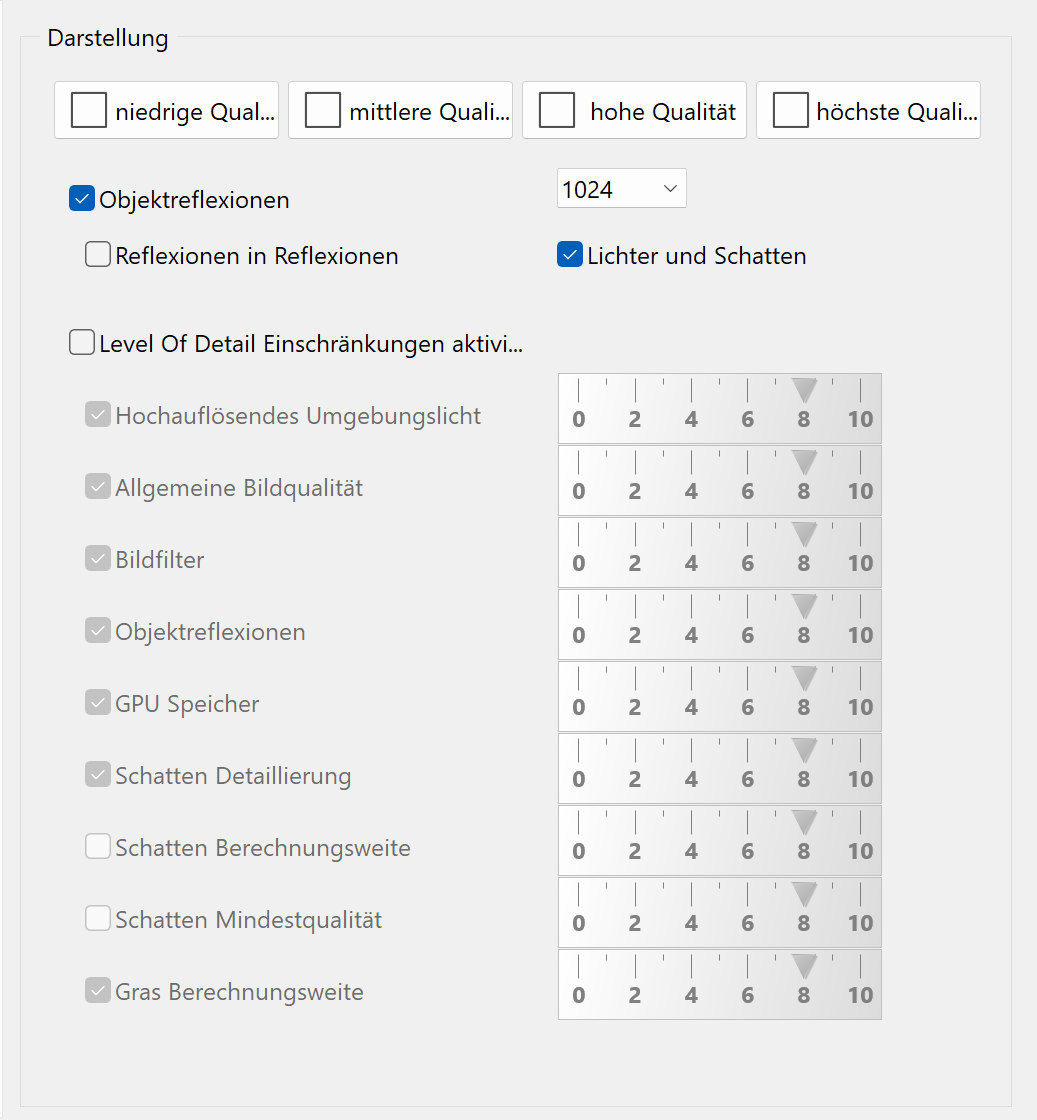
Depiction
Despite their high performance on the graphics card, shaders can take up some time during image rendering. Depending on the ability of your hardware, you can influence the graphics output by reducing the level of detail (LOD) for instance. An example for this technique is the distance of the camera up until which the grass shader will generate grass blades.

There are four predefined quality settings to facilitate simple configuration.
Tip
When producing photos and videos, LOD can be disabled.
Each setting on this page can be adjusted individually in order to deactivate or emphasize individual effects.
Object-reflections

Object-reflections are pre-calculated once, when the shader technology is enabled. This one-time calculation requires some processing power, and if new objects are added to the model, only the changes have to be calculated.
Optionally it is possible to calculate reflections in reflections. This increases the quality but also requires more processing power.
Resolution

Shininess and reflections are pre-calculated and saved as bitmaps. The higher the resolution, the better the quality. The size; however, is limited by the available memory on the graphics card. On low-end graphics cards, this value should be reduced.
Lights and shadows

Also, soft shadows are pre-calculated and can be deactivated in order to improve performance.
Level of Detail

The main switch activates the possibility to use the LOD technology. Every single option can be set individually and adapted in quality.
Shader effects
![]()
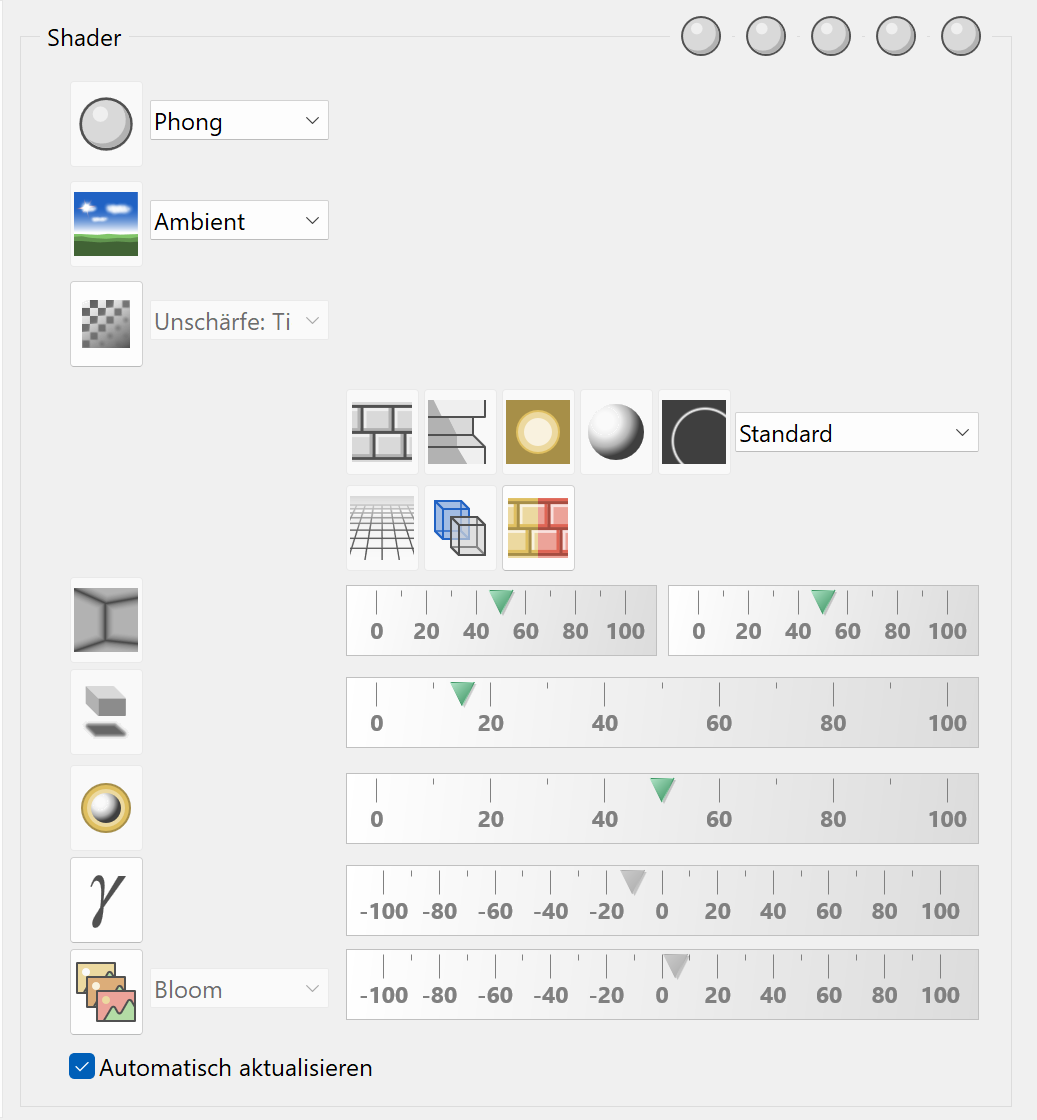
Independent of shader material properties, various effects can be applied to the whole image. Some of those effects, you might already know from image processing software. In ELITECAD, they are calculated in real time, while you walk through your model.
Some effects have a common technical term, but for the user interface, more comprehensible terms were preferred. The technical names are sometimes given in brackets.
There is no special knowledge required. Just select the effect and use the sliders to modify the values. The image is updated in real-time and the effect is visible immediately.
Graphics performance

The number of spheres displayed depends on the power of your graphics card.
Automatic refresh

If this option is enabled, every change in the options will be displayed immediately in the graphics window.
Image rendering with shaders

This switch enables the shader technology.
The menu allows you to set different styles of image generation. The standard setting is Phong-Shading. Alternatively, you can generate output as greyscale, or dotted images. Some options have additional parameters, which will be visible on demand.
| Phong | |
|---|---|
 |
 |
| Pencil | |
 |
 |
| Greyscale | |
 |
 |
| Cartoon | |
 |
 |
Panorama environment

This switch enables the depiction of a panorama environment.
In the menu, you can select if the panorama environment gets darker during night scenes. In the state ambient, the darkening of the panorama environment is enabled.


Filter

This switch activates image filters, for instance, depth of field.
The menu allows you to choose the type of filter. Some filters feature special parameters that can be made visible if required.
Extended bump mapping (steep parallax)
![]()
Bump maps create depth effects on surfaces. Using additional shadows for bump maps the natural look of the surface can be enhanced even further.

Bump map shadows
![]()
Extended light model (micro facets)
![]()
Over exposure (emission)
![]()
This over exposure emphasizes very luminous objects.

Rim lighting
![]()
Rim light is usually used in movie productions. A light source is placed behind a person, which creates discreet lighting along the silhouette, therefore creating a good contrast with the background.
Surface appearance without visualisation material

For all objects that have not been assigned a visualisation material, a default appearance can be assigned here.
Maximum filter quality
![]()
If this setting is active, then it attempts to achieve the maximum image quality depending on capabilities of the graphics card but independent of the material settings.
Hence, the material may define simple texture filter but the trilinear texture filter is used instead.
Extended transparency calculation
![]()
Anti-aliasing
![]()
Renovation planning shader
![]()
This special ELITECAD shader is only available in ELITECAD Architecture and combines the of the colouring of renovation planning projects with the shader settings.
Ambient shadows (SSAO)

Ambient shadows enhance the shadows of corners and edges inside the building. This leads to a more contrasting depth perception for example of joining walls having the same colour.

Soft shadows (shadow occlusion)

While the sun in nature generates a precise shadow, soft shadows can often be created by diffused light sources.

Light aura (halo)

This effect creates a halo effect around light emitting objects.
Gamma correction

Dynamic range effects (HDR)

Context menu
![]()
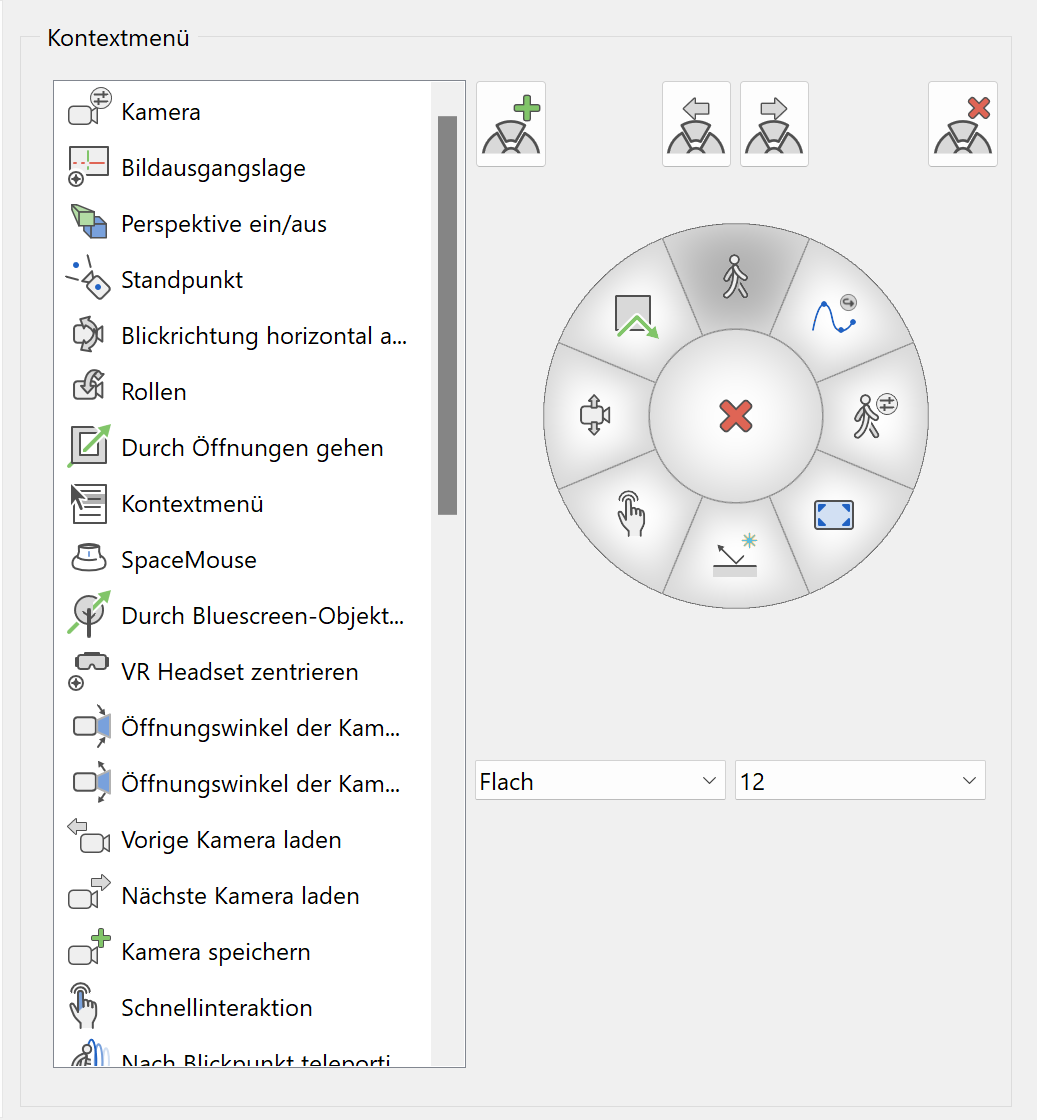
The walking mode features its own context menu, which can be operated by various input devices. Using this dialog window, it is possible to add entries to the context menu, remove them or change their order.
Insert
![]()
The selected menu entry from the list will be inserted into the context menu. Alternatively, it is possible to move a menu entry from the list to the menu via drag and drop to insert it.
Remove
![]()
The selected entry will be deleted from the context menu. Alternatively, it is possible to move an entry from the context menu and move it to the list via drag and drop to remove it.
Move anti-clockwise
![]()
The selected menu entry in the context menu will be moved anti-clockwise by one entry. Alternatively, the entry can also be moved in the context menu using drag and drop.
Move clockwise
![]()
The selected entry in the context menu will be moved clockwise by one entry. Alternatively, the entry can also be moved in the context menu using drag and drop.
Menu style

Depending on the selection, the menu will be depicted in a different way. For the depiction in a virtual reality environment, a transparent style can be selected as well.
Number of entries

The number of entries in the menu can be increased up to 12 entries.