Input devices
Configuration input devices
|
|
Camera toolbar |
| Menu View > Camera > Configuration walk mode/input devices/shader |
Keyboard and mouse
![]()
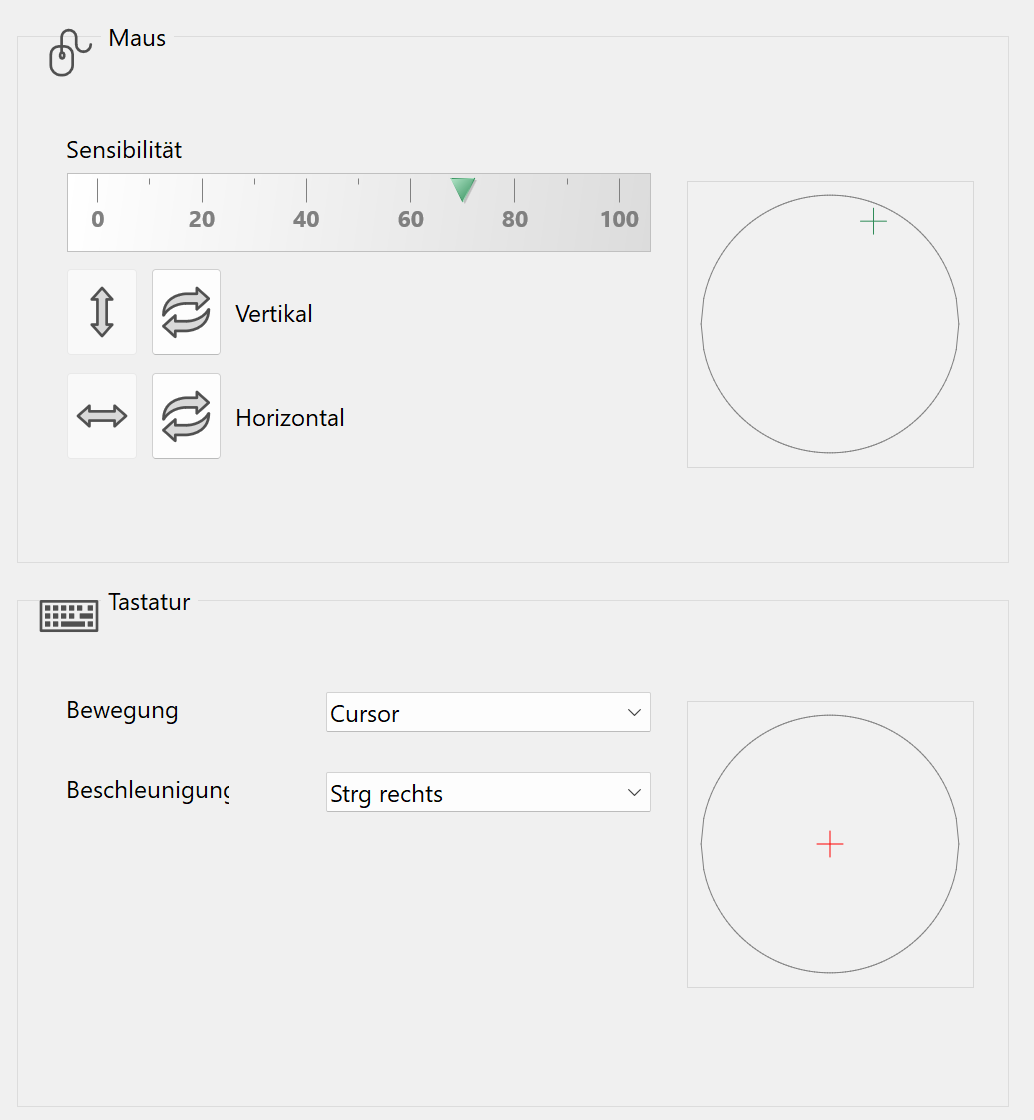
Controlling with mouse and keyboard is the standard input method in walking mode.
Mouse
The green cross in the circle visualizes the mouse movement.
Sensitivity

The sensitivity of the mouse movement can be set between 0 and 100%.
Vertical / Horizontal
![]()
![]()
The horizontal and vertical movements can be deactivated independently.
Invert
![]()
The direction of movement, horizontal or vertical, can be inverted if necessary.
Keyboard
The red cross in the circle shows the keyboard input.
Movement

Movement control with the keyboard is also possible using the arrow keys or the keys W-A-S-D.
Acceleration

The key that is set here increases the speed of movement. This corresponds to the "running" mode.
Gamepad
![]()
PS4® is a registered trademark of Sony Computer Entertainment.
XBOX® is a registered trademark of Microsoft.
SpaceMouse®, SpaceNavigator® and SpacePilot® are registered trademarks of 3Dconnexion GmbH.
These components are only configurable if they are installed. Depending on the type, the number of configurable options may vary.
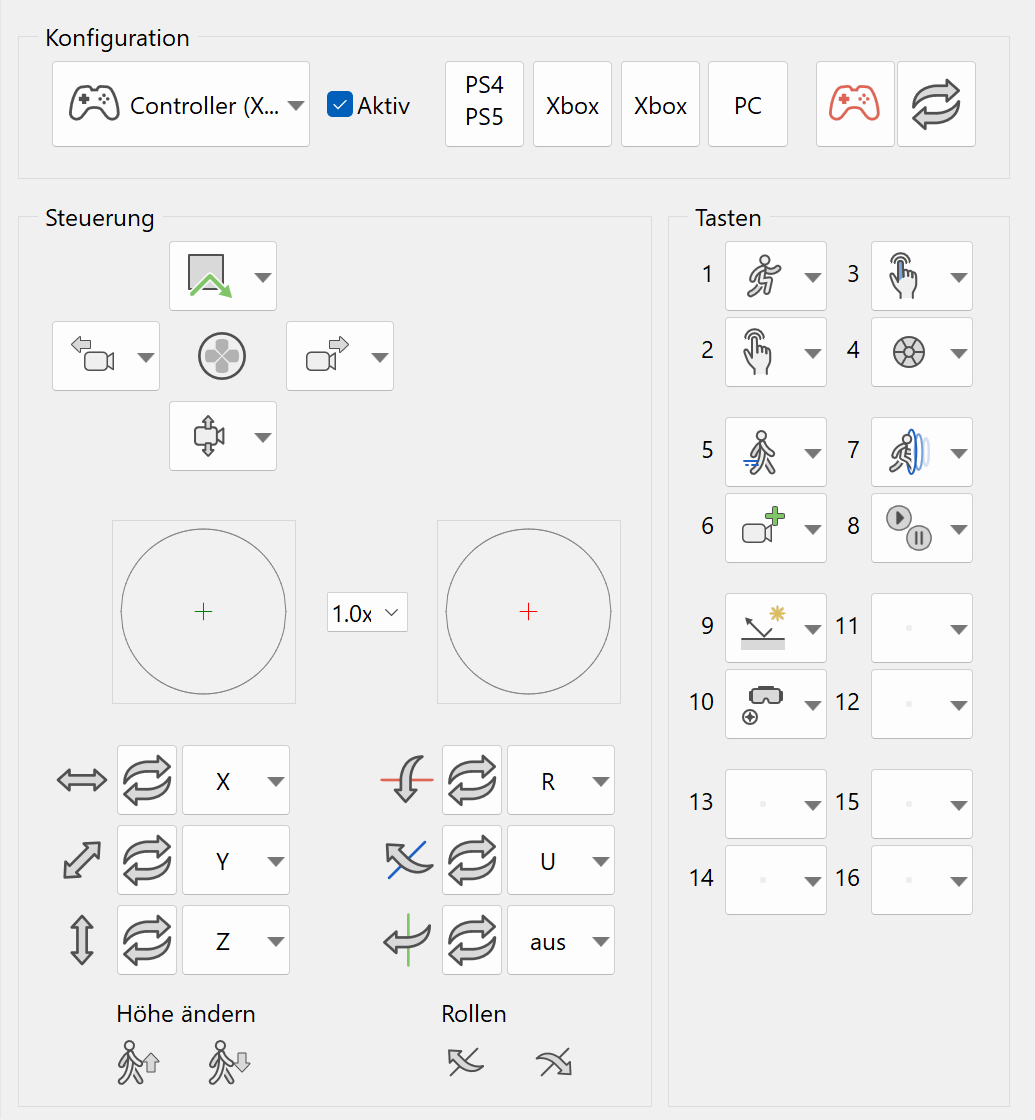
Configuration
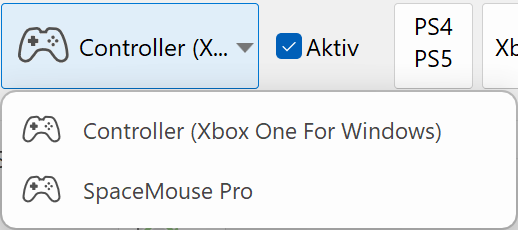
Device selection

Selection of the gamepad to configure. There can be multiple gamepads active at the same time.
Note
Improved · 16 R1 · Improvements
![]()
The SpaceMouse has been combined with the other Gamepad controls as they have similar functionality. When we use the term "Gamepad" in this chapter, this is meant to include the SpaceMouse.
The buttons can be set in ELITECAD but also can also be set in the options dialog of the manufacturer. It is recommended to not double assign a button through this method as this can lead to undesirable results. Instead, the assignment menu should be used. If the buttons are set in ELITECAD, it is recommended (but not absolutely necessary) that you deactivate the automatically set buttons in the manufacturer dialog.
A pre-installed default setting for ELITECAD kann be imported.
<ELITECAD-Installation path>\u\<version>\cad\glob\3DconnexionConfig.3dxz
Active checkbox

The checkbox shows if the gamepad is active.
Presettings

These switches can be used to load presets for the selected controllers
Restricted input device
![]()
A gamepad can also be configured as a restricted input device. This setting is especially useful if multiple gamepads are active. Restricted input devices can be paused with a button, which can be configured in the button assignments.
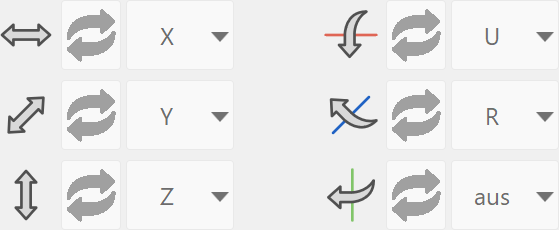
Invert axis
![]()
This switch inverts the axis.
Control
Movement
The control of the gamepads is done with two joysticks. The movement can be checked by looking at the two circles with the red and the green crosses.
In general, the movement and rotation axis are controlled with the two joysticks. Each direction can be inverted if desired.
Buttons


The buttons on the gamepad can be assigned individually. Depending on the type of device, there is a variable number of buttons on the device.

Pressing a button will highlight it (blue) in the dialog window. This button can then have a function assigned to it.
Axes
![]()
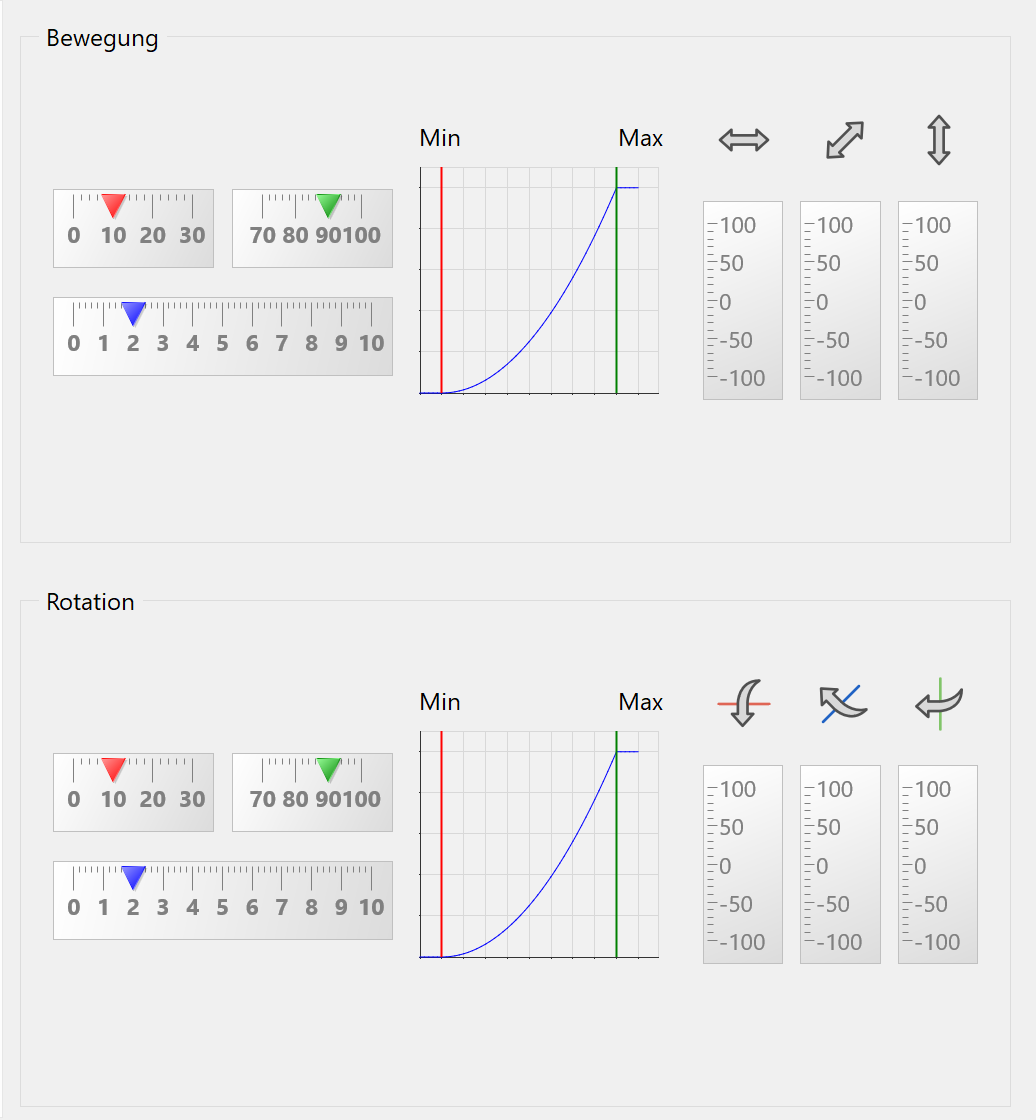
In this dialog window, the sensitivity of the input device can be configured. The movement of the joysticks is shown in the corresponding bars. The diagram visualizes the current sensitivity setting.
Movement / Rotation
Dead zone

In order not to react to unintended movements, it is possible to configure a “dead zone” at the beginning of an input.
Maximum

After a certain maximum is reached, reaction to joystick movement will cease.
Exponent

The sensitivity between the dead zone at the beginning and the maximum at the end can be configured here. The higher the exponent, the later but also the more intense the system will receive the input.
Leap Motion®
![]()

LeapMotion® is a registered trademark of Leap Motion Inc.
The LeapMotion is an input device, which allows for the interaction using gestures. The device can be used to manipulate camera positions or as an input device for walking mode.
Requirements
In order to be able to use the LeapMotion, first the associated drivers have to be installed. These can be found on the manufacturer website: https:/www.leapmotion.com/setup/desktop/windows
Connection
As soon as the drivers are installed and the device is connected via USB, the LeapMotion will be shown as connected.
 Device not connected or drivers not installed
 Device connected
Activate gesture control
If the device is connected correctly, the interaction can start. By pushing the Stop button, the interaction can be cancelled at any time.
Configuration: Camera mode
The camera mode is activated automatically when a common design model view is open. In this mode, the camera can be moved to observe the model from all angles. To start the interaction, the user has to perform a grab movement, to gain control over the model. The following interactions are possible:
- Translation: moving the model along x,y,z axis
- Rotation: tilting and rotating the model around x,y axis

To achieve a more dynamic behaviour it is possible to enable inertia. This option allows the model to keep moving the direction it was being moved, even after the interaction stops. If for instance, a model is rotated and the user lets go of the model, it will keep rotating for a few moments before it stops completely.

If inertia and endless rotation are enabled, and the model is rotated with a certain speed, an endless rotation can be achieved. This means that the rotation is performed even after the model is let go. The endless rotation can be stopped by grabbing the model again with the hand.

This setting allows dynamically moving the clipping plane with the hand. To achieve this, first select the model with your hand, and then in case the clipping is active, you can move the clipping plane by extending your thumb from the hand.
Configuration: Walking mode
As soon as walking mode is activated, the LeapMotion starts behaving like a controller. The user has the possibility to move and rotate in all directions. To move in a certain direction, it is only necessary to move the hand in the according direction.
Hands
![]()
| Architecture | Mechanics |
|---|---|
 |
 |
This setting enables you to actually see your hands in ELITECAD and get a visual representation of the movements. To enable the hands, the walking mode has to be enabled first. Furthermore, using the material editor, you can set a custom material or colour to your hand.
Sensitivity
Using the 6 sliders for the corresponding axis it is possible to set the sensitivity of the interaction. There are 3 sliders for the rotation and 3 for the translation. Using the toggle buttons it is also possible to lock each axis individually.
Tip
The area of interaction of the LeapMotion is a cone, spreading out over the sensor. If the hands are not located inside this cone, there might be issues with detecting the interaction.
Virtual Reality
![]()
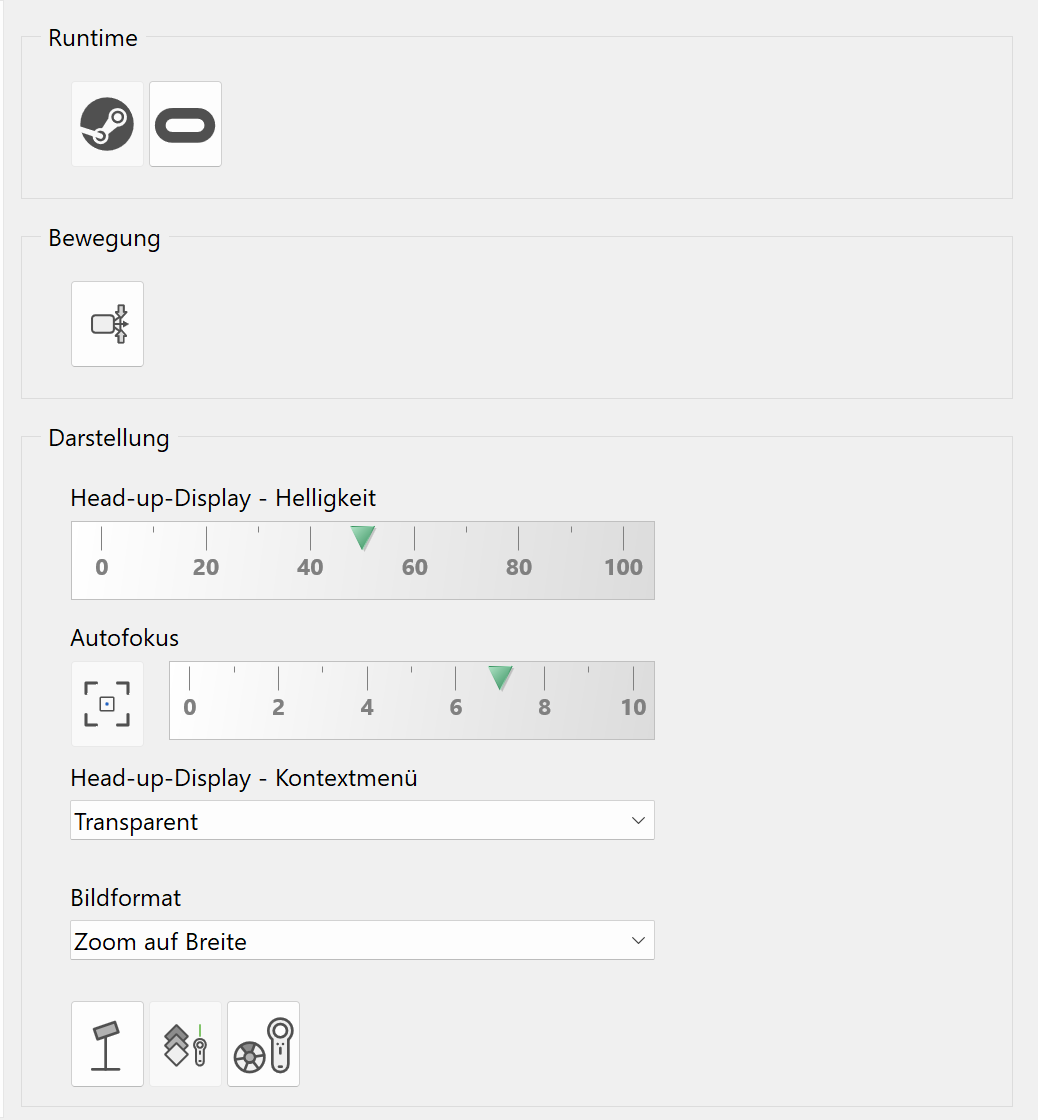
Runtime
This option allows switching between different runtime libraries of VR headsets. The SteamVR is independent of manufacturer therefore VR devices like Oculus Rift, HTC Vive, Windows Mixed Reality, etc. can be used. The usage of touch controllers becomes possible as well.
![]() SteamVR Runtime
SteamVR Runtime
![]() Oculus Rift Runtime
Oculus Rift Runtime
SteamVR has to be installed independently and a SteamVR account has to be created.
SteamVR should run in parallel to ELITECAD.
Movement
Fix body vertically
![]()
This option can be used to fix the observer in an upright position.
Depiction
Brightness heads-up-display

A status bar is displayed inside the VR glasses. In dark environments, the brightness can be reduced at any time.
Autofocus

In a stereoscopic image, the focus is always set to a certain distance. Either this is done automatically, or the distance has to be provided.
Context menu

This option configures the style of the graphical menu.
Aspect ratio

The image the observer sees in Virtual Reality can also be displayed in the graphics window. Various options are available for this setting.
Sensors
![]()
If this option is activated the sensors are displayed in the VR glasses.
Crosshair / interaction rays
![]()
This option switches between the crosshair and the interaction rays of the VR controllers.
Position of the graphical menu
![]()
If this option is activated the graphical menu is displayed relative to the VR controllers.