Drawing basics
Drawing a polygon
A polygon consists of interrelated lines that can be selected together with a single click, including subsequently. When drawing, ensure that you only ever draw interrelated lines in a polygon.
Workshop
Draw the following polygon:

- Start with the DRAW function.

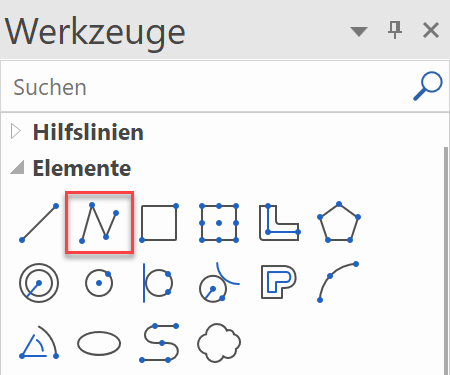
This function is found under Tools > Elements.
- Start with the perpendicular line. Move the cursor into the upper left of the screen and left-click on the start point P1.
- Move your cursor down (no need to keep either mouse button pressed). As soon as you move the cursor vertically to below the starting point, a temporary help line and the angle will appear.

Once you are at roughly the correct distance, left-click on the location P2 to confirm it. - The next element is horizontal. Move your cursor to the right. Once again, the temporary help line and the angle tell you whether you are orthogonal. When you have reached the correct distance, confirm the location P3 by left clicking.

- The next point, P4, is located in the middle of the two points P1 and P3. You cannot snap this point directly. Instead, you require help points known as temporary reference points.

Set the two reference points BP1 and BP2 positioning your cursor briefly over points P1 and P3 until an orange cross appears.


The middle point can be caught between two temporary reference points.
Move the cursor towards the centre until the capture symbol appears, indicating the centre of 2 points. P4

- The next element is perpendicular to the slanting line and ends on the base line. This time you need to add a temporary reference point BP1 to the starting point. Move the cursor to the intersection point of the temporary help line and the base line. The symbol for perpendicular and for intersection point P5 appears on the cursor.


- The next element is a curve. In the input assistant, additional drawing functions such as tangential arc, curve through 3 points, etc. are available.
For the input assistant to appear above the value field, the Tab key must be pressed.
Select the function TANGENTIAL ARC.
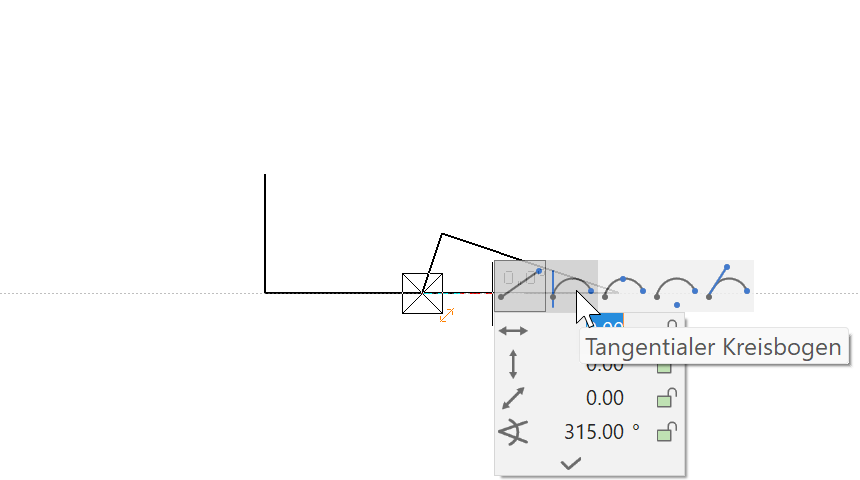
Set the temporary reference point BP1 and the end point of the circle vertically above P6.


- The next element is parallel to the existing slanted line and ends vertically above P3.

The one reference point BP1 is located on P3, the other BP2 somewhere on the slanted element.


Set P7 parallel to BP2 and vertical to BP1. The symbols for perpendicular and parallel should appear on the cursor.
 ,
, 

- The last element ends in the middle of the slanted line. You can set this point directly without reference points. When doing so, make sure that the symbol for centre of element appears on the cursor. P8


- To finish the polygon, click again on P8.
- To remove the lines from the screen, open a new file.

Tip
To finish a polygon, close it by clicking on the start point, double-clicking on the final point or by cancelling the function > Esc key or another function.
Polygon via entry of coordinates
Very often it is not possible to catch a point, rather a certain line length is predefined. These lines can of course be constructed with help lines. It is much easier and more efficient to enter a polygon using coordinates.
Values field
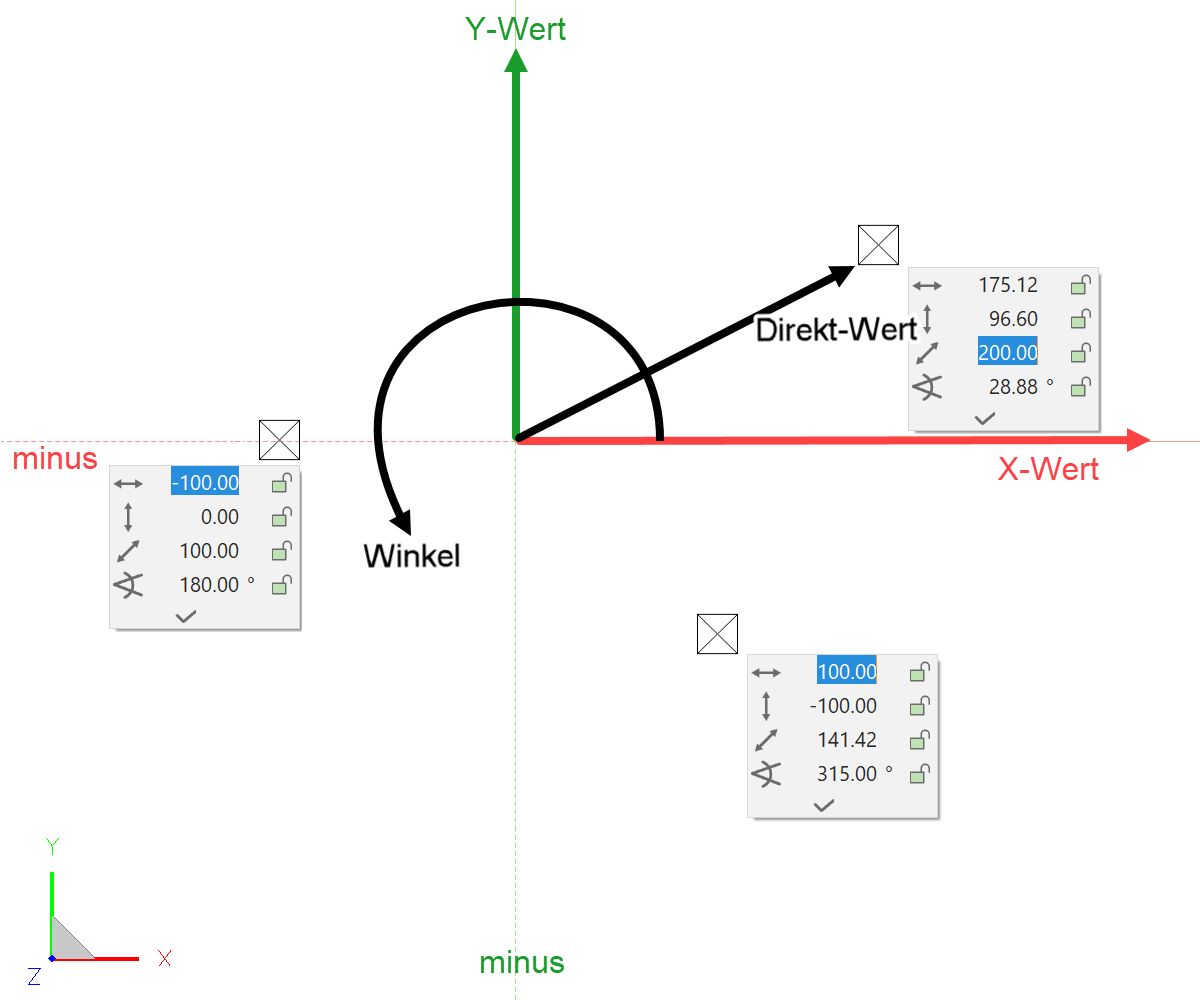
Lengths can be entered directly in the values field. To move to the values field, press the Tab key. In the values field the x value (horizontal), the y value (vertical), the direct value or the angle can be entered.
Value on element or help line
If, when a value is entered, the cursor is on an element or a help line that passes through the marker or a temporary reference point, the entry switches to the direct value and you need only enter the distance, without worrying about the angle or the minus range.
Workshop
This sequence of lines must be created by entering coordinates.

- Start with the DRAW function.
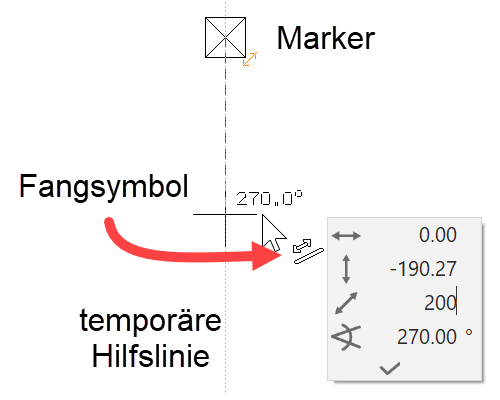
- Move the cursor on any random point and left-click on P1.
- Move your cursor below P1 until the temporary help line 270° appears, press the Tab key to access the values from the value field, enter 600 as direct measurement and confirm with Enter > (P2). Provided the cursor is located on a temporary help line, the direct mass will be transferred to the help line in the direction of the cursor.

- To create the next point you proceed in exactly the same way except that you move the cursor onto the temporary 0° help line. For the direct dimension you enter 1600 > (P3).

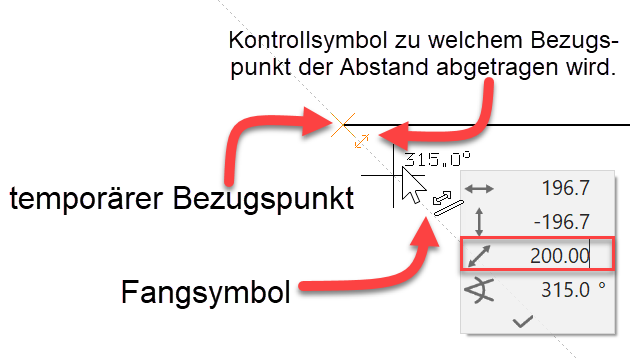
- Entry of coordinates also works from a temporary reference point. Set a reference point on P1, then move the cursor to the right until the 0° help line appears, press the Tab key, enter 300 as direct measurement and confirm with the Enter key > (P4).


- Instead of using the temporary help lines, the location of the new point can be determined by entering an x and a y value. Ensure that the cursor is not positioned over a temporary help line, press the Tab key and enter 0 as x value and -300 as y value > (P5).

- Enter the angle 45° into the value field and lock it by clicking on the padlock. The colour of the padlock changes to grey. The cursor is now fixed on the 45° ray. Also set the x value to -300 and confirm > (P6).


- Finish the polygon by clicking again on P6.

- To remove the lines from the screen, open a new file.