Extended navigation functionality
In this workshop, we will learn additional functionality for the walking mode like flying and jumping. Up until now we move around in the virtual world similar to what we are used from the real world. However, in virtual worlds we have more possibilities. We can activate and deactivate the gravity and collision control, which allows us to fly or walk through walls in our building. We can aim at points and use the teleport function to transport ourselves to a certain point in the model. All those functions are already pre-configured on our gamepad and can be activated by pressing certain buttons.
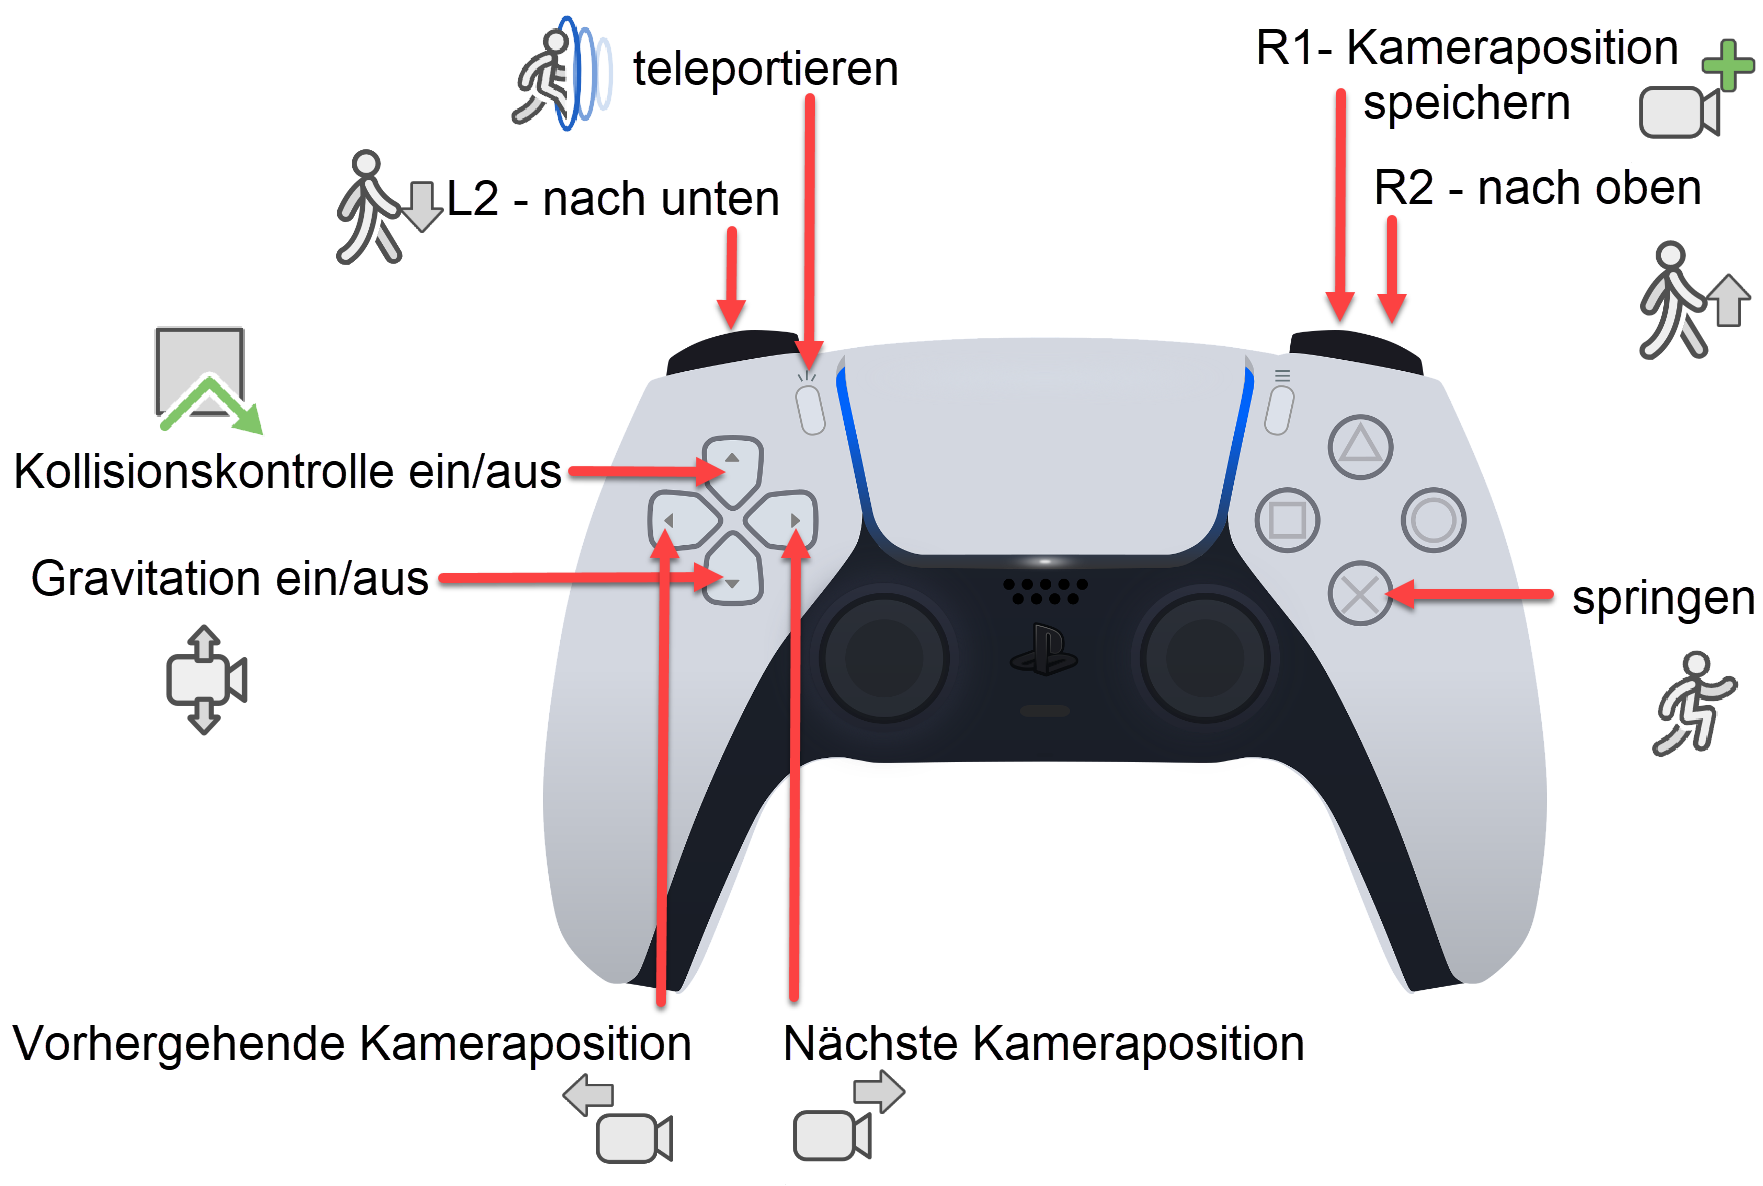
The standard configuration looks as follows:
Flying and gravity
Workshop
![]()
Gravity pulls the camera towards the floor. If the collision control is active, the free fall ends at the next surface. If there are no surfaces, the fall will be stopped at the active storey. Deactivating the gravity allows us to fly through the model using input devices.
![]()
![]()
- Now Let's walk to the balcony on the first floor of our building and walk towards the railing.
-
Deactivate the gravity and now move up and back a little bit.

Now we can view our model from a perspective that in real life would only be possible in a helicopter or a drone.
- Fly around the house and familiarise yourself with the controller.
Collision detection – walking through walls
Workshop
Just like in the real world, virtual objects also present an obstacle in the WALKING MODE that cannot be penetrated. Optionally, the collision control can be deactivated, so it is possible to walk through walls and objects in buildings. The collision control is permanently disabled for several types of objects. Windows, doors and glass elements so it is possible to walk into rooms as well as bluescreen objects like plants are ignored in collision control.
![]()
- Now, Let's deactivate the collision control and fly through our model to the basement. When we are located in the basement we activate gravity and collision control again which puts us on the ground and we can continue our walkthrough from the there.
- Take some minutes to practice flying around in the model so you familiarise yourself with the functionality.
Jumping
Workshop
![]()
- First, position yourself onto the balcony in the first floor next to the railing and make sure the gravity is enabled. If you walk towards the railing, at some point you will collide with it (because it is taller than 50cm) so you cannot go further. It is possible to jump across the railing by using the jump button and simultaneously moving forward. That way we will land on the terrace one storey below. The same exercise can be done with the fence, which is also higher than 50cm.
Tip
In case the jumping height is not sufficient, you can jump higher by pressing the jump button multiple times.
Teleporting
Workshop
![]()
Another possibility to move around in the model is using teleportation. This means you can point at a certain location with the hair cross, and then, by using the teleportation button, you can transport yourself to that place with one click. If you do not aim at a certain object, you will be transported into the pointing direction by 15 meters.
-
Let's stand next to the pool and aim at a point on the concrete wall in the corner of the backyard and press teleport.

With one big leap, we are teleported to the position, so this allows us to cover greater distances in shorter time. Pick some other places where you want to teleport yourself and practice this functionality.
Save camera
Workshop
![]()
![]()
![]()
Using the gamepad, you can also save certain camera positions (snapshots). These are then added to the camera list. The functions NEXT CAMERA and PREVIOUS CAMERA can be used to change the current camera position to the next or previous in the camera list. Changing the camera is animated (optional).
- Walk or fly to a certain point and create a snapshot. Take several more snapshots from different angles and positions and then activate them by using the camera functions. The example model comes with several snapshots, which you can explore. This feature allows you save positions from which you can start your virtual walkthroughs.
Tip
The function camera from the toolbar camera opens the dialog for the camera positions, where you can define and edit the names for each camera. In this dialog, you can also select your desired camera position. If you choose the names for your positions well it will be easier to find certain positions. You can also delete camera positions in this window. If you define camera paths later on, it will also be beneficial if the positions have unique names.