Interactions
General
In the walking mode, it is possible to interact with the model without switching to the classical ELITECAD user interface. When in walking mode, a small hair cross shows the focal point on the screen. Depending on the focused object, the interaction button enables the following actions:
- Change library part
- Change material (texture)
- Change panorama environment
- Show object information
- Select object
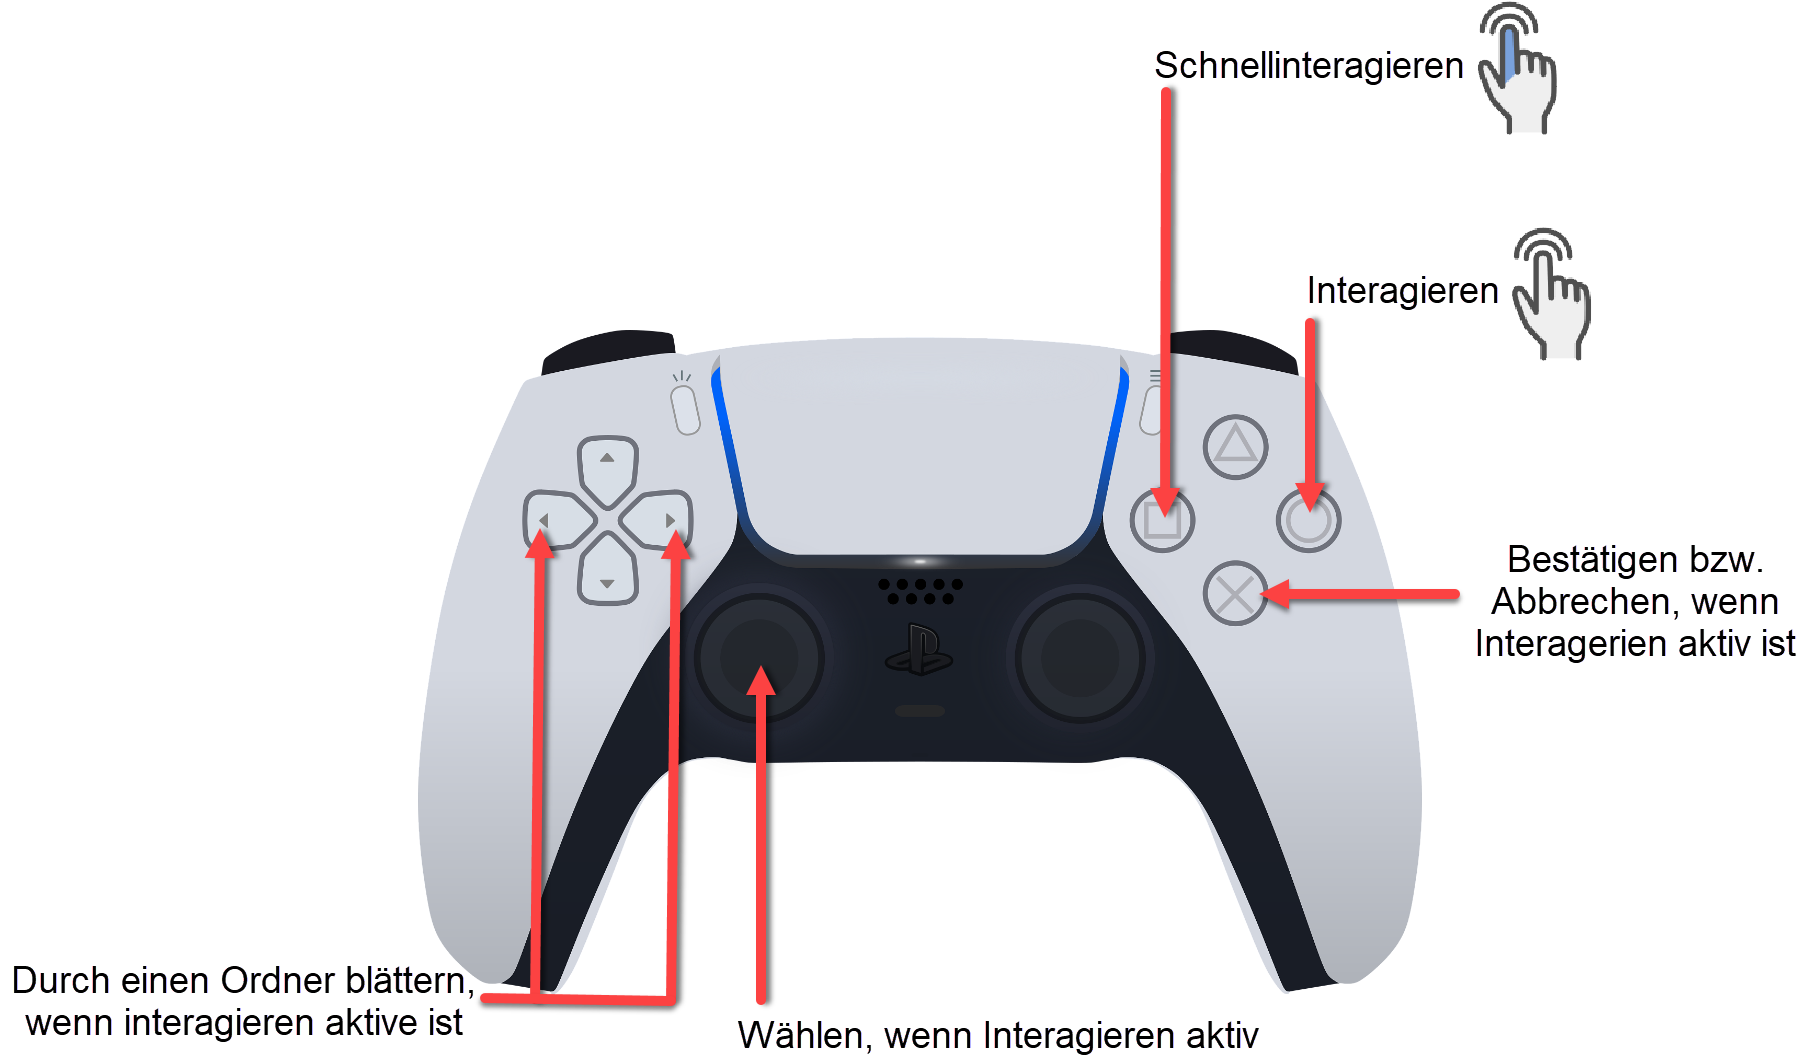
Interaction
![]()
The function INTERACT shows a menu which lets the user choose between library parts, materials or selecting the object or displaying information.

Quick interaction
![]()
The function QUICK INTERACTION automatically performs the preferred option for the current scenario, for instance library part exchange when aimed at a library part. Shader materials like panorama environments, grass, fire, waves etc. are detected as well. This means that the system always suggests the most appropriate function to the user, which leads to a quicker result.

Direct interaction
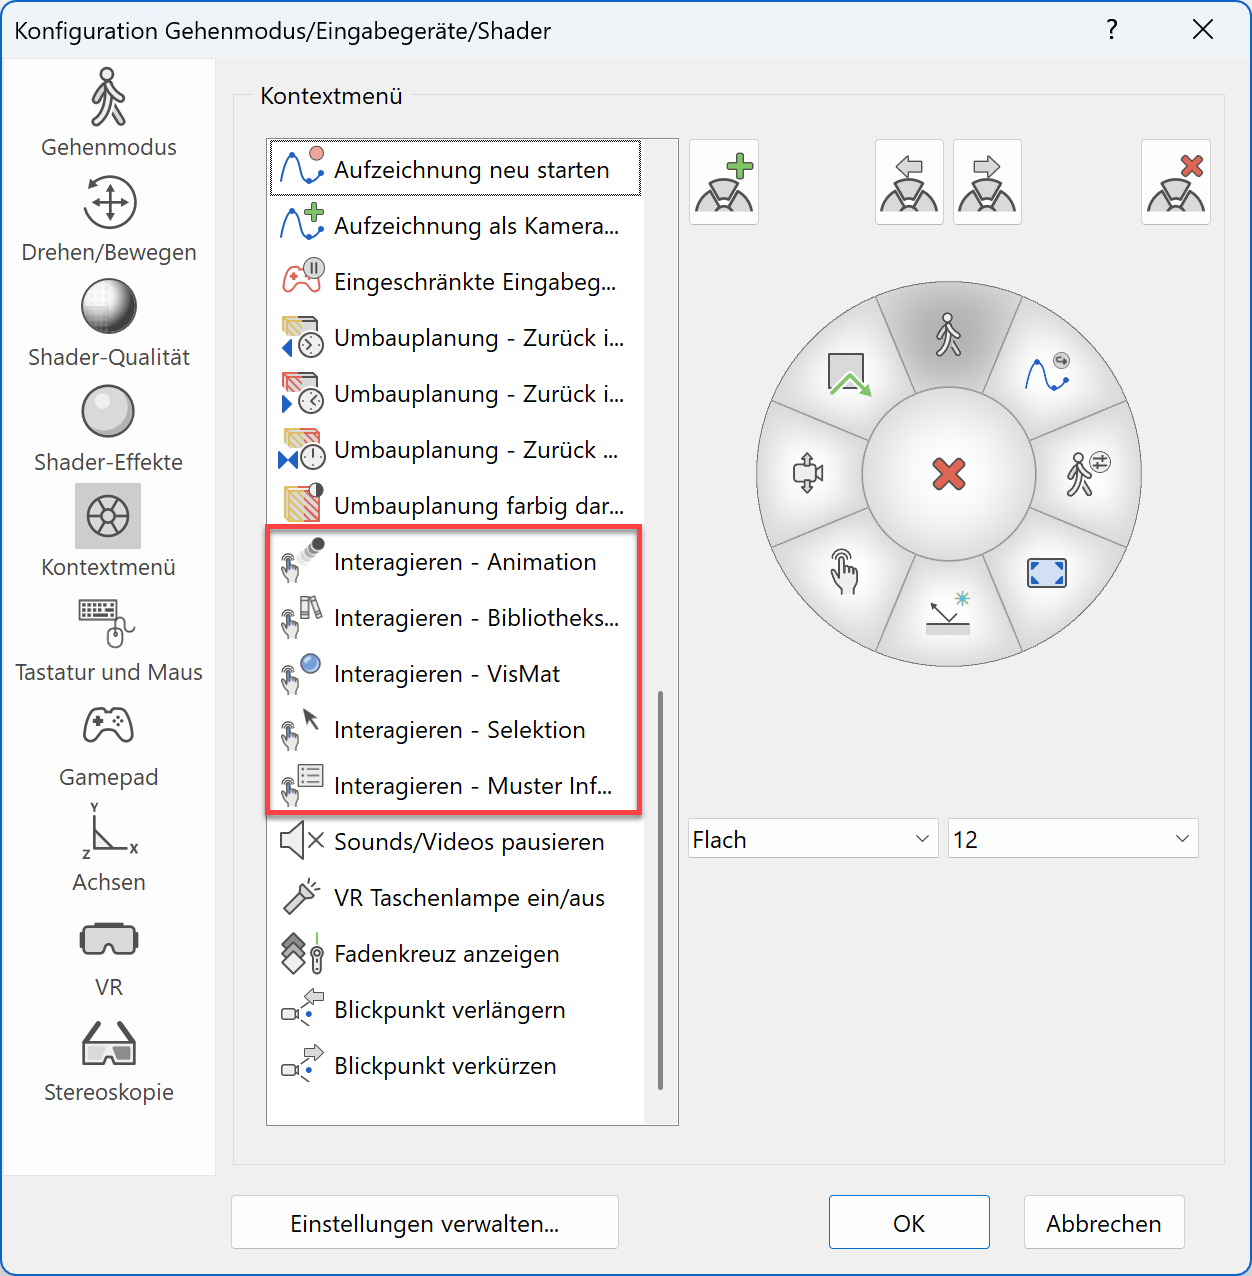
When DIRECT INTERACTION is used, the user can choose which kind of action shall be performed, e.g. animation, library part or material exchange, show info or select the object. This means only the desired actions are suggested to the user. The functions have to be configured in the context menu.
Interact with library parts
Workshop
Exchange library parts
-
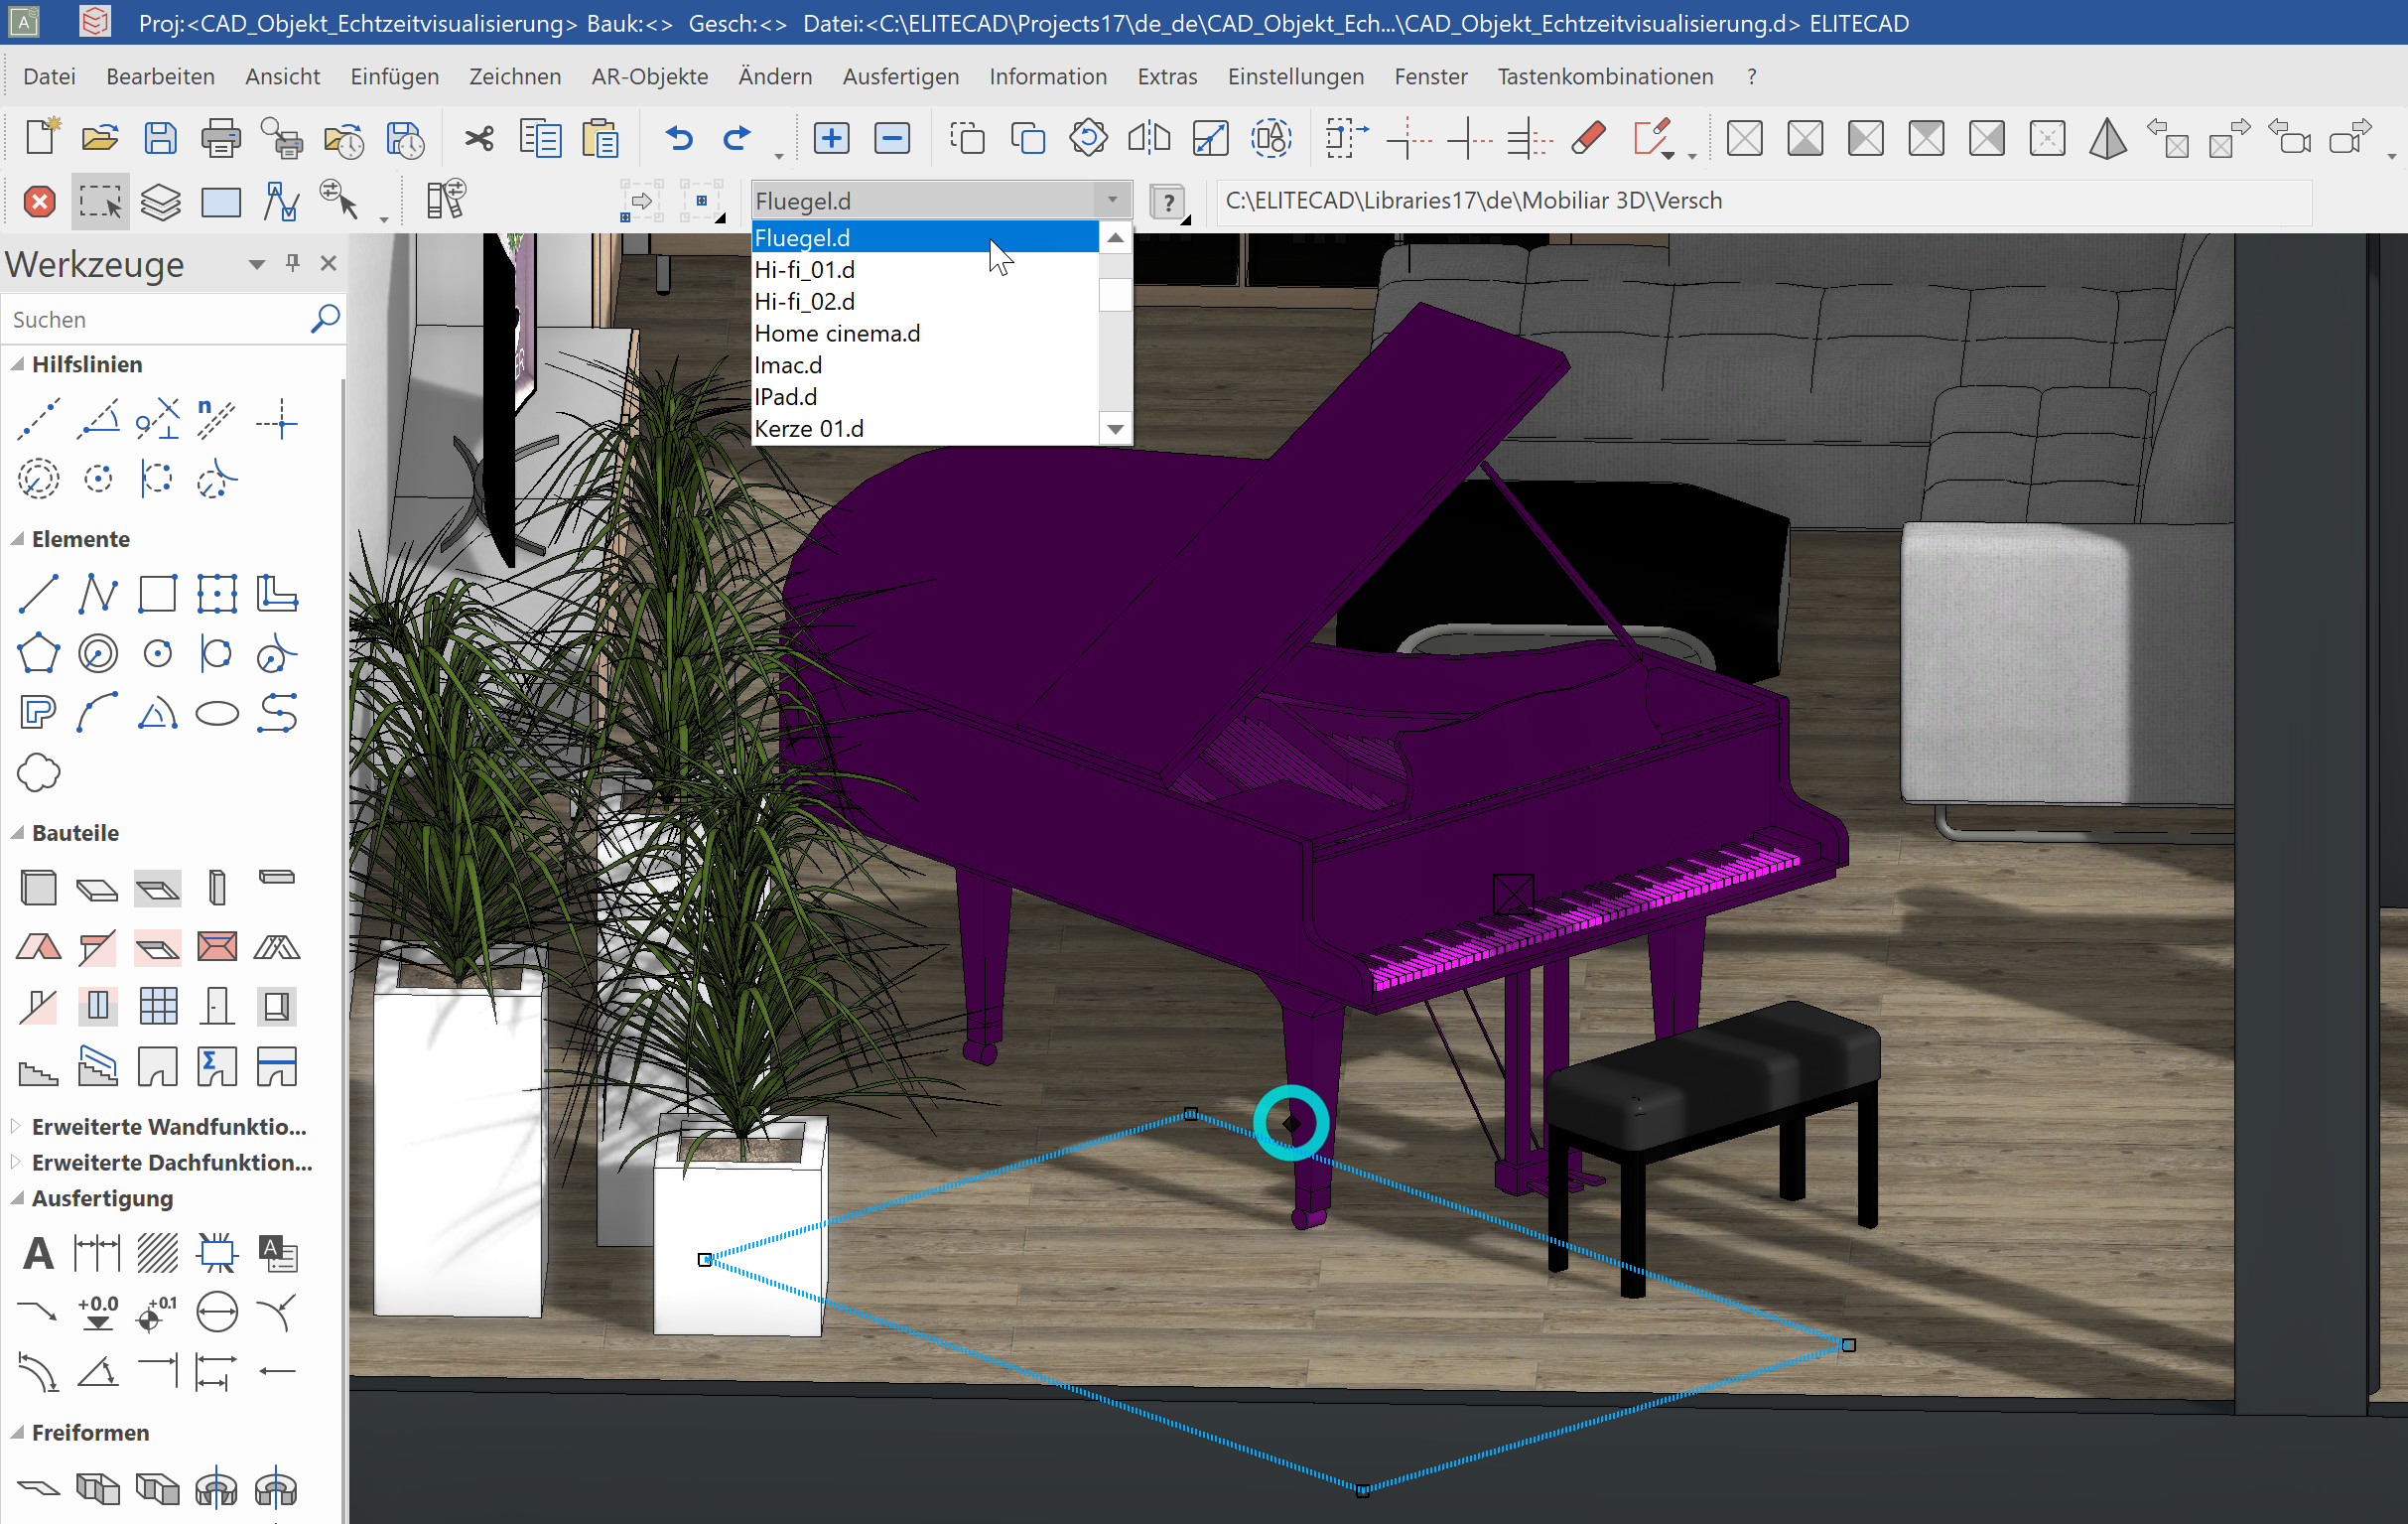
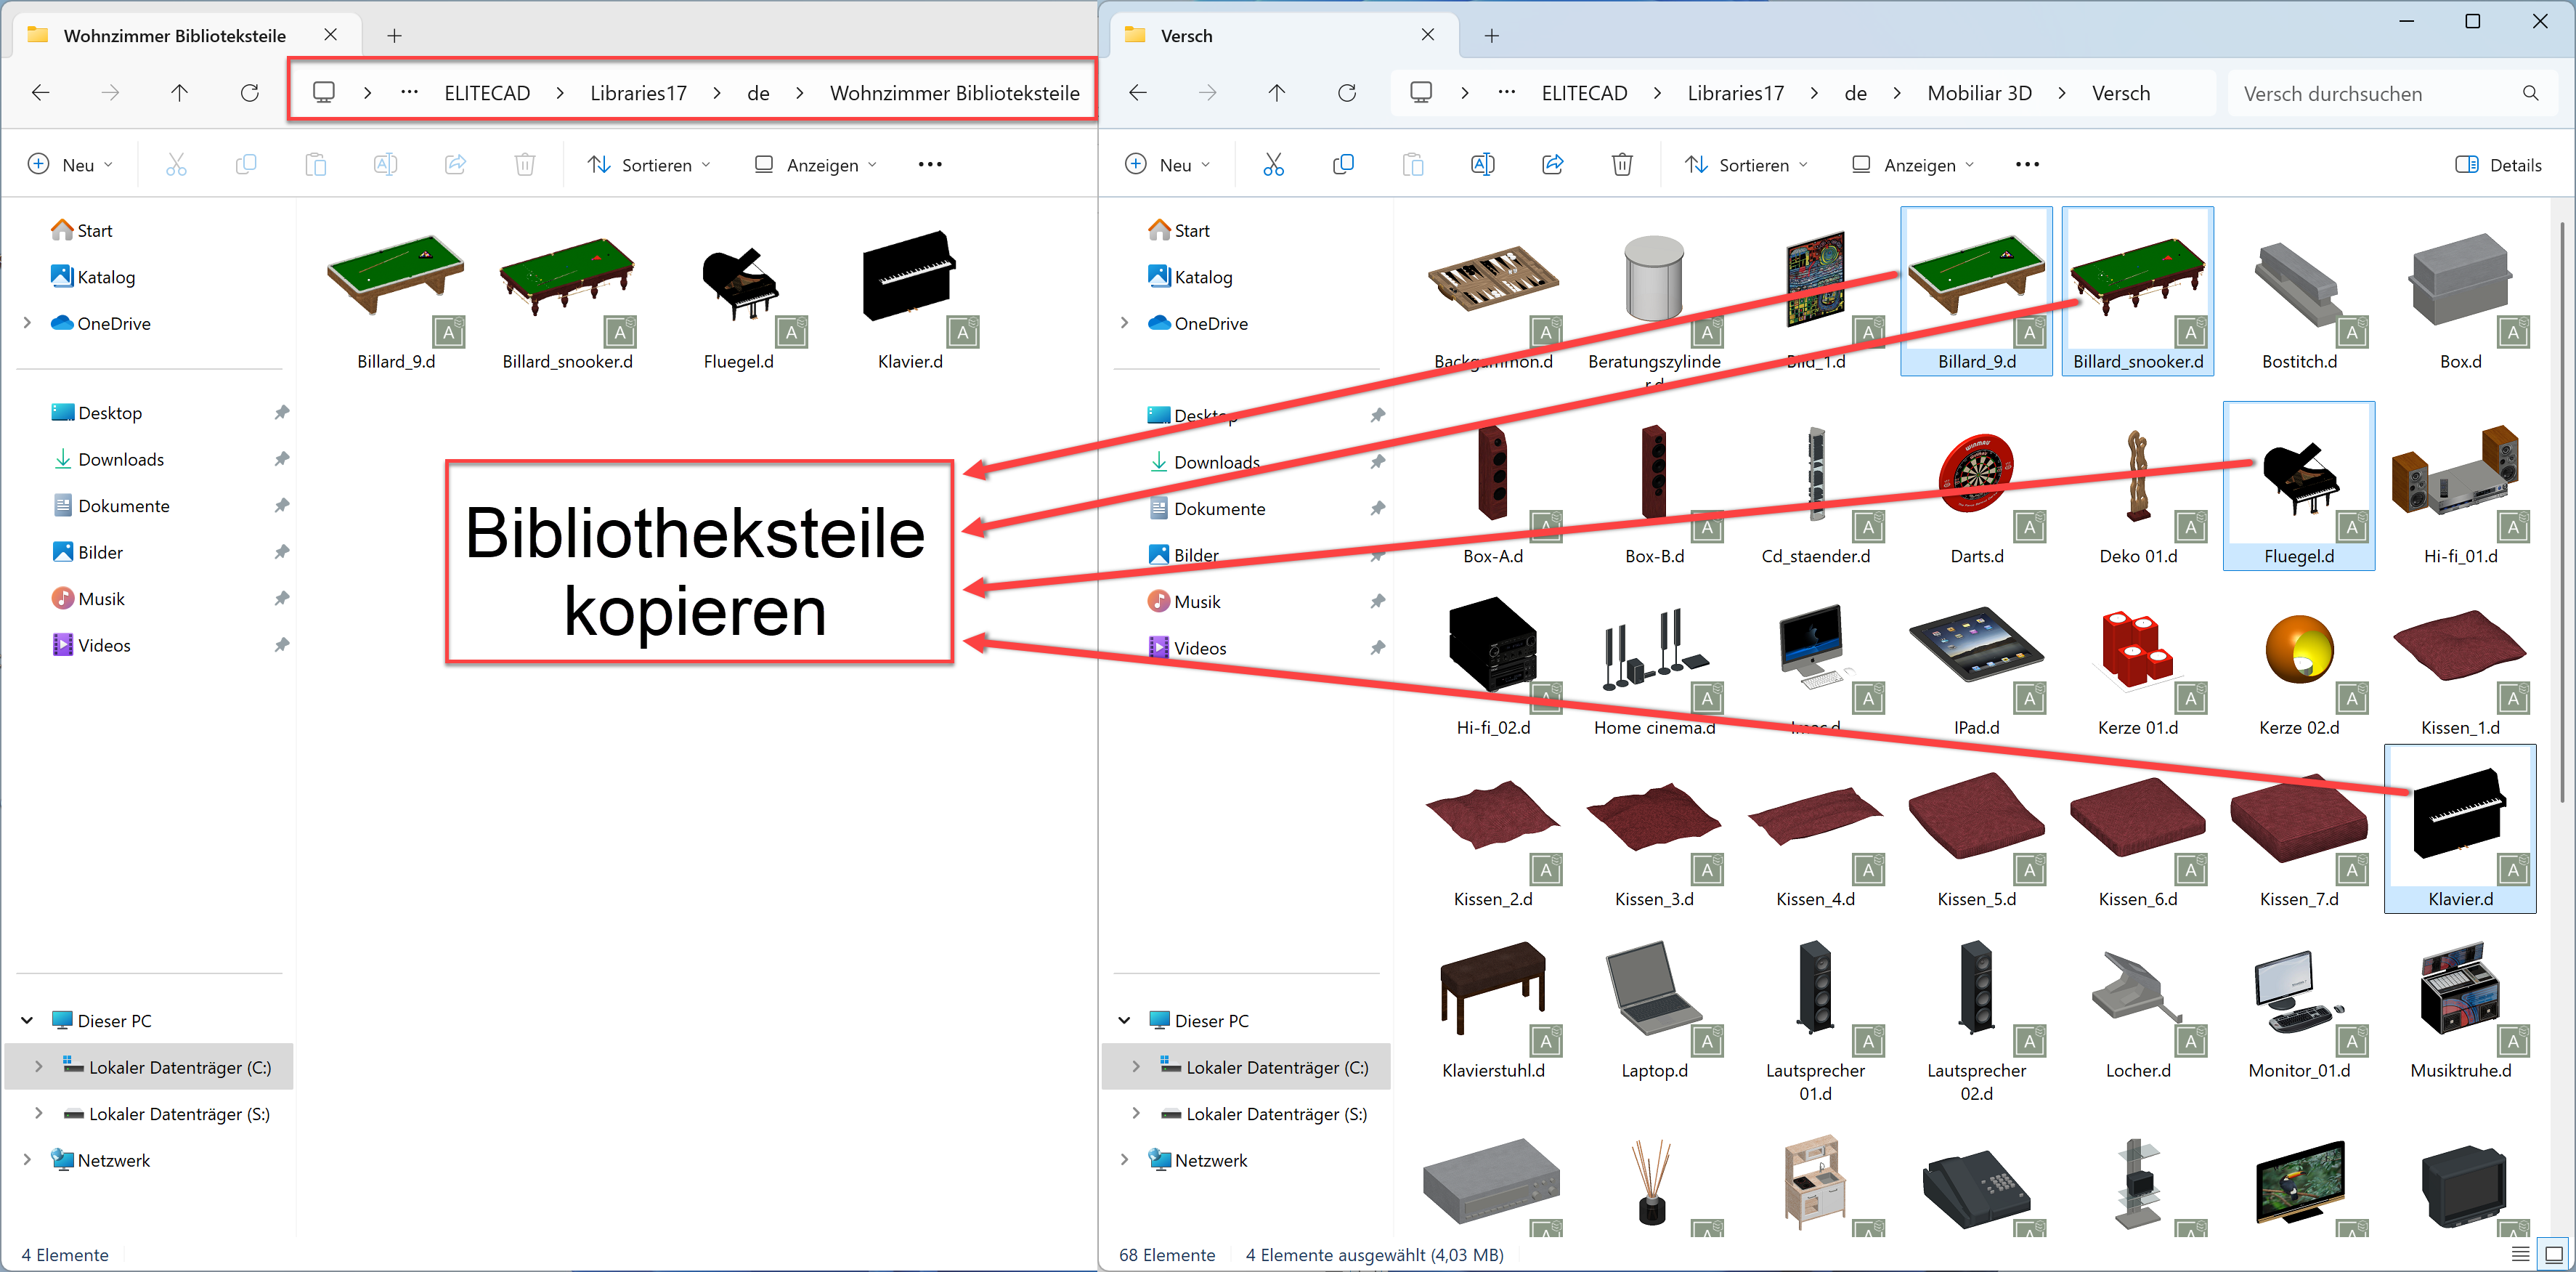
Let's use the hair cross to focus on a library part, for instance the piano inside the living room, and then press INTERACT.
-
We select the button CHANGE LIBRARY PART. Now the graphical menu displays library parts and their corresponding preview images, which are located in the same folder as the selected one.
If we use the button QUICK INTERACTION, the menu with library parts will appear right away so we can choose a library part to exchange. In order to see more library parts than the ones displayed we can use the arrow keys to switch between the pages. After we have found the desired library part, we can use confirm to exchange it. That way the piano will be replaced by the chosen object.
-
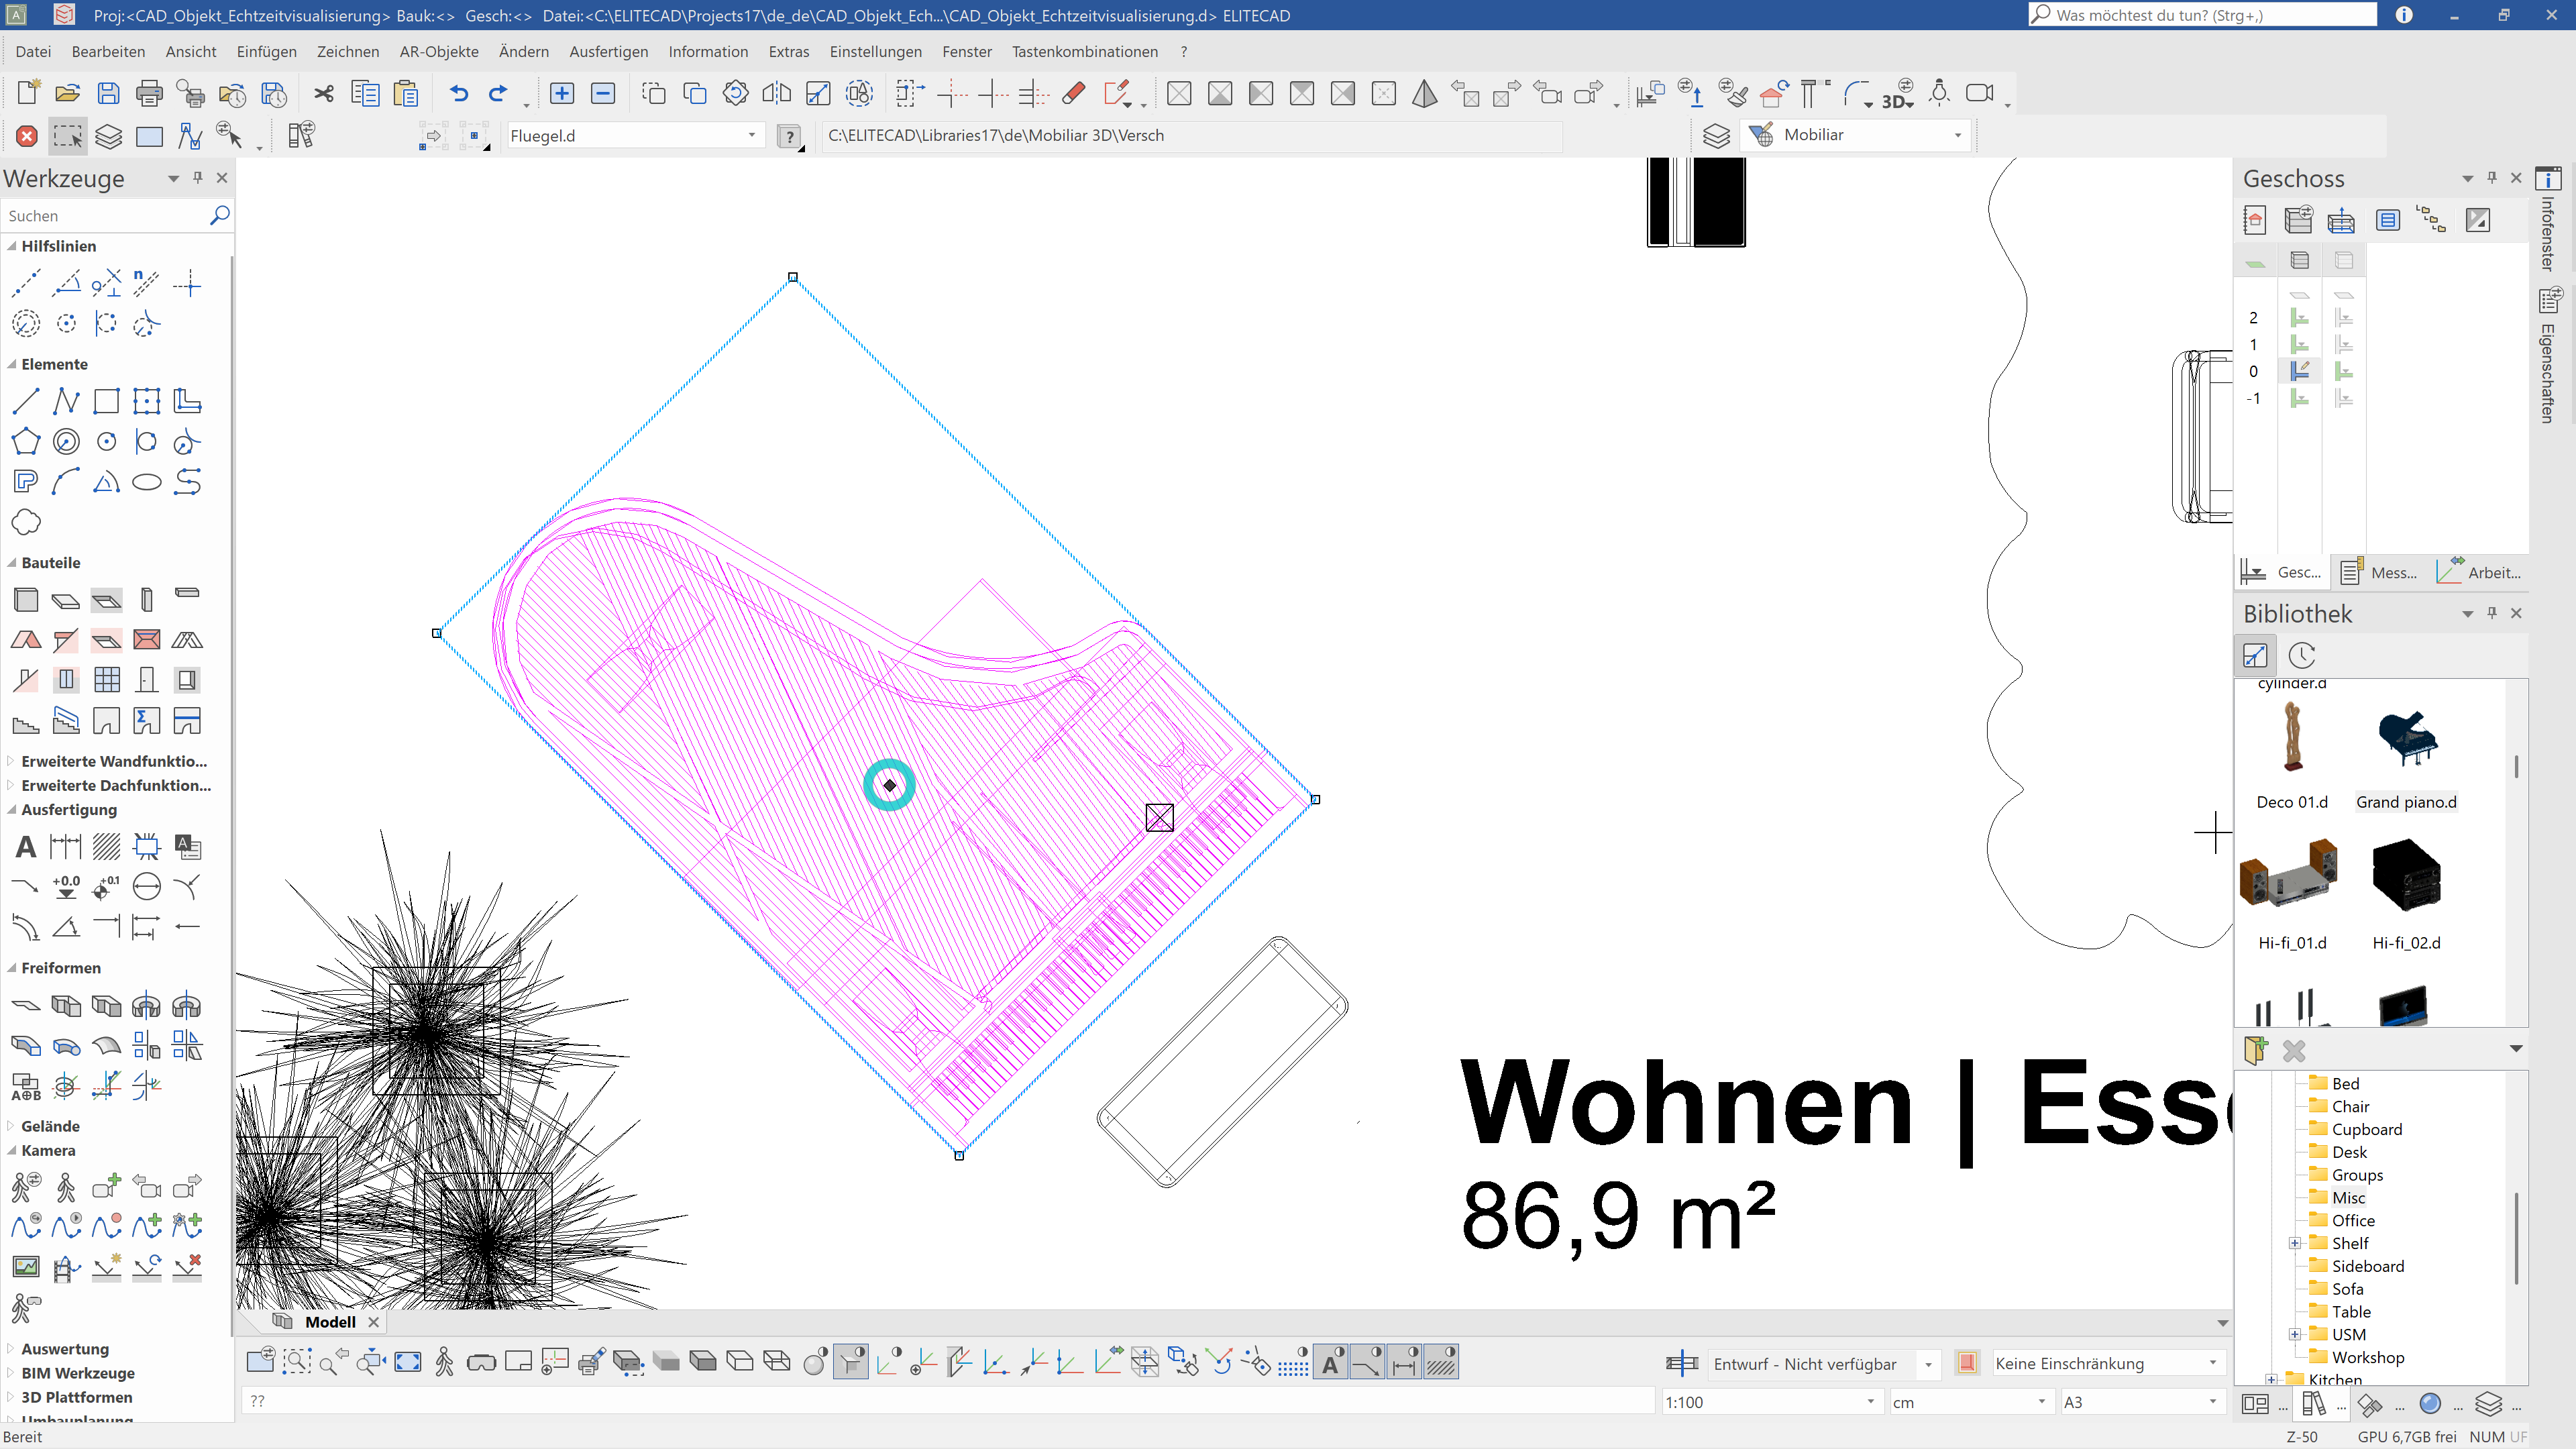
If we want to modify the selected object, we have to switch to the CAD user interface, which shows us information about the selected library part. Besides the library symbol and the name of the object, we also see the storage path. The name of library part is part of a dropdown menu, which shows all objects that are located in the same path. The content of this directory can be modified freely by the user, so the next time this function is executed the new content will be displayed.
-
Now we only need to delete the existing library part in the model and exchange it with the one form the new directory.

- Let's switch back to WALKING MODE and change the piano by selecting it with the hair cross and pressing QUICK INTERACTION. The selection now only shows the library parts, which are located in the new directory.
Customise library parts
In order to appear in the menu, library parts have to be located in the same directory as the originally selected object.
Since the library part is located in the default path, all library parts located in this path are displayed. Since we only want to provide some selected objects, but not change the default directory, we can just create a new folder and copy all the desired parts into this one. That way we have created a new directory that only provides the library parts that we want to provide for selection.
Let's make a folder \libraries17\en\Living room lib elements and fill it with the desired parts.
Tip
Please note that the library parts for exchange should also be ELITECAD files (*.d extension).
If the library parts are a grouping, it is necessary to ungroup the objects before changing the library part, because it is only possible to exchange single objects.
Interact with panorama environments
Workshop
Exchange panorama environments
-
Now Let's aim at the sky with our hair cross and press INTERACT.

We choose the button CHANGE PANORAMA ENVIRONMENT and the graphical menu is loaded with all available panorama environments that are stored in the same folder as the selected one.

-
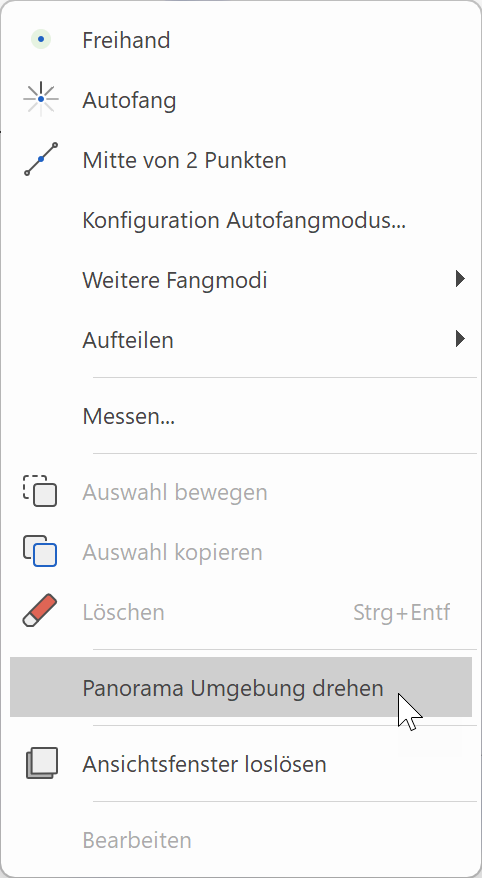
If we press the button QUICK INTERACTION, the panorama environment menu will be shown right away and we can select a panorama environment to change the current one.
- After we have decided on which one we want to exchange, we can select it and confirm. The panorama environment is exchanged and the background will be switched.
-
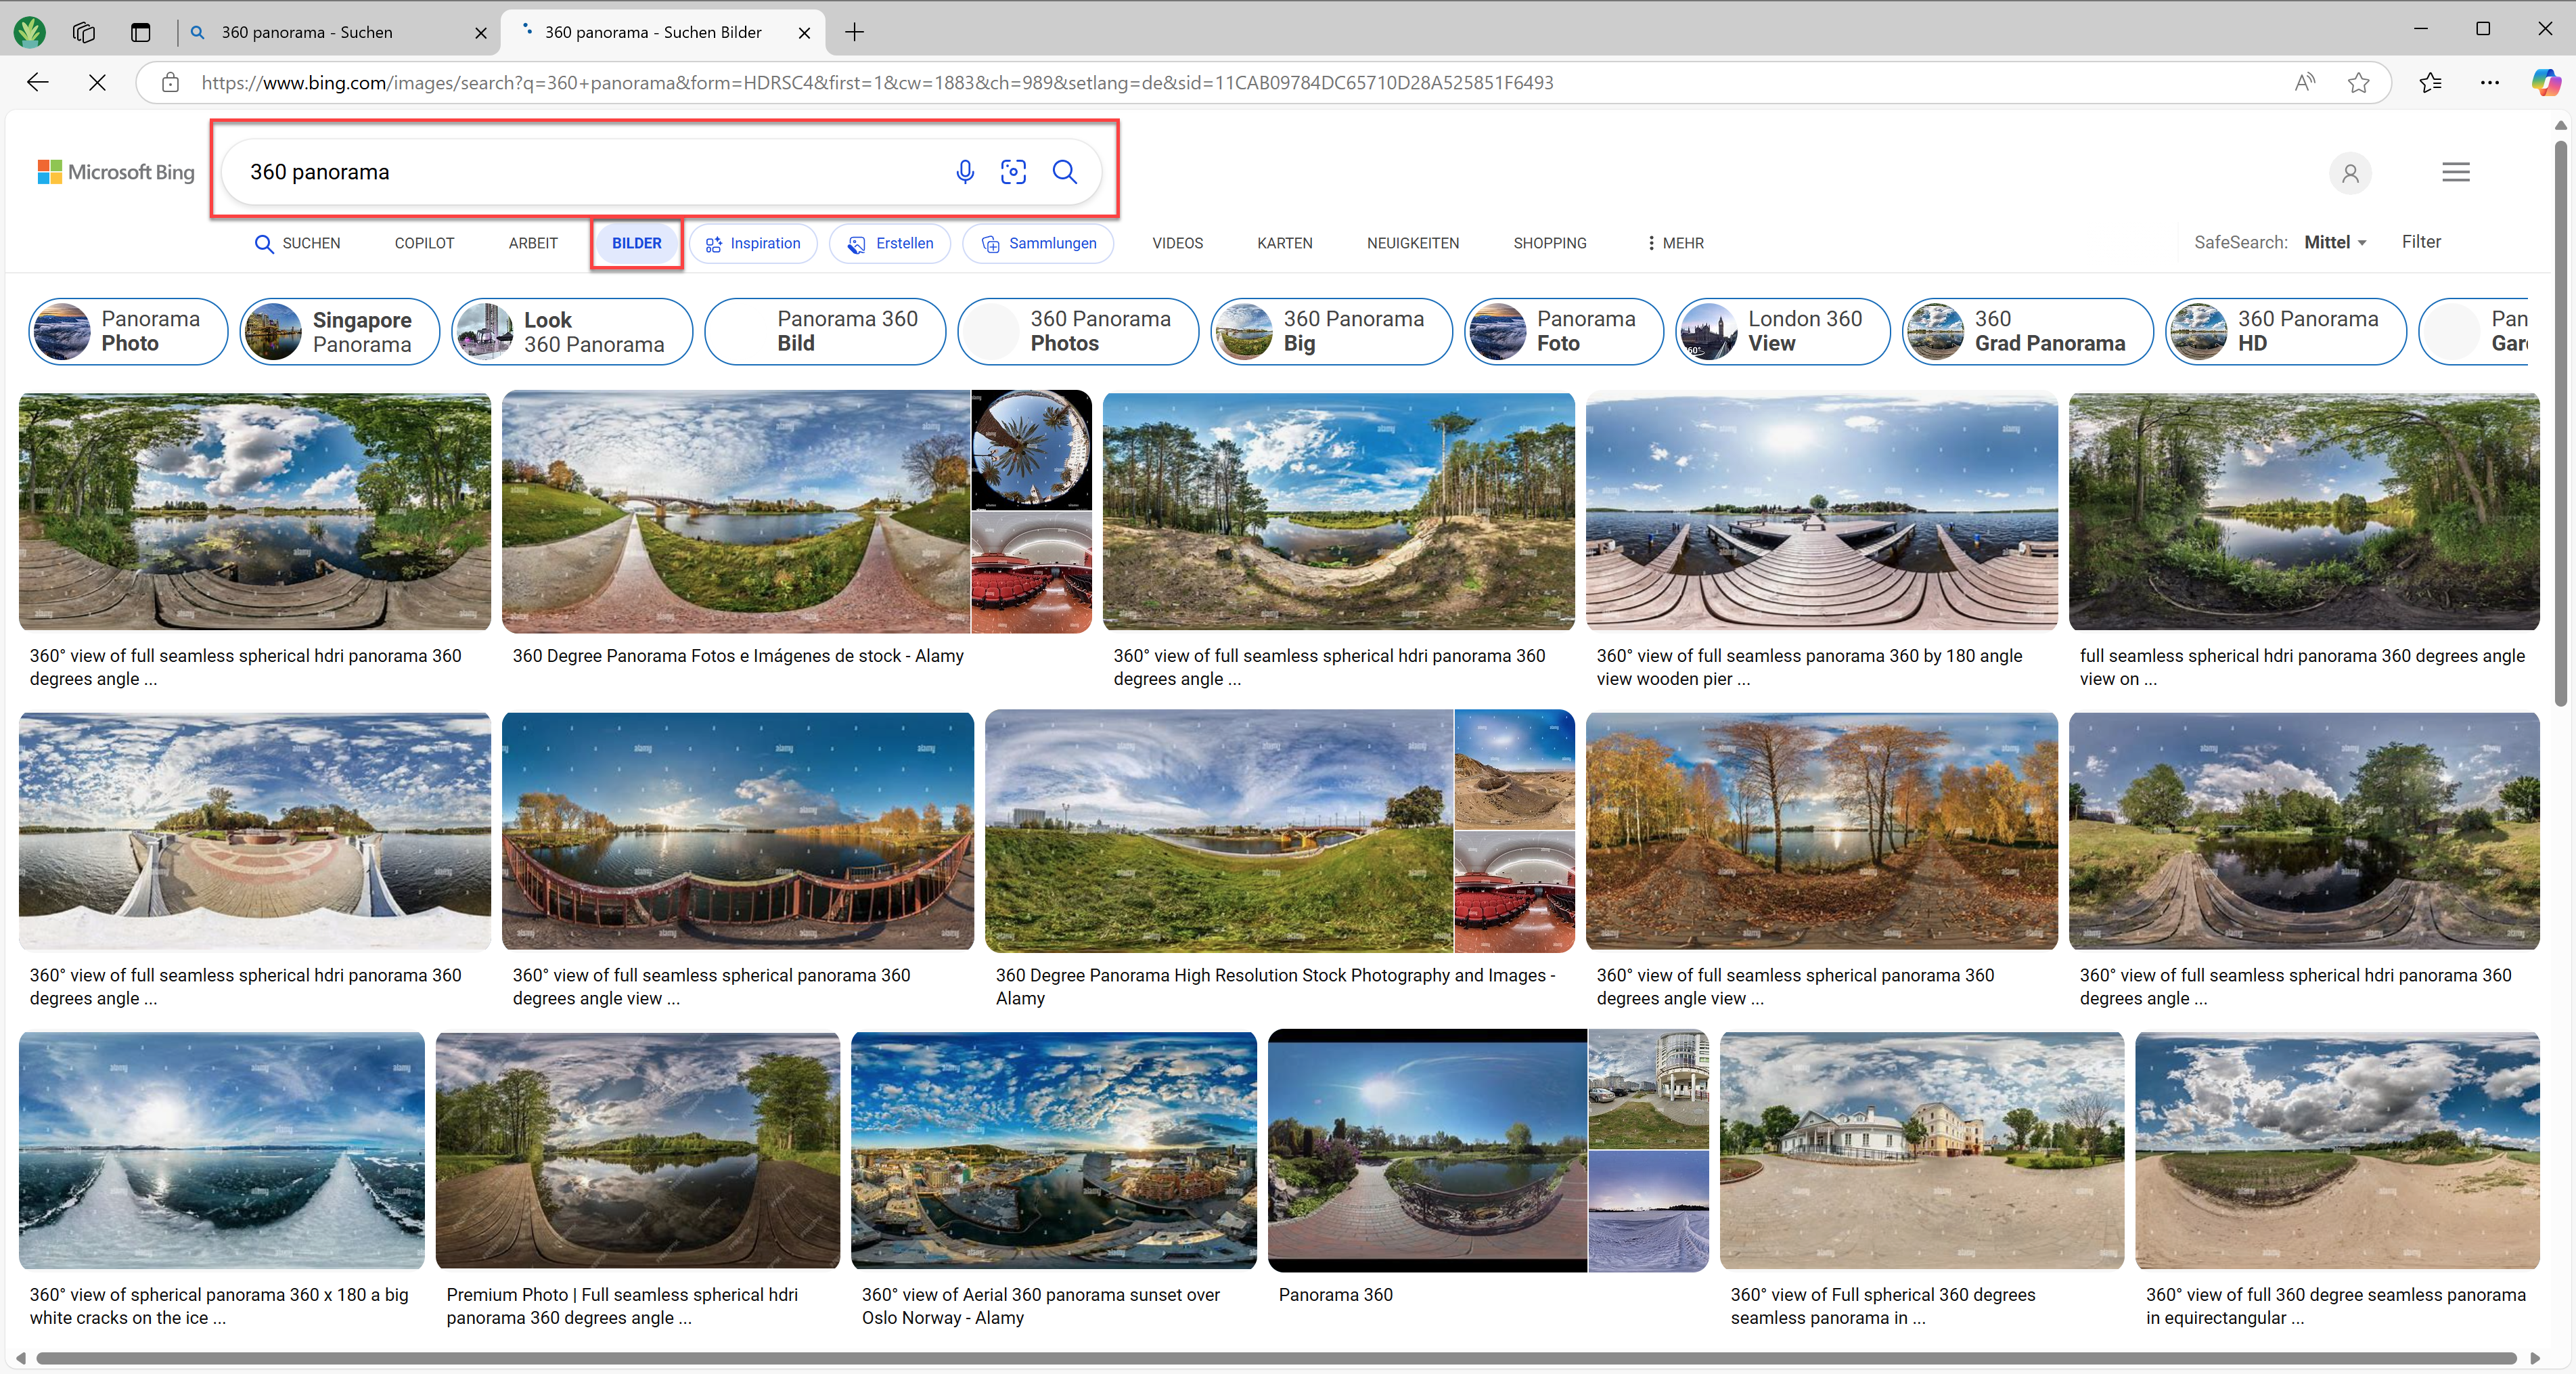
Let's open a web browser and look for “360 panoramas” in image search. If you find an image, you like, save it into a temporary directory.
-
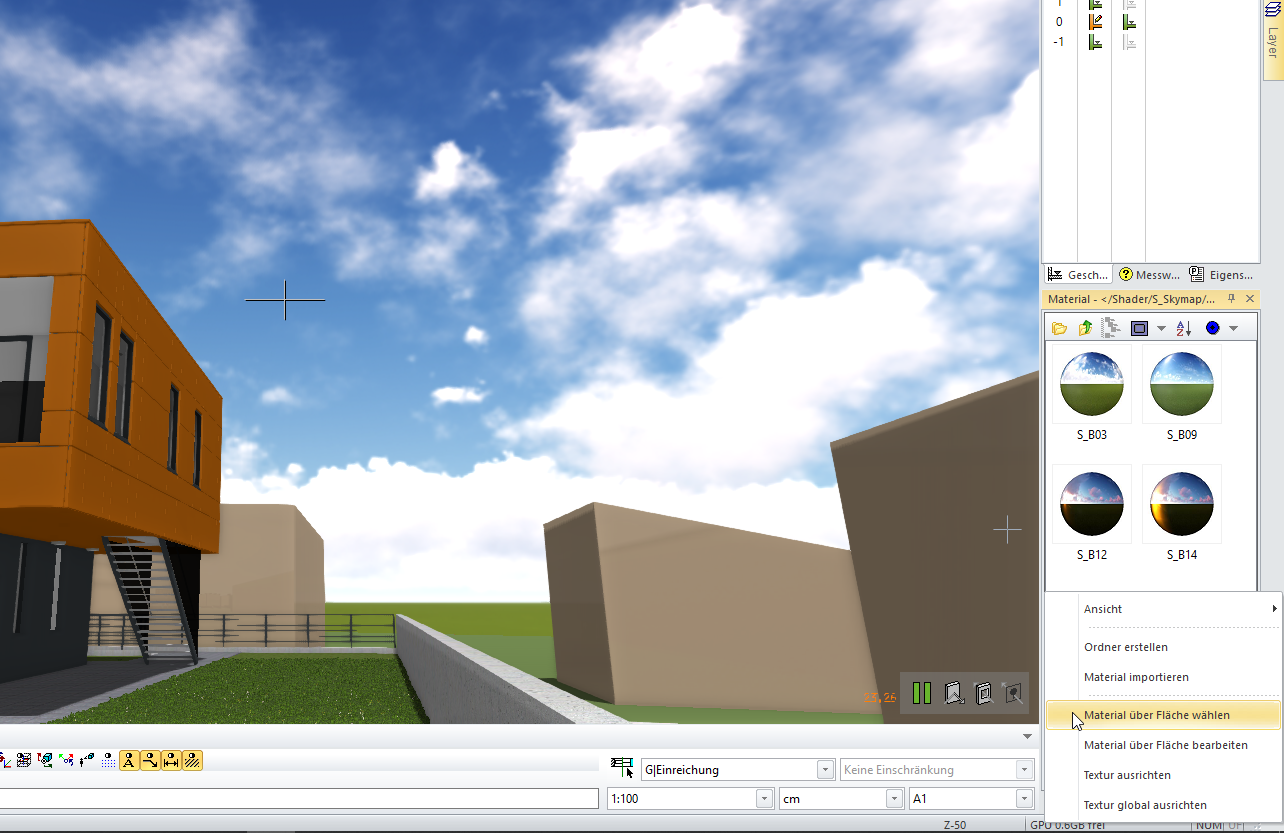
After saving the new images temporarily, we need to figure out where to save them, so they are suggested for the panorama environment exchange function in ELITECAD. Since panorama environments are essentially materials (textures), with special shader properties, we can use the function SELECT MATERIAL BY SURFACE and the required directory is opened in the material manager. First, we activate the shaders and switch to WALKING MODE, which we then pause and use the function SELECT MATERIAL BY SURFACE.
-
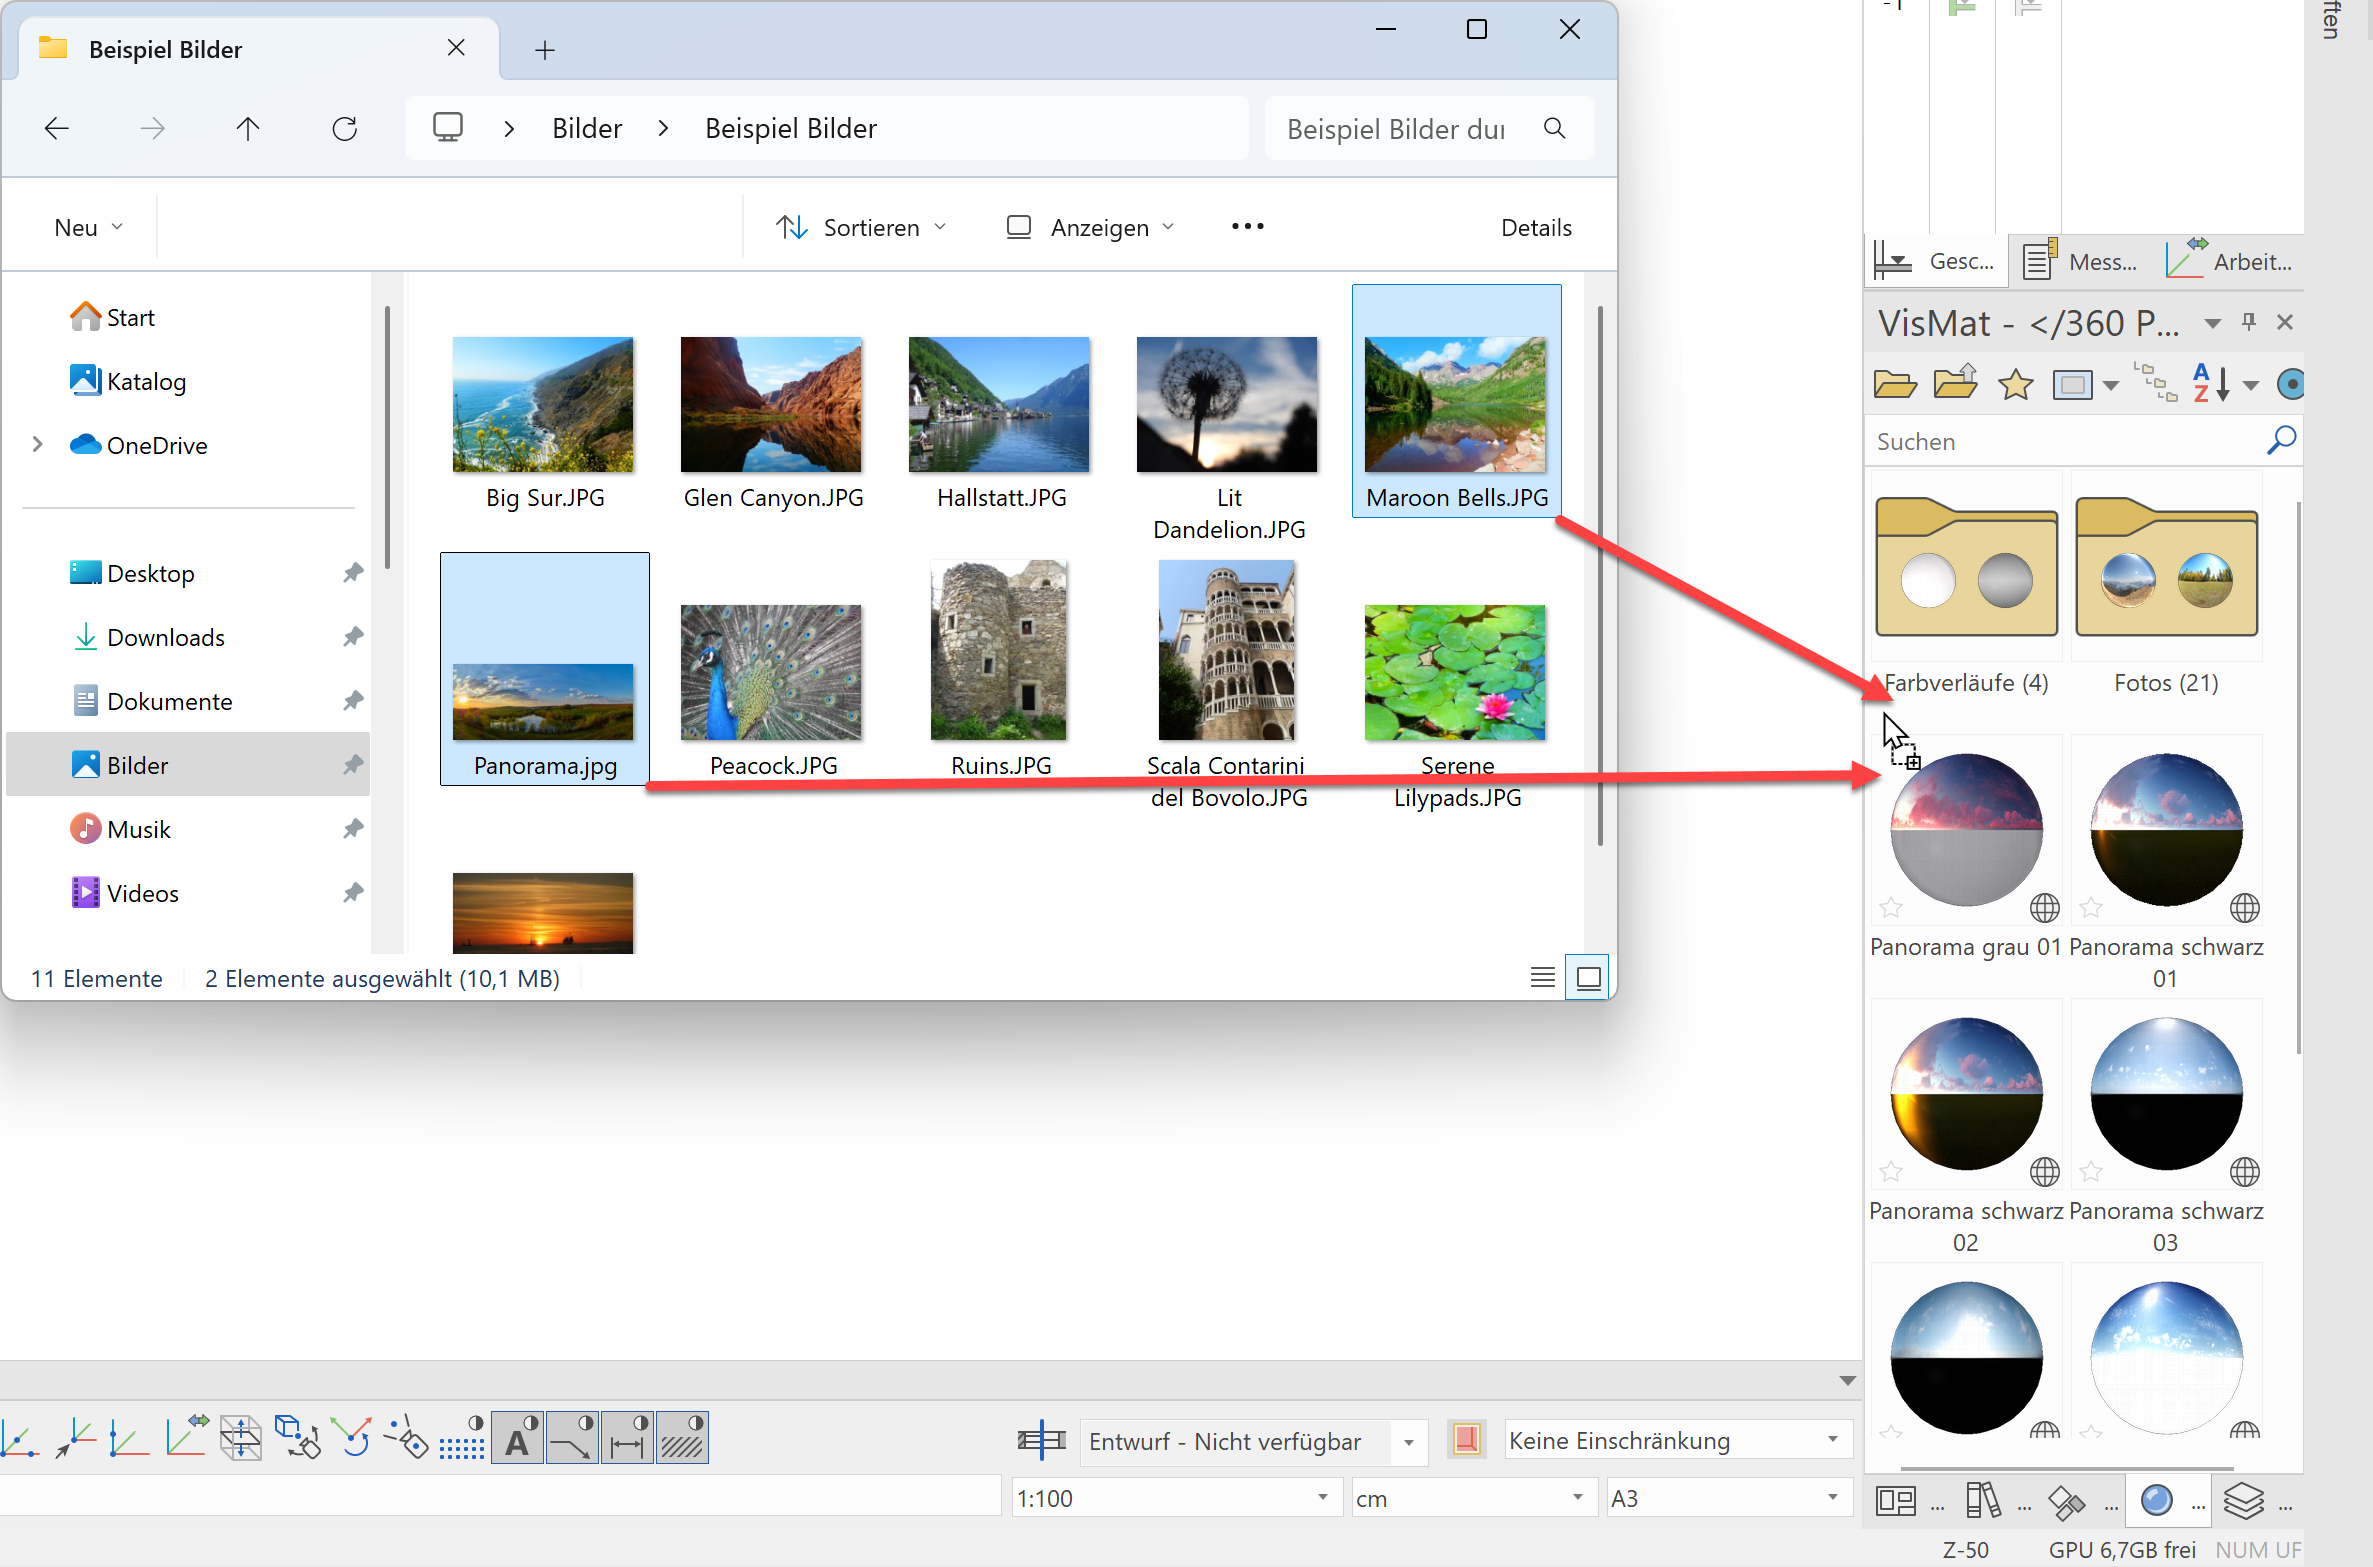
After we have found and opened the location for the new panorama environment, we copy the new panorama environment into this directory. We can do this easily with Drag & Drop.
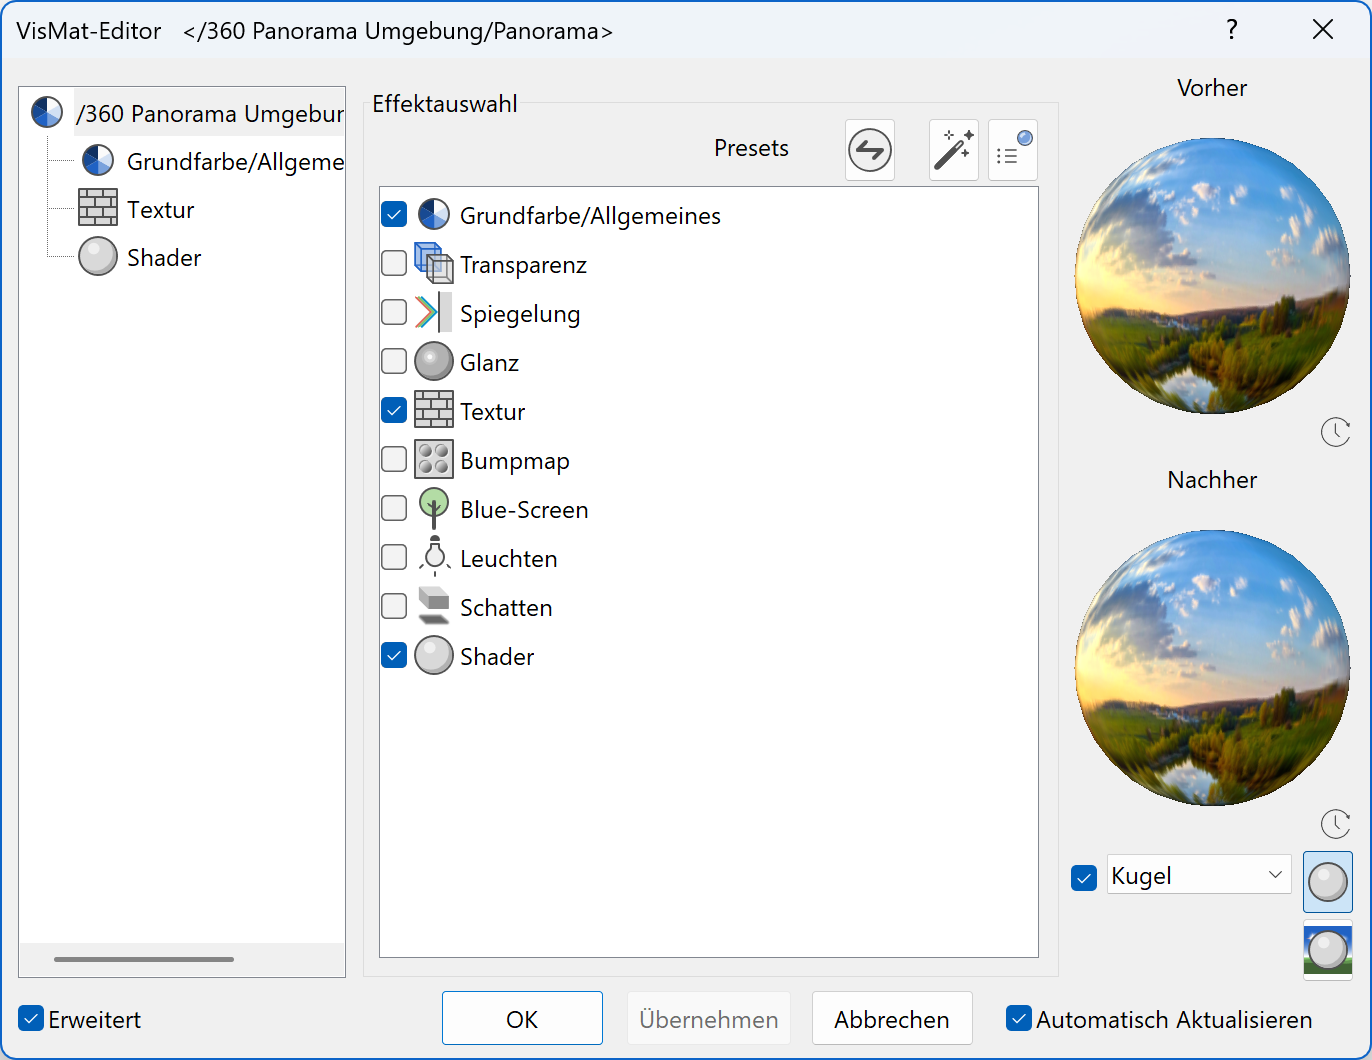
- The next step is to assign the new panorama images the PANORAMA ENVIRONMENT properties so we can use them in the panorama environment exchange function. Let's open the material editor with a double click on the new materials and activate the shaders by setting the checkbox SHADER.
-
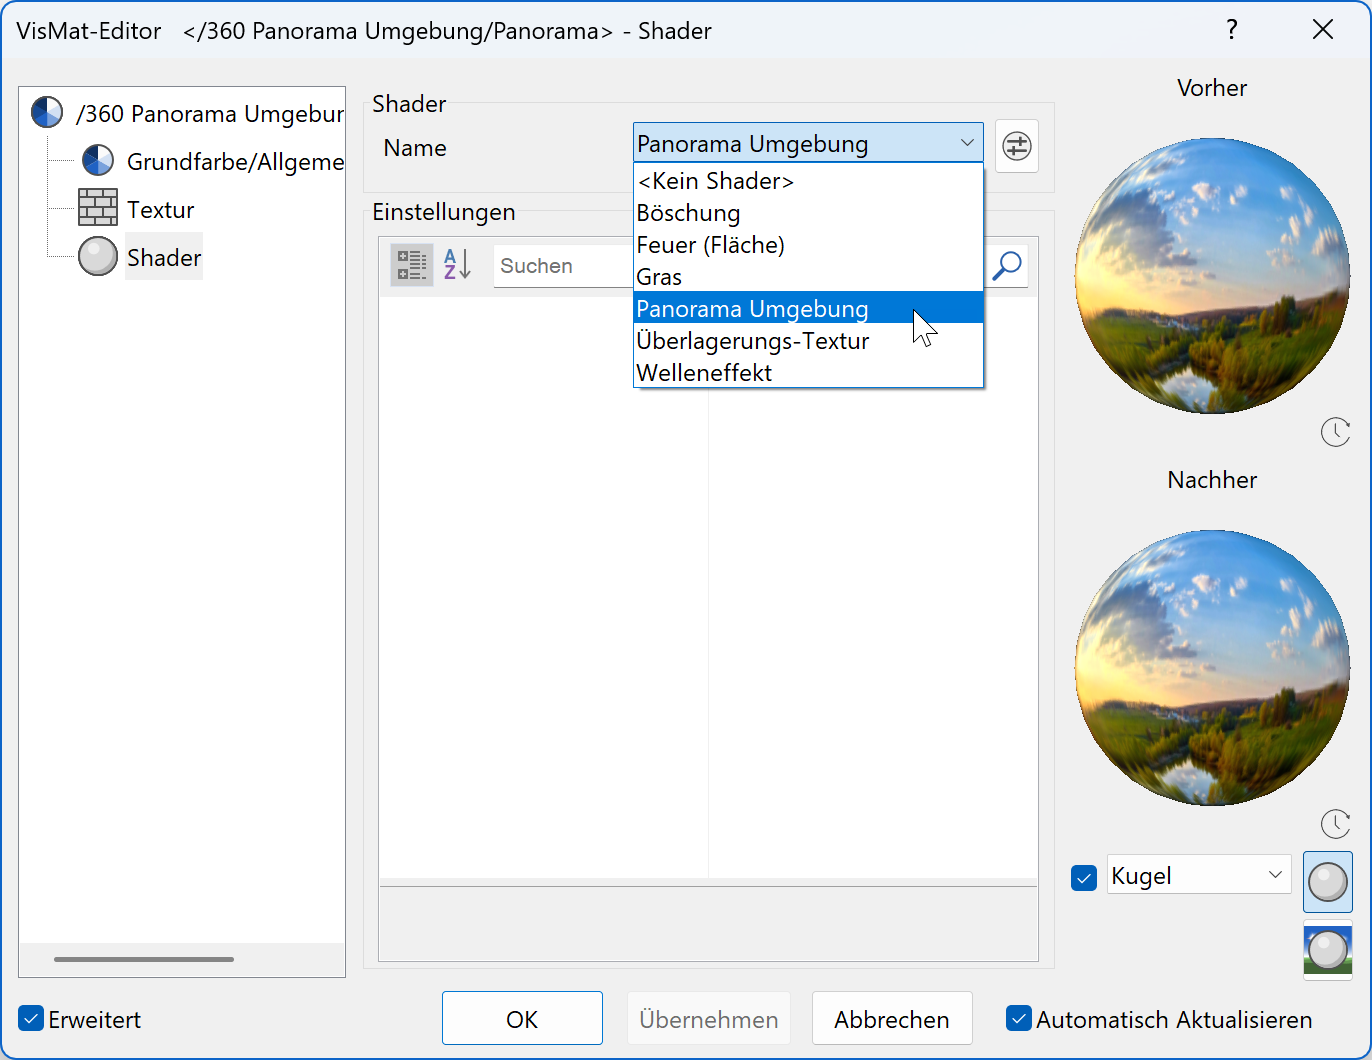
In the shader properties, we activate the entry "panorama environment" in the dropdown menu.
-
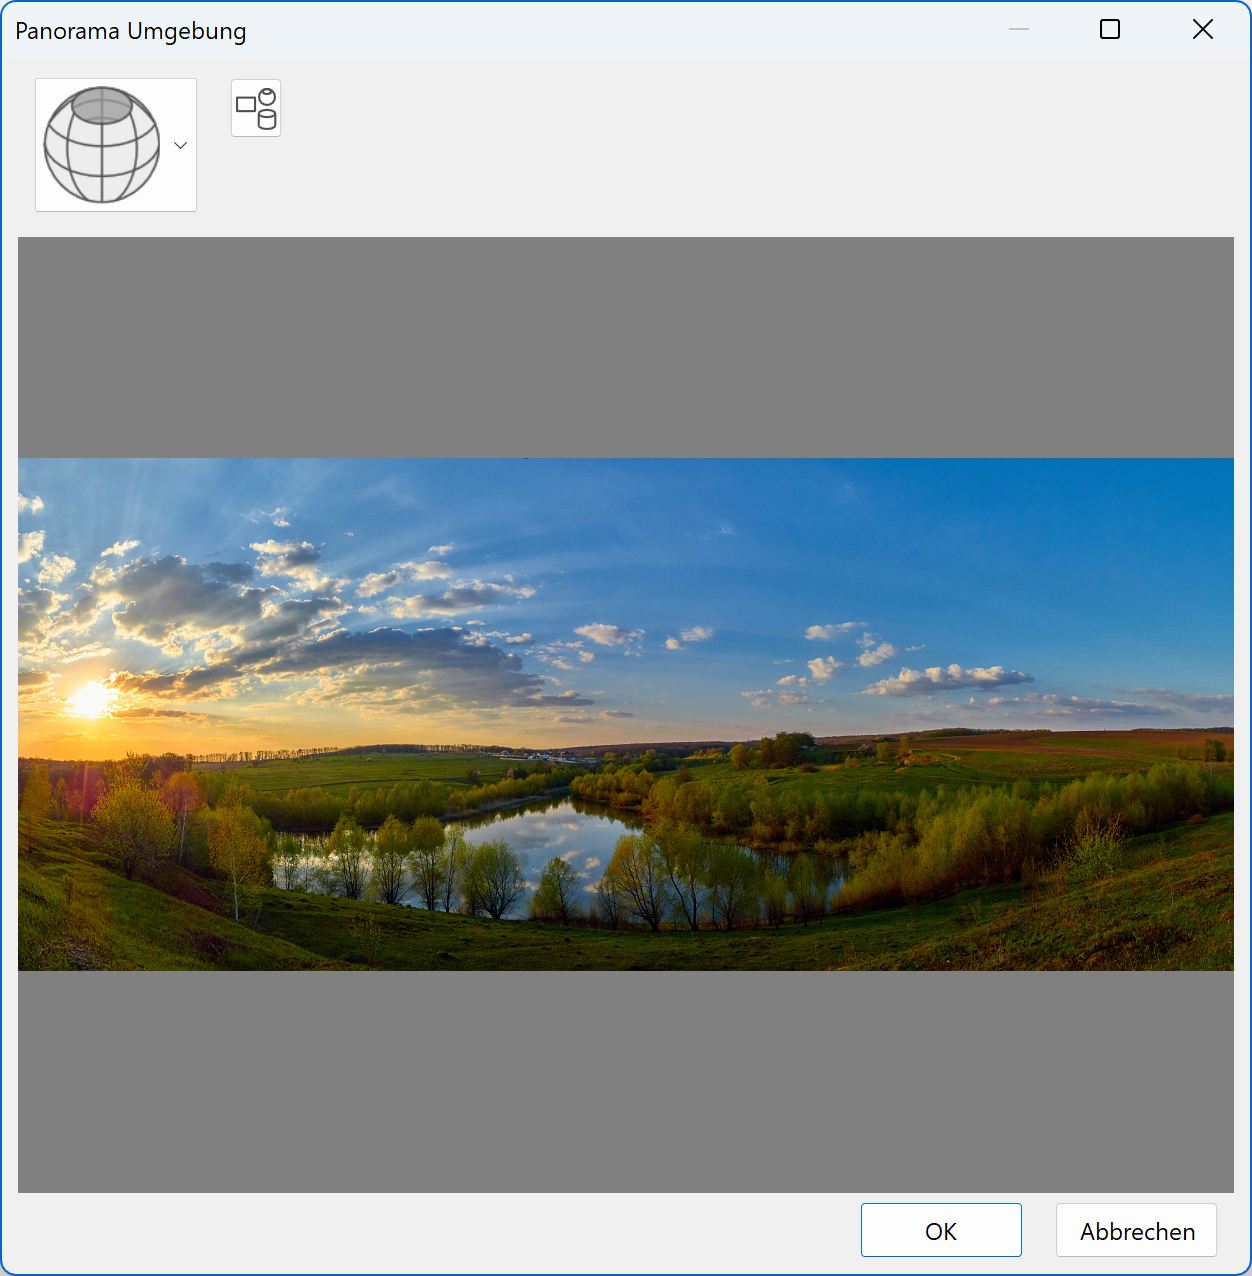
Afterwards we open the parameter dialog of the panorama environment
 and activate the automatic detection of the panorama environment type. The function DETERMINE PANORAMA ENVIRONMENT TYPE AUTOMATICALLY
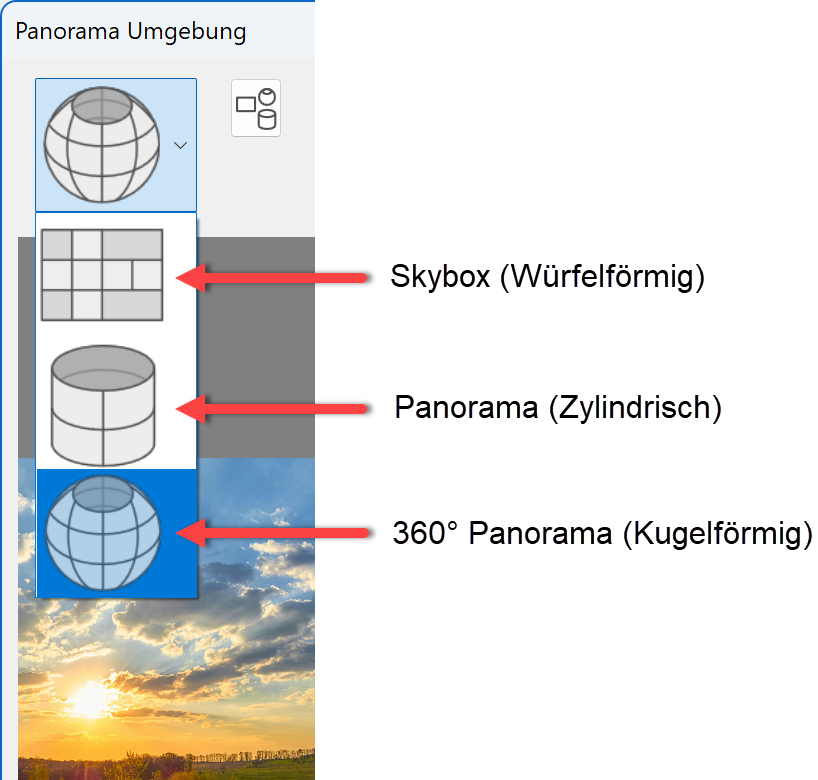
  only works with new images that have no type assigned. It is always possible to manually adapt the type later on. The following types are valid: SkyBox (aligned like a cube), panorama (cylindrical) or 360-degree panorama (spherical).
With this configuration, most of the panorama environments from the internet are ready to use in ELITECAD.
-
If we now switch back to WALK MODE, look up into the sky with our hair cross and press QUICK INTERACTION, we will see our new panorama environments available.

-
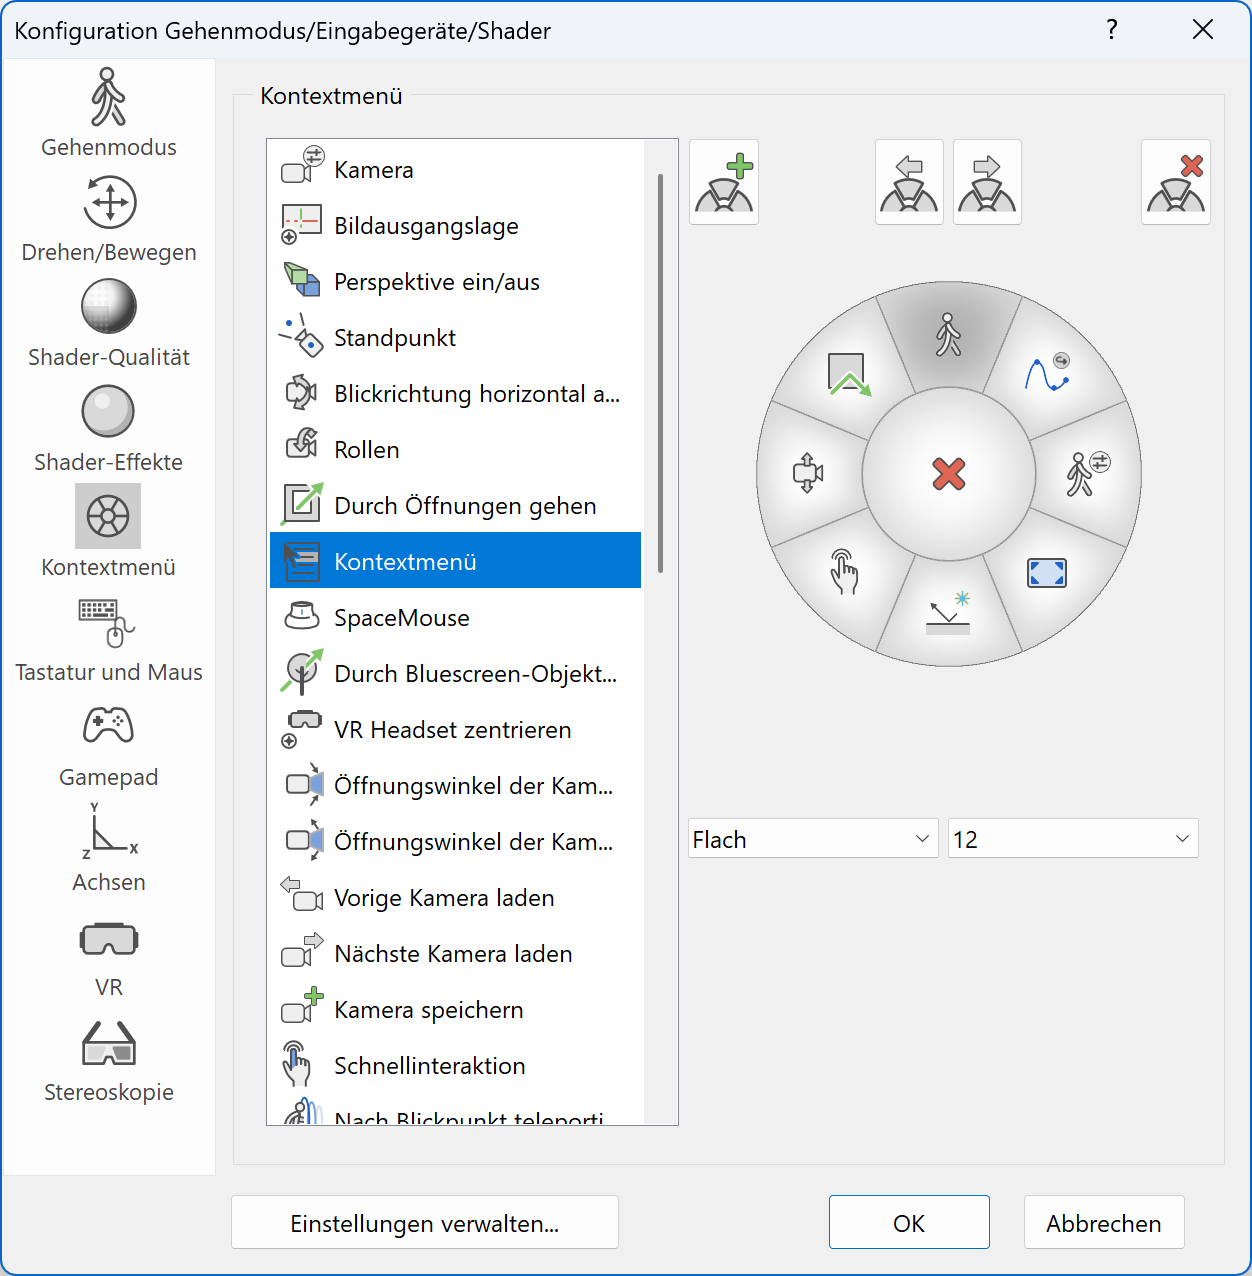
To do this, we open the WALK MODE CONFIGURATION and place the function context menu in our round context menu for the walk mode.
-
Now back in WALK MODE aim your hair cross at the sky and open the context menu. With the function ROTATE PANORAMA ENVIRONMENT you can select the reference point and rotate your background with the mouse according to your model. The first click selects the reference point for rotation, the second click determines the new position of the point in the model. Using Esc, you can abort this function.
Customise panorama environments
There are three ways to get additional panorama environments for your library. The first one is to create your own panorama environment, but keep in mind that the creation of custom panorama environment can only be done with special cameras. Secondly, it is possible to create 360 degree panorama environments with smartphones, but usually the quality is not very satisfying. In this example, we choose another way of obtaining panorama environments, which is downloading them from the internet.
Align panorama environments
If a panorama environment is active and we are in WALK MODE, we have the possibility to align the panorama environment horizontally in our model.
Tip
Panorama environments are materials (textures) with special shader properties. If you need more information about materials, you can read chapter Managing and Organising of the ELITECAD user manual.
Interact with materials (textures)
Workshop
Change materials
When changing materials there are two main points to consider, one being the MATERIAL ASSIGNMENT mode and the other being the check where this material has been used.
-
First, Let's open the material manager and check the MATERIAL ASSIGNMENT mode, because this setting has a direct effect on the behaviour of the material exchange function.
-
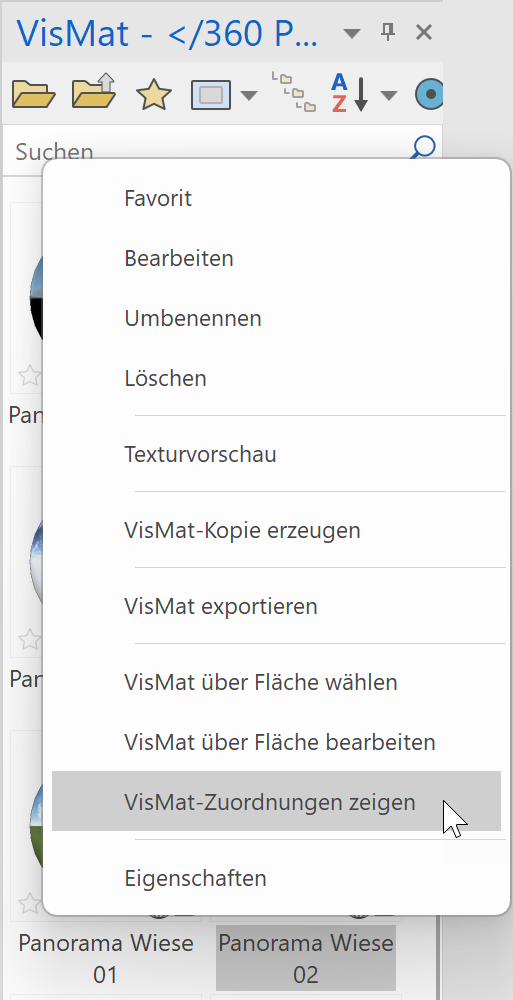
Furthermore, it is important to know where the material has been used in order to see which objects are affected by the change of a material. For this purpose, we need to open the context menu in the material manager with the material selected and activate the function SHOW MATERIAL ASSIGNMENTS.
Now we use our hair cross to focus on the floor in the living room and press INTERACT.

-
We choose the option CHANGE MATERIAL and now the graphical menu shows us all materials, which are located in the same path with a material preview for material change. If a library part is selected, both options CHANGE LIBRARY part and CHANGE MATERIAL are displayed and we can choose which action to perform.

-
If we press the button QUICK INTERACTION, the material menu appears directly and we choose a material for exchange right away or browse through the available materials.
-
After we have decided on a new material, we can select and confirm it. The new material is activated and the appearance of the floor changes accordingly.

-
First, we need to find out where to store the new materials in order to have them available for material exchange. For that, we can use the function SELECT MATERIAL BY SURFACE which opens up the corresponding directory automatically.
To do this, we activate the shader and WALK MODE, and then we pause the walk mode and use the function SELECT MATERIAL BY SURFACE in the material manager.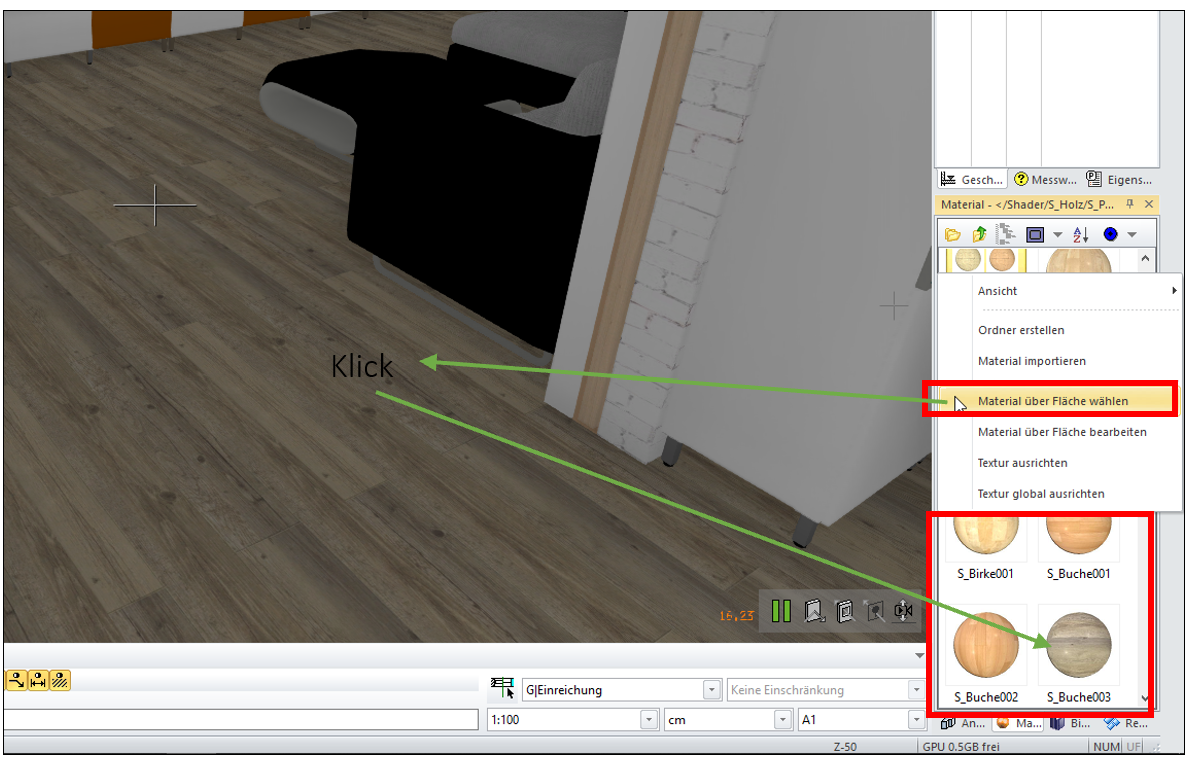
-
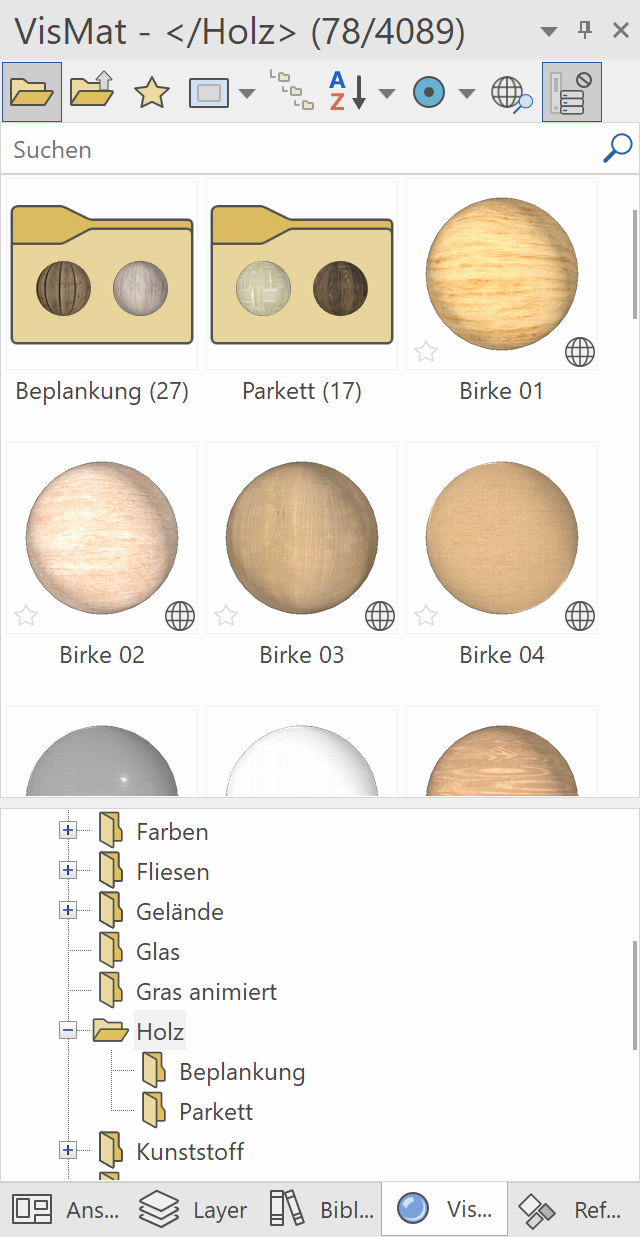
After we have found the directory for storing new materials (in the material database), we realise that this is a default directory which we do not want to change. Therefore, we create a new folder floor material and copy the desired materials into this new directory. We can use the Drag&Drop functionality and simply move the materials from one path to another.

-
The next step is to assign the material from the new folder to the floor, which can also be done by drag and drop. Now the next time we select this floor, we will have our custom material selection available for this specific floor.
- So Let's return to WALK MODE and go to the living room. When we now select the floor with our crosshair and press QUICK INTERACTION, we see the list of new materials for material exchange.
Customise visualisation materials (VisMats)
There are several different ways how new VisMats can be added. One option is to create your own materials or customizing existing ones. Another option is to download new materials from the internet and importing them into ELITECAD. A detailed description of this can be found in the Help Center Manual in the material management chapter.
Tip
The ELITECAD user manual chapter Manage and organise contains a whole section on the topic of material management.
If you want to use the same selection of materials on a different ELITECAD system, it is necessary to export the material database and import it in the target system.