Walking mode
The walking mode allows navigating through a model by moving the camera in a first person angle. Changing the position can be achieved in several different ways by using various input devices. Depiction in walking mode is in perspective projection.

Keyboard and mouse
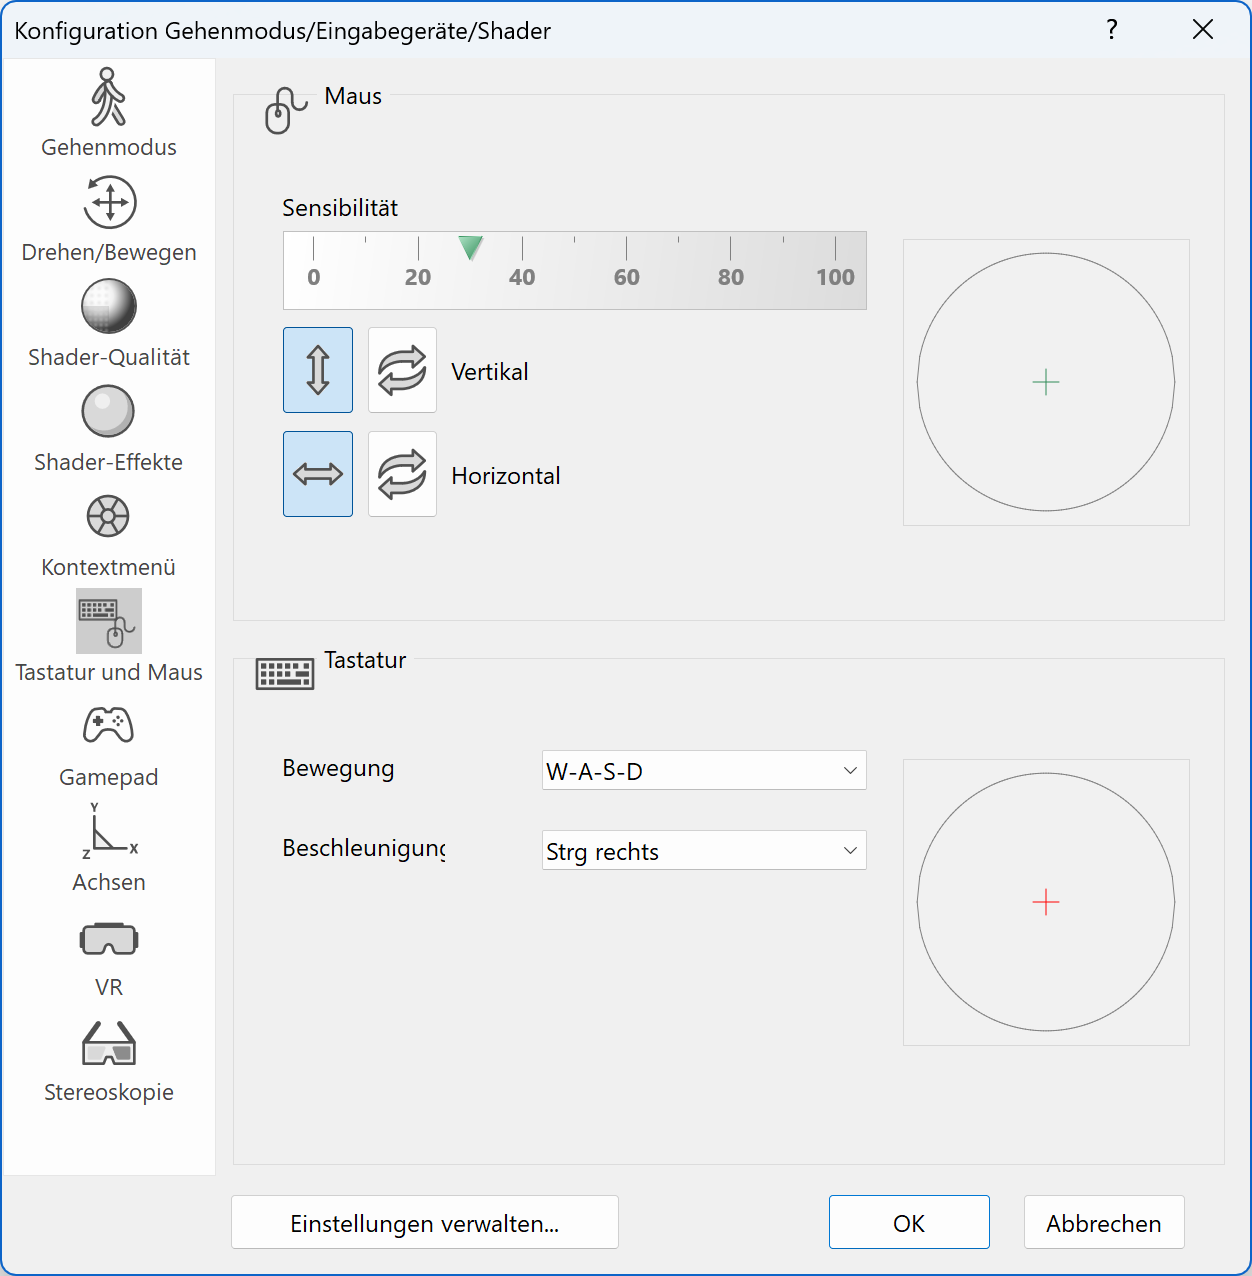
You can use standard input devices like keyboard and mouse for navigating within the walking mode. Key mapping and mouse buttons can be freely configured. The directions can be inverted and the sensibility can be adapted to your personal preferences as well.

Gamepads
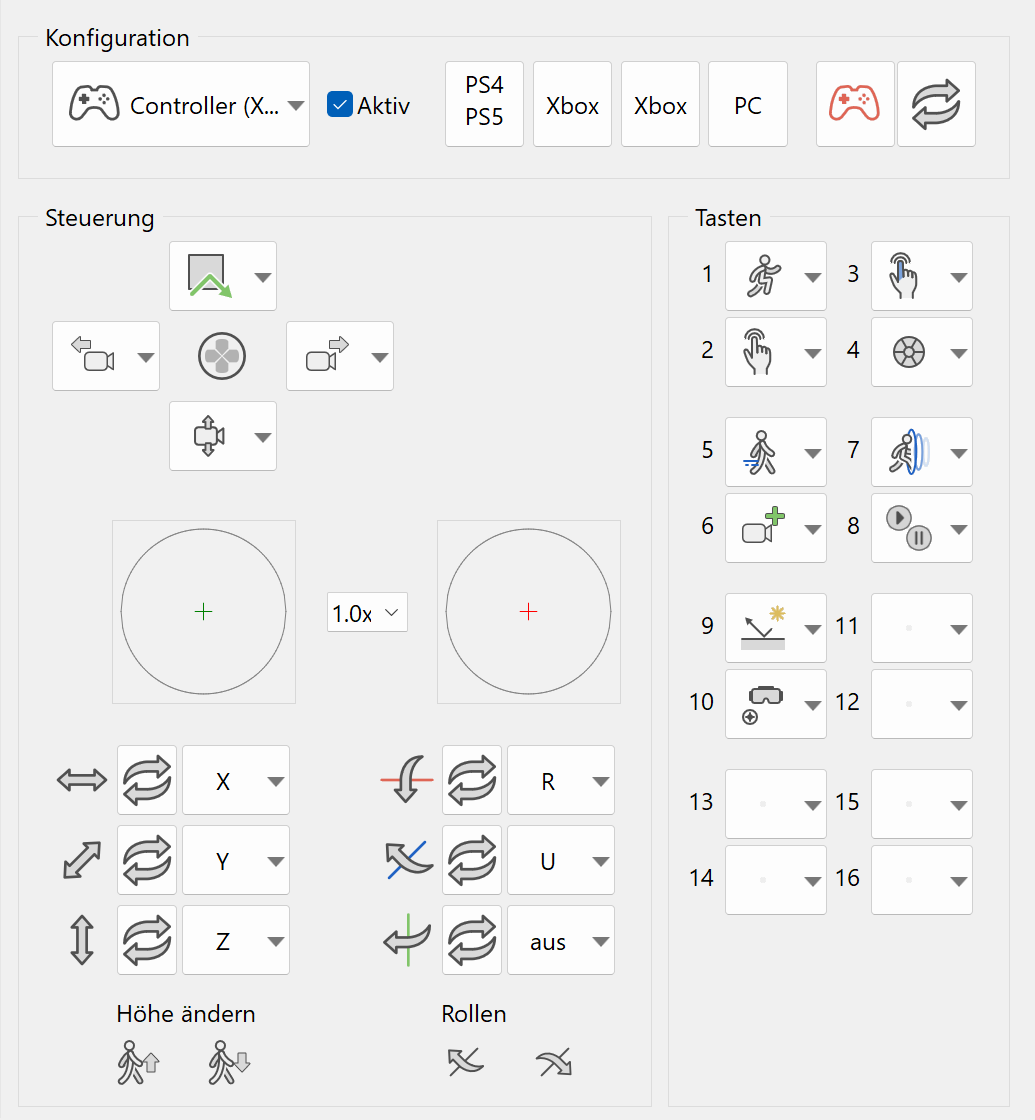
Gamepads are the preferred choice for navigating through a model in the walking mode. ELITECAD already has predefined configurations for common devices so the PlayStation 5® or Xbox® controllers work out of the box. Other devices work as well, but have to be configured manually. Depending on the devices, all buttons and switches on the gamepad can be configured freely. This means you can map your favourite ELITECAD functions to buttons on your gamepad. The sensitivity of the buttons can be configured to your preferences.

VR glasses and peripherals
ELITECAD comes with a native integration of STEAMVR. This platform contains OpenVR, which is a vendor independent runtime library that supports various VR glasses like the Oculus Rift, HTC Vive and the Windows Mixed Reality. In order to use OpenVR you need to create an account with Steam. After you have installed SteamVR, you need to install the runtime library separately.

Status display
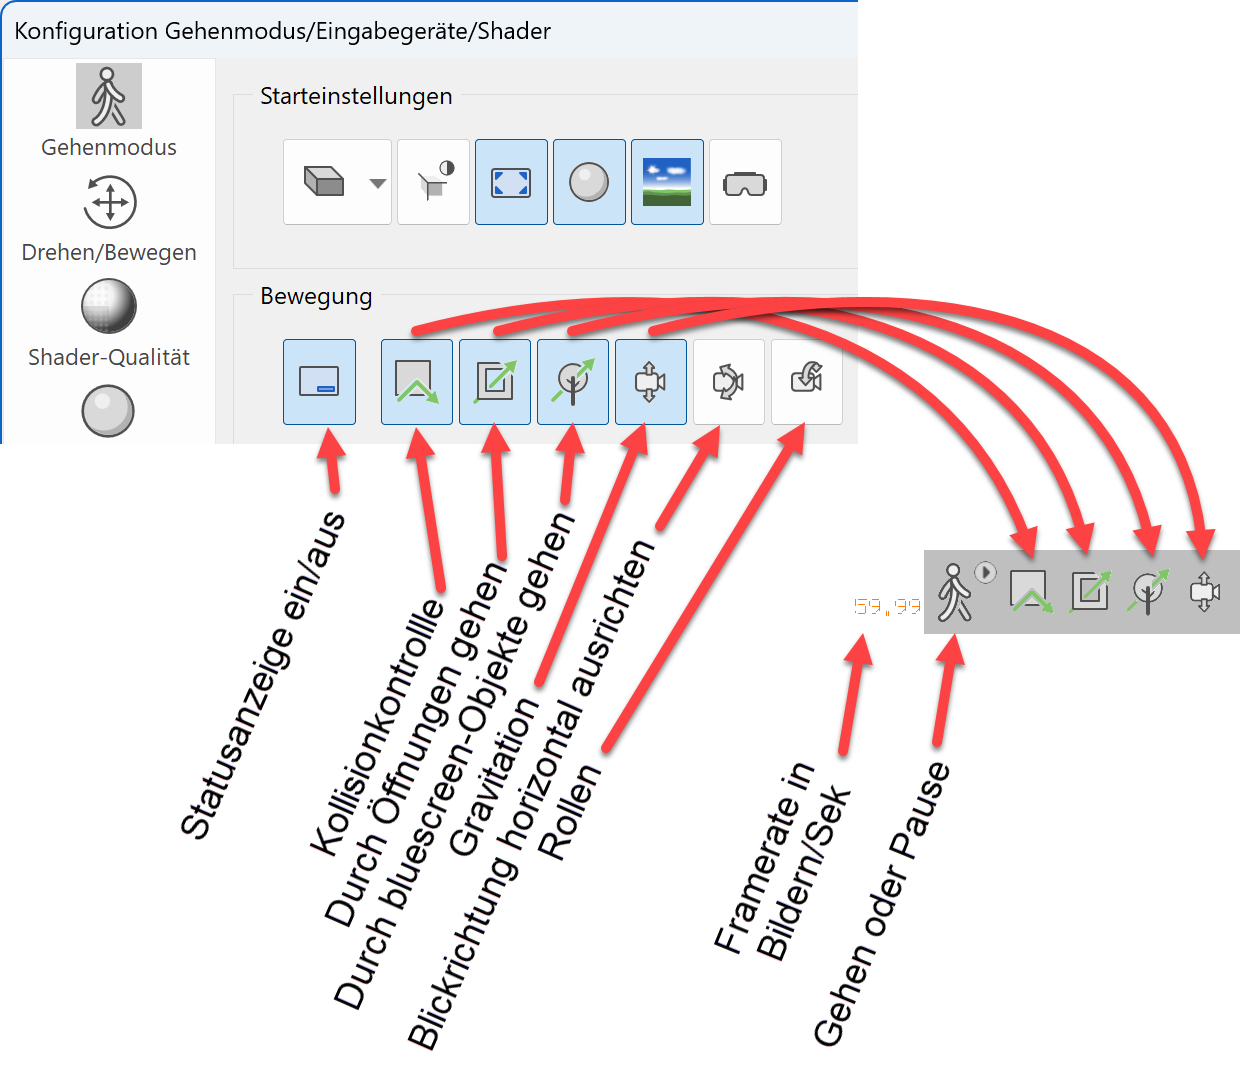
When the walking-mode is enabled, there is an optional transparent status bar at the lower part of the display. It features various indicators about which state you are currently in and which options are active.

Context menu disc
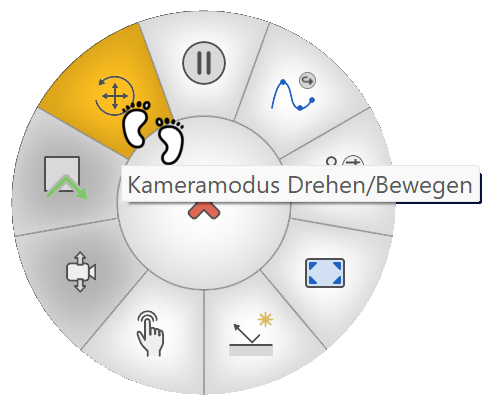
The context menu takes on a different form while in walking mode. The functions can be added or removed as tiles for quick selection. This disc-form is designed to simplify the use of a gamepad or VR experience while not hampering keyboard and mouse operation.
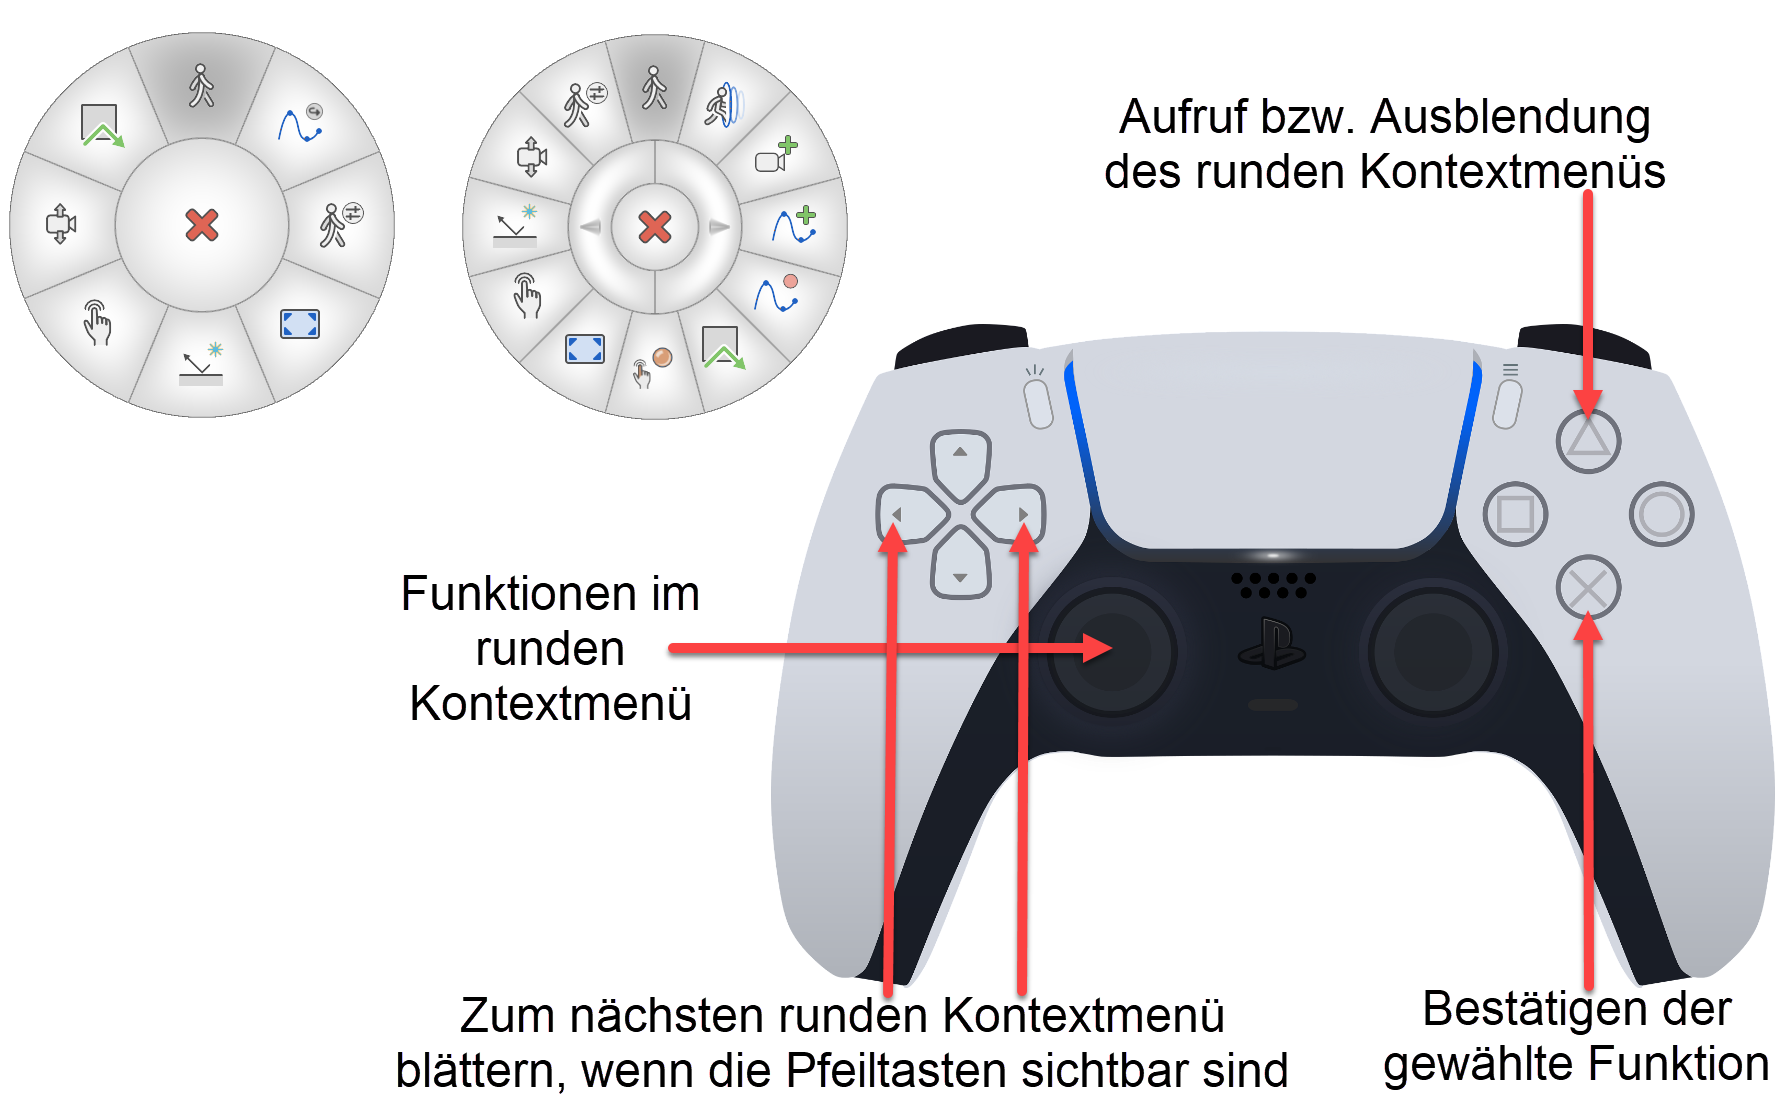
The normal context menu can also be called up using a function tile of the context menu disc.

Sensitivity
The camera features freely configurable eye height as well as opening angles. The sensitivity of linear movements and rotations can be configured as well.

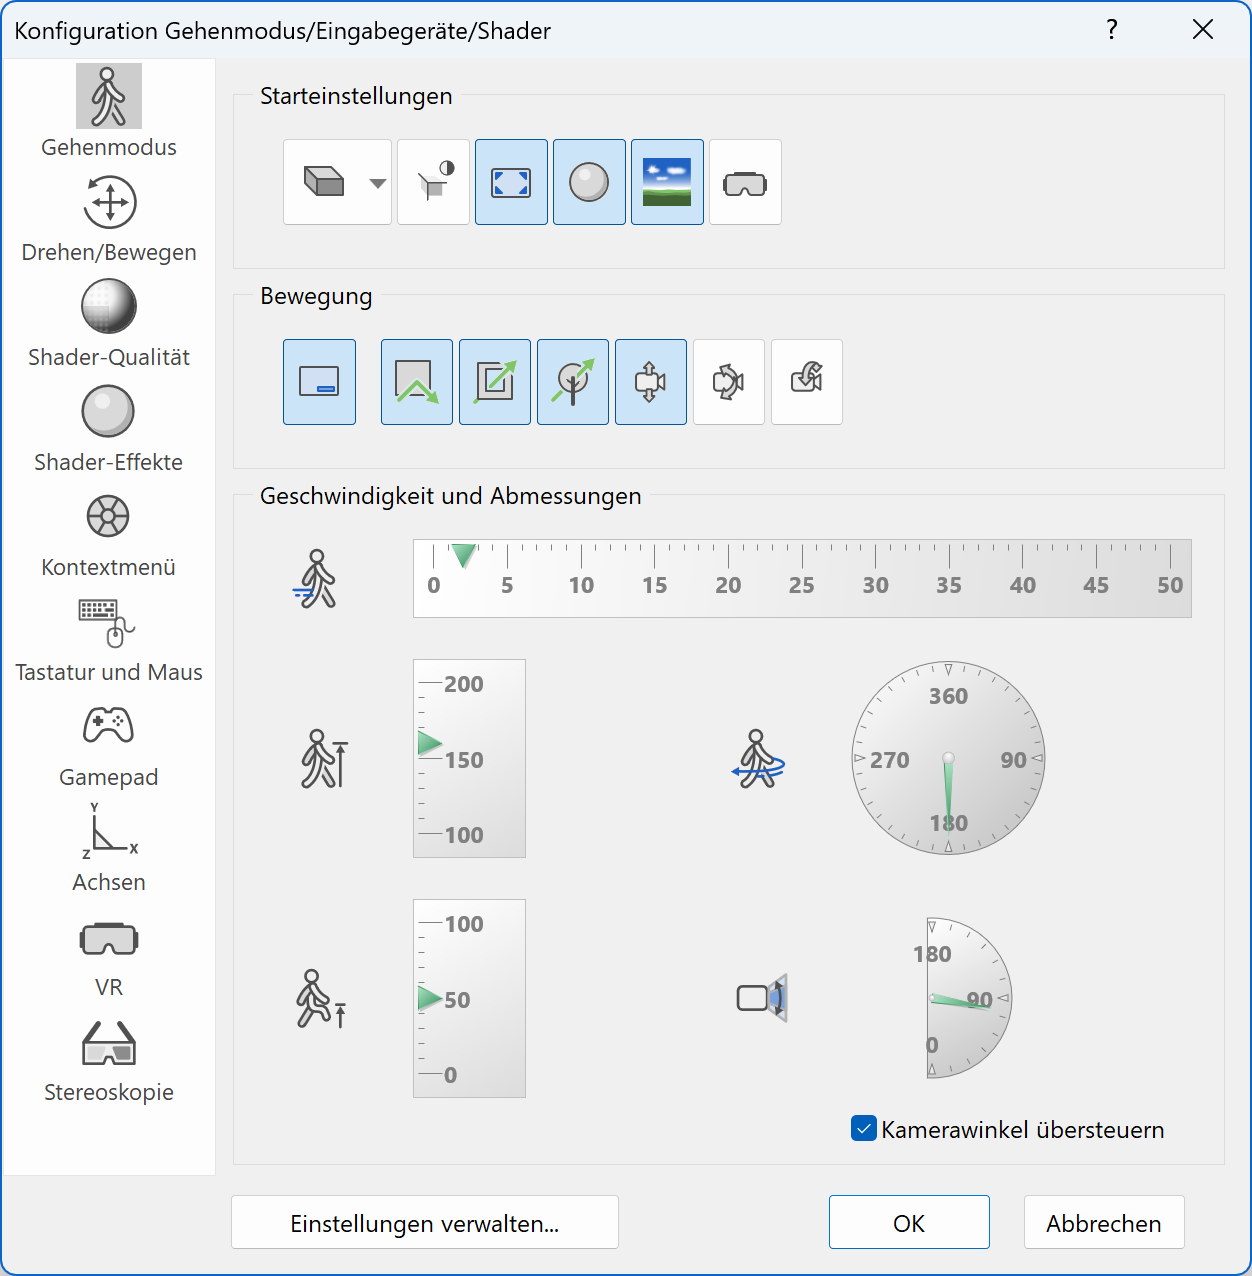
Start settings
Upon activation of the walking mode, various presets enable an easy and comfortable start. You have the ability to switch on shading, insert 360° panorama views, switch to full screen mode or activate the 3D-glasses.

Speed
![]()
Additional functions, which can be mapped to the gamepad allow for a change of movement. For instance, one can run faster or move more slowly.
Walking with keyboard and mouse
Workshop
In this workshop, we will learn how to walk using the keyboard and mouse. The advantage of these devices is that every user is familiar with them and there is no need to buy new devices. The disadvantage is that many useful functions cannot be used with keyboard and mouse.
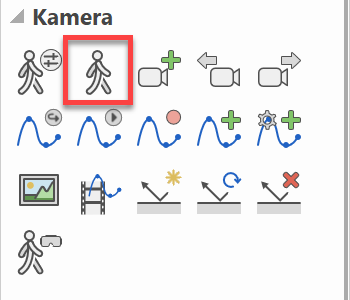
In order to get started we have to configure some settings by opening the CONFIGURATION WALK MODE dialog from the toolbar CAMERA.
-
Please verify that your configuration looks like the one shown in the screenshot. In case you have different settings, please adapt them to match the standard settings.
-
Confirm the dialog with
 and start the WALKING MODE from the toolbox.
Your camera is placed into the scene and first you might fall to the bottom until the next active storey because of the gravity.
-
Now use the keys W - A - S - D and left Shift to navigate to the beginning of the street and look towards the street.

When you are in full screen mode, you have two orientation points that give you some information about the currently active settings and the location. On the one hand, there is a hair cross in the centre of the screen, which shows you the viewing and walking direction. On the other hand, there is a status view of the current settings in the bottom right corner of the screen.
This status bar shows the following information if they are active:
-
Now walk alongside the street past the house. At the end, turn around and walk back to the staircase. Walk up the stairs and around the house. Afterwards walk up the stairs to the first floor and enter the house via the balcony. You will realise that it is possible to pass through doors and windows (depending on the settings). That way you can reach all the rooms.
Use the following keys to navigate:
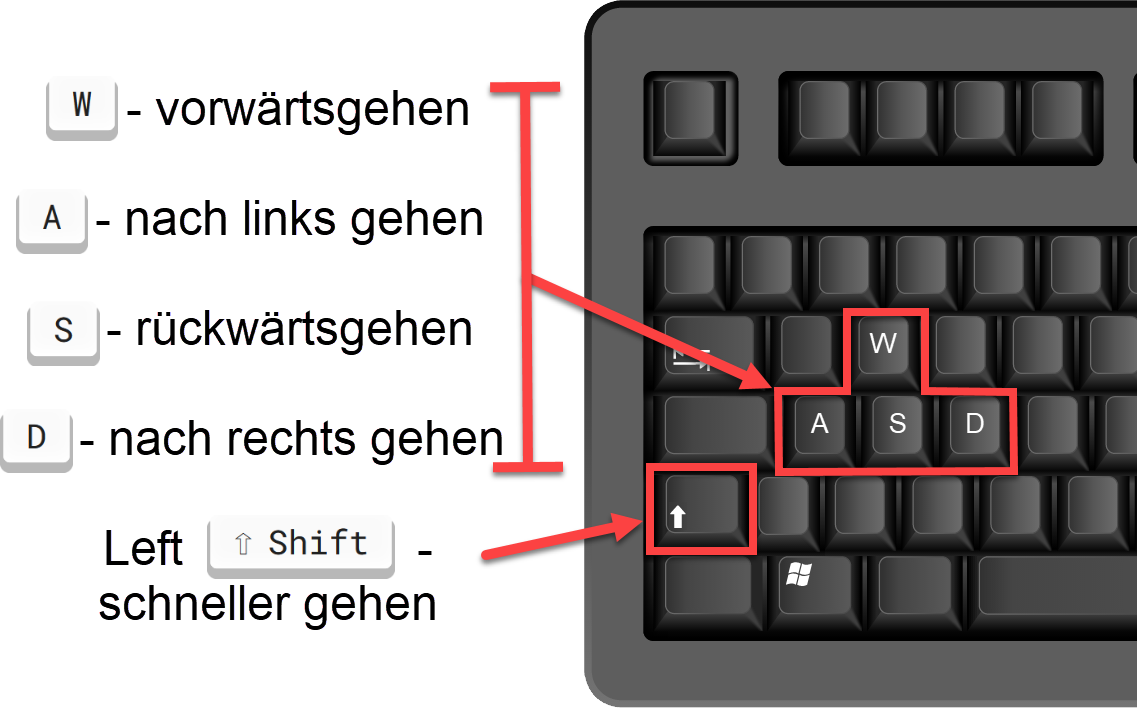
The walking direction, which corresponds to the viewing direction, is controlled via the mouse.
-
Walk in and around the house until you are familiar with the controls.
In order to leave the walking mode, open the menu by performing a right click on the screen. Select CAMERA MODE ROTATE/MOVE or after opening the context menu you can move outside the graphics screen and click the WALKING MODE ON/OFF icon
 either in the camera toolbar or below in the image properties bar.
This will open the following query, where we select the corresponding option.
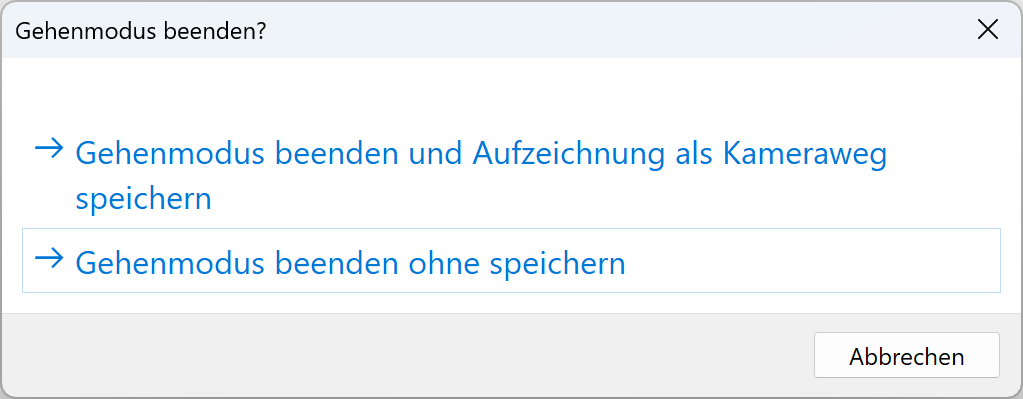
Afterwards you can choose which position should be loaded when you return to the model.
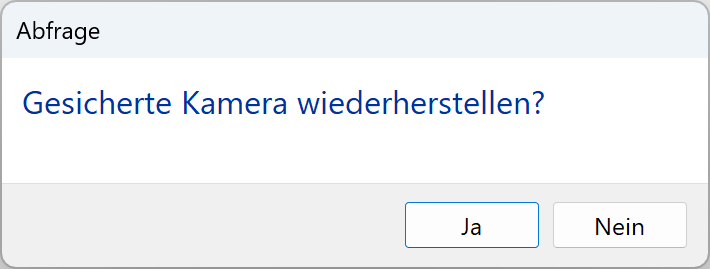
After the confirmation, we are back in CAD mode. The stored camera position is the last active camera in the CAD mode before entering the WALKING MODE. If this query is answered with NO, then the current position stays active.
Walking with gamepads
Workshop
In this workshop, we will practice walking with gamepads. This input device is more efficient and intuitive and provides many additional functions, which cannot be accessed using the mouse and keyboard option.
-
First, we have to check some configurations and maybe make alterations. Open the CONFIGURATION WALK MODE dialog from the toolbar CAMERA.
-
Before we can start, we need to connect the controller to the PC. This can be done by pressing and holding the PlayStation button for several seconds. Once connected, please verify whether your settings correspond to the settings shown in the screenshots below. In case they do not match, please adjust them accordingly.
Confirm the parameter dialog with
switch to WALKING MODE using the toolbar.
Your camera is placed into the scene and first you might fall to the bottom until the next active storey because of the gravity.
-
Now use the joysticks and the button L1 to navigate to the beginning of the street and look towards the street.
-
Now walk along the street past the house. At the end, turn around and walk back to the staircase. Walk up the stairs and around the house. Afterwards walk up the stairs to the first floor and enter the house via the balcony. You will realise that it is possible to pass through doors and windows (depending on the settings). That way you can reach all the rooms.
We can use the following buttons to move around:
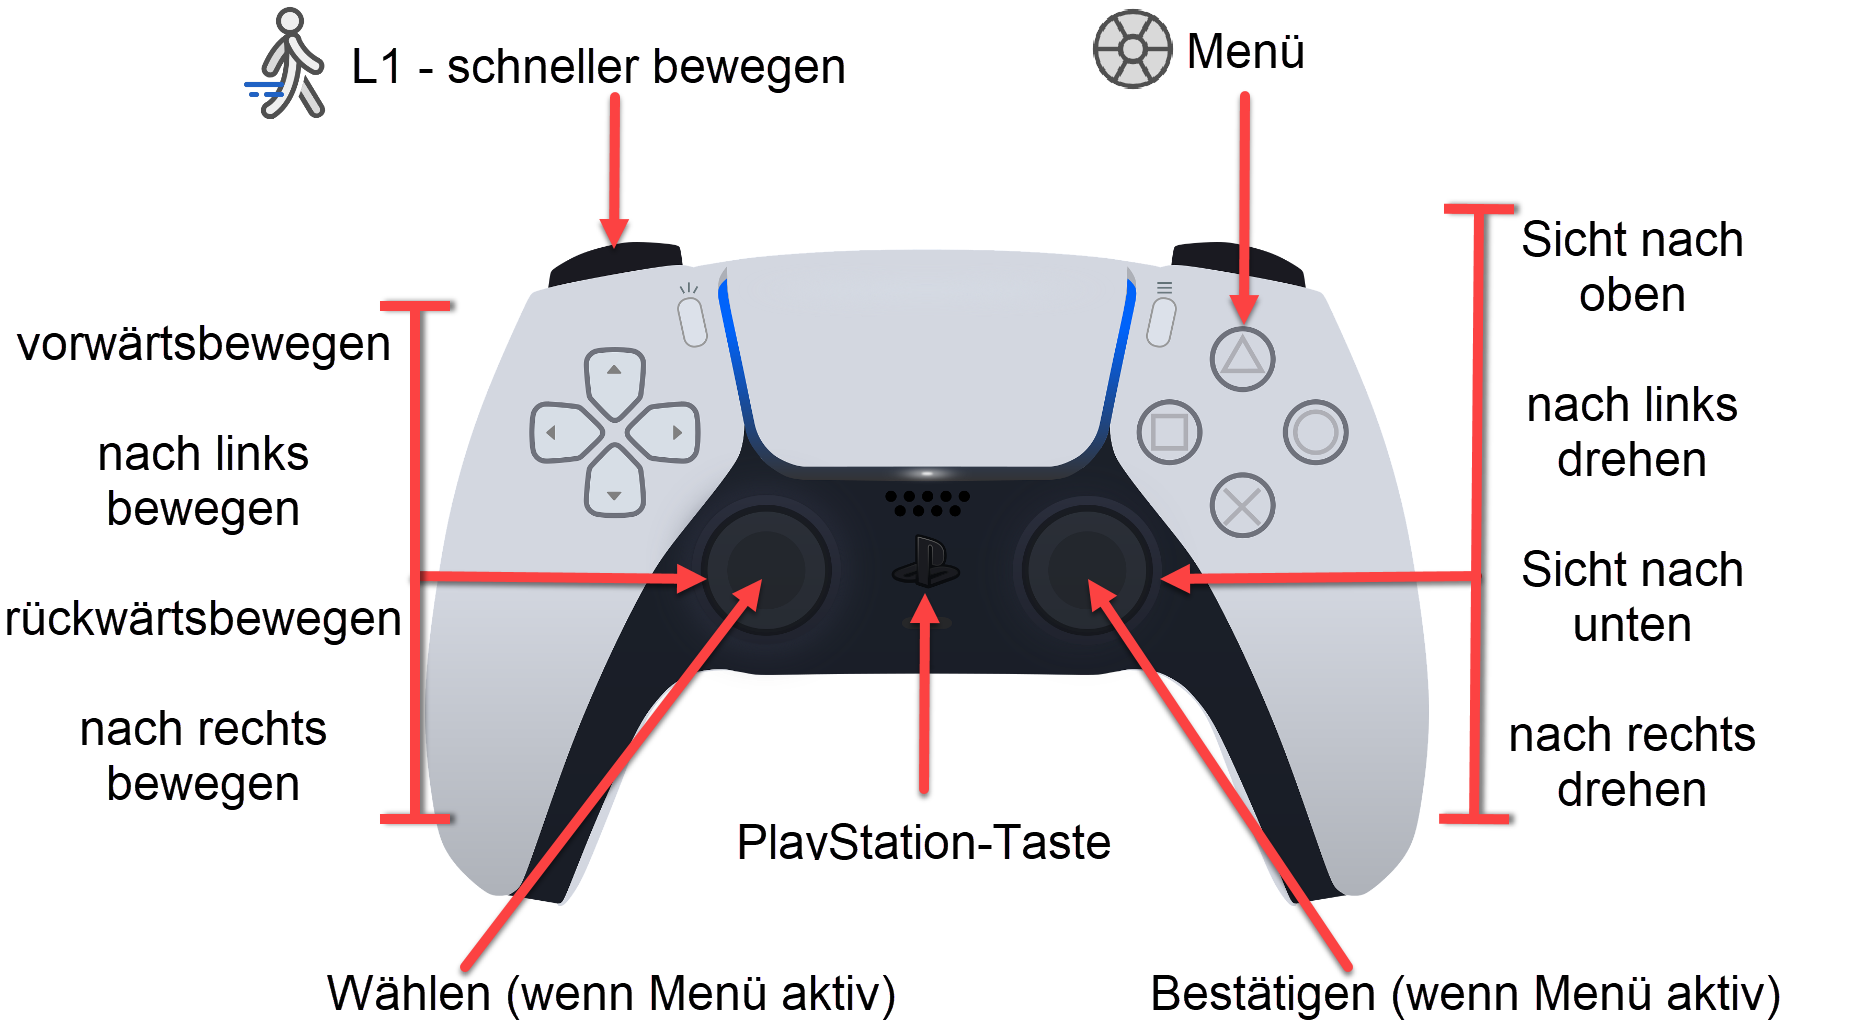
It is important to note that, in contrast to the keyboard, the amount of movement of the joystick controls the speed of the movements. This means, if the joystick is moved to the maximum, the speed will be much higher, than if it is moved just a little bit. Furthermore, it is possible to move both joysticks at the same time, which for instance allows moving forwards and at the same time changing the viewing direction.
-
Now move around the model until you are familiarised with the navigation.
In order to leave the walking mode, open the menu by performing a right click on the screen. Select CAMERA MODE ROTATE/MOVE.
This will open the following query, where we select the corresponding option.
Afterwards you can choose which position should be loaded when you return to the model.
After the confirmation, we are back in CAD mode. The stored camera position is the last active camera in the CAD mode before entering the WALKING MODE. If this query is answered with NO, then the current position stays active.
Tip
In order to switch to camera mode MOVE/ROTATE you can also open the menu with the gamepad. After the first query, you need to use the mouse to confirm.
Note
Sincere there are countless devices that can be used with ELITECAD, it is not possible to cover the installation of every single device in this course. Please make sure your device is properly installed and works correctly on your system. In case of questions, please contact your IT support.
In the scope of this course, we will work only with PlayStation 5 controllers because it is the most efficient input device for this purpose.