Fillet Surfaces
Fillet surfaces
|
|
Fillet toolbar |
| Modify menu > Fillet surfaces > Fillet |
This function can be used to fillet a surface with as many surfaces as you wish.
The following queries appear after activating this function:
Fillet radius?
The desired radius is entered in user units.
Associative? (Y/N)
If this query is responded to with "N", the surfaces are trimmed and filleted. The fillet surface is created as a separate definition. The radius can no longer be changed. If "assoziativ" is selected, the surfaces involved are combined into one object. This object also has the fillet surface. There is an association with the starting surfaces, so that each change results in the fillet also being recalculated. The fillet radius can be changed in the property bar.
Fillet which surface?
Now select the surface to be filleted by clicking on it. For surfaces that intersect each other, there are four options for filleting. The position of the surface points clicked determines the position of the fillet surface. Filleting happens in the direction of the points.
Fillet using which surface? (enter = End)
Now you can select other surfaces to be filleted by clicking on them. Once all surfaces are selected, this function is closed with Enter .
note
At least two surfaces must be specified, otherwise the message Only one surface was specified! appears.
If it is not possible to fillet the surfaces, the message Filleting cancelled appears.
Tip
Delete filleting:
If the fillet was created associatively, it can be removed again using the 3D DELETE function. Otherwise, it is restored when the fillet surface is deleted.
Associative filleting:
Changes to the starting surface can only be correctly recalculated if no additional surfaces are affected by the filleting.
If a surface is filleted with several other surfaces, you must make sure that these surfaces connect to each other tangentially in the fillet area.
Workshop
Fillet surfaces
First, draw a circle with a radius of 100 cm and use it to define a box. The exact description can be found in the workshop DEFINE BOX.
 |
 |
Select the FILLET SURFACES function
Fillet radius?
Enter the value 50cm and confirm with Enter .
Associative? (Y/N)
Confirm with "Y" Enter .
Fillet which surface?
Click on the lateral surface with your mouse.
Fillet using which surface? (enter = End)
Click on the top surface and end the function with Enter .
|
 |
Trim surfaces
|
|
Fillet toolbar |
| Modify menu > Fillet surfaces > Trim |
This function can be used to trim a surface with as many surfaces as you wish.
The following queries appear after activating this function:
Associative? (Y/N)
If this query is responded to with N, the surfaces are trimmed. This process can no longer be changed. If "associative" is selected, the surfaces involved are combined into one object. There is an association with the starting surfaces so that each change results in the trim also being recalculated.
Trim which surface?
Now select the surface to be trimmed by clicking on it – it is then coloured magenta.
For surfaces that intersect each other, there are four options for trimming. The section curve splits each surface into two halves. The surfaces must be clicked on each side that is to remain after the operation.
Trim using which surface? (enter = End)
Now you can select other surfaces to be trimmed by clicking on them. Once all surfaces are selected, this function is closed with Enter . The result is that the surfaces are trimmed and the section curve displayed.
note
At least two surfaces must be specified, otherwise the message Only one surface was specified! appears.
If it is not possible to trim the surfaces, the message Trimming cancelled appears.
Tip
Delete trimming:
If the trimming operation was created associatively, it can be removed again using the 3D DELETE function. Otherwise, it is restored when the section curve is deleted.
Workshop
Trim surfaces
First draw an extrude and a slanted surface over three points. The exact description can be found in the workshops DEFINE EXTRUDE and DEFINE SURFACE.
 |
 |
Select the TRIM SURFACES function.
Associative? (Y/N)
Confirm with "Y" Enter .
Trim which surface?
Click on the outer edge of the slanted surface.
Trim using which surface? (enter = End)
Click on the base edge of the extrude and end the function with Enter .
|
 |
Chamfer surfaces
|
|
Fillet toolbar |
| Modify menu > Fillet surfaces > Chamfer |
This function can be used to chamfer a surface with as many surfaces as you wish.
The following queries appear after activating this function:
Chamfer distance?
The desired distance is entered in user units.
Chamfer angle? (0:symmetric)
The desired angle is entered in user units.
Associative? (Y/N)
If this query is responded to with N, the surfaces are trimmed and chamfered. The chamfer surface is created as a separate definition. The chamfer distance can no longer be changed. If "associative" is selected, the surfaces involved are combined into one object. This object also has the chamfer surface. There is an association with the starting surfaces, so that each change results in the chamfer also being recalculated. The chamfer distance can be changed in the property bar.
Chamfer which surface?
Now select the surface to be chamfered by clicking on it. For surfaces that intersect each other, there are four options for chamfering. The position of the points clicked on the surfaces determines the position of the chamfer surface. Chamfering happens in the direction of the points.
Chamfer using which surface? (enter = End)
Now you can select other surfaces to be chamfered by clicking on them. Once all surfaces are selected, this function is closed with Enter .
note
At least two surfaces must be specified, otherwise the message Only one surface was specified! appears.
If it is not possible to chamfer the surfaces, the message "Chamfer cancelled" appears.
Tip
Delete chamfer:
If the chamfer was created associatively, it can be removed again using the 3D DELETE function. Otherwise, it is restored when the chamfer surface is deleted.
Workshop
Chamfer surfaces
First, draw a circle with a radius of 100 cm and use it to define a box. The exact description can be found in the workshop DEFINE BOX.
|
|
Select the CHAMFER SURFACES function.
Chamfer distance?
Enter the value 50cm and confirm with Enter .
Chamfer angle? * (0:symmetric*)
Enter the value 50 and confirm with Enter .
Associative? (Y/N)
Confirm with "Y" Enter . Chamfer which surface?
Click on the lateral surface with your mouse.
Chamfer using which surface? (enter = End)
Click on the top surface and end the function with Enter .
|
 |
Section curve
|
|
Fillet toolbar |
| Modify menu > Fillet surfaces > Section curve |
This function can be used to section a surface with as many surfaces as you wish and then calculate their intersection lines.
The following queries appear after activating this function:
Associative? (Y/N)
If you respond to this query with "N", the surfaces are retained and the section curve is created in a new model. This process can no longer be changed. If "associative" is selected, the surfaces involved are combined into one object. There is an association with the starting surfaces, so that each change results in the section curve also being recalculated.
Section which surface?
Now select the surface to be sectioned by clicking on it.
Section using which surface? (enter = End)
Now you can select other surfaces to be sectioned by clicking on them. Once all surfaces are selected, this function is closed with Enter .
note
At least two surfaces must be specified, otherwise the message Only one surface was specified! appears.
If it is not possible to section the surfaces, the message Interection cancelled appears.
| Example: | ||
|---|---|---|
 |
 |
 |
Trim/Fillet
|
|
Fillet toolbar |
| Modify menu > Fillet surfaces > Trim/Fillet |
This function can be used to:
Fillet a surface with as many surfaces as you wish. There are several options from which to choose the most appropriate action.
Trim a surface with as many surfaces as you wish. This is also possible with an offset.
note
At least two surfaces must be specified, otherwise the message Only one surface was specified! appears.
If it is not possible to trim/fillet the surfaces, the message Trim/Filleting cancelled appears.
Tip
To trim a surface with an offset, a radius must be specified and the FILET option switched off.
If a surface is filleted with several other surfaces, you must make sure that these surfaces connect to each other tangentially in the fillet area.
The following queries appear after activating this function:
Please click on the surface in the 3D view [ Enter = calculate]
Now select the desired surface by clicking on it.
The following parameter window appears:
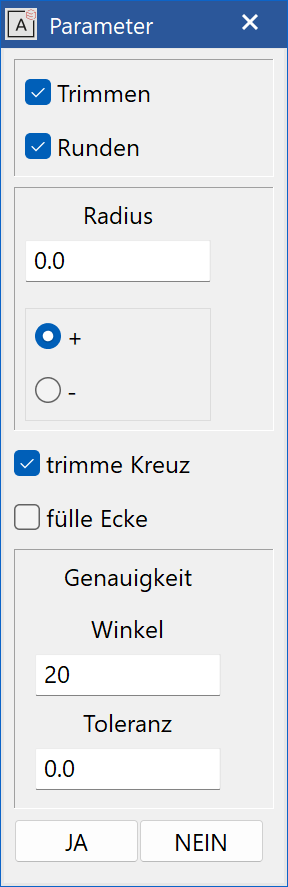
Trim:
The selected surface is trimmed.
Fillet:
A new surface with the specified radius is added to the selected surface. If neither option (trim/fillet) is checked, the selected surface remains unchanged.
+/-:
This switch indicates the direction of the radius. "+" indicates the positive normal vector direction.
Trim cross:
If this option is activated, the crosshair is used to determine which surface sections are trimmed away. Otherwise, these surface sections are the sections that are retained. This check box only takes effect in combination with trimming.
Fill corners:
If this option is activated, the fillet surface is continued up to the edge of the first surface.
Precision:
The values set here for level and tolerance should not be changed.
Angle:
The smaller the angle, the more precise the render (time!)
Tolerance:
Precision for the transition of the fillet surfaces (in user unit)
The value set apply to the selected surface. If the surface that has turned magenta is the desired surface, click the YES button. However, if the magenta surface is not the desired surface, click the NO button.
Please click on the surface in the 3D view [ Enter = calculate]
Now you can select another surface. (As described above)
Once all surfaces are selected, this function is closed by pressing Enter following the query Please click on the surface in the 3D view [ Enter = calculate].
The selected surfaces are then trimmed and/or filleted.
| Example: | |
|---|---|
 |
 |
Variable trim/fillet
|
|
Fillet toolbar |
| Modify menu > Fillet surfaces > Variable fillet |
This function can be used to:
Fillet a surface with as many surfaces as you wish. There are several options from which to choose the most appropriate action.
Trim a surface with as many surfaces as you wish. This is also possible with an offset.
note
At least two surfaces must be specified, otherwise the message Only one surface was specified! appears.
If it is not possible to trim/fillet the surfaces, the message Trim/Filleting cancelled appears.
Tip
To trim a surface with an offset, a radius must be specified and the FILET option switched off.
If a surface is filleted with several other surfaces, you must make sure that these surfaces connect to each other tangentially in the fillet area.
The following queries appear after activating this function:
Please click on the surface in the 3D view [ Enter = calculate]
Now select the desired surface by clicking on it.
The following parameter window appears:
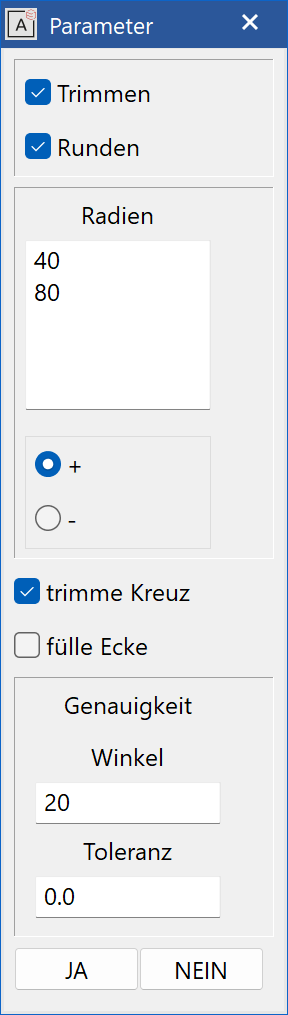
Trim:
The selected surface is trimmed.
Fillet:
A new surface with the specified radius is added to the surface selected. If neither option (trim/fillet) is checked, the selected surface remains unchanged.
Radii:
Several radii (in user units) can be entered here. It is only possible to enter one radius per row.
+/-:
This switch indicates the direction of the radius. "+" indicates the positive normal vector direction.
Trim cross:
If this option is activated, each part area on which the crosshair is located is trimmed. Otherwise, these part areas are retained. This check box only takes effect in combination with trimming.
Fill corners:
Currently not supported
Precision:
The values set here for level and tolerance should not be changed.
Angle:
The smaller the angle, the more precise the render (time!)
Tolerance:
Precision for the transition of the fillet surfaces (in user unit)
The values set apply to the selected surface. If the surface that has turned magenta is the desired surface, press the YES button. However, if the magenta surface is not the desired surface, press the NO button.
Please click on the surface in the 3D view [ Enter = calculate]
Now you can select another surface. (As described above)
Once all surfaces are selected, this function is closed by pressing Enter following the query Please click on the surface in the 3D view [ Enter = calculate].
All curves with constant radii are then displayed on the screen, and the following query appears:
Please click points on the guide curve [ Enter = calculate]
Now indicate all points, in the desired order, on the curves displayed by clicking on them. Each individual point is checked with the query "This point?" and confirmed with "Y/N". Press Enter to end the selection of points.
Please enter interpolation type
0 → point
1 → tangent
2/3 → radius
The interpolation type must be specified here by entering the corresponding numbers.
Point: Points are connected by lines.
Tangent, Radius: Points are connected by flat curves.
| Example: | |
|---|---|
 |
 |
Invert trimming
|
|
Fillet toolbar |
| Menü Ändern > Verrunden > Invert Trimming |
This function can be used to select the remaining surface (inverse surface). This means that this function saves you from having to redefine incorrectly trimmed surfaces.
The following queries appear after activating this function:
Please click on the surface in the 3D view
Now select the surface to be trimmed by clicking on it – it is then coloured magenta.
Invert surface?
If the surface that has turned magenta is the desired surface, confirm the query with "Y" Enter . However, if the magenta surface is not the desired surface, respond to the query with "N" Enter . In this case, the query Please click on the surface in the 3D view. This cycle is continued until positive confirmation is received for the query Invert surface?.
Then the desired surface is inverted.
| Example: | |
|---|---|
| Incorrectly trimmed surface | Inverted trimming |
 |
 |
Blend corner
|
|
Fillet toolbar |
| Modify menu > Fillet surfaces > Blend corner |
This function is used to fillet three converging fillet surfaces.
The following queries appear after activating this function:
Please click on the surface in the 3D view
Now select a fillet surface by clicking on it. The selected surface is then coloured magenta.
This surface?
If the surface that has turned magenta is the desired surface, confirm the query with "Y" Enter . However, if the magenta surface is not the desired surface, respond to the query with "N" Enter . In this case, either the query Please click on the surface in the 3D view appears again, or if several surfaces are possible, the next is proposed. This cycle is continued until positive confirmation is received for the queries This surface?.
Then the blend corner is created.
| Example: | |
|---|---|
 |
 |