Glass elements
|
|
Construction parts toolbar |
| AR Objects menu > Glass element |
The advantage of the window glass element is that a glass element does not require a wall.
This creates the option of constructing glazing anywhere in the room for all variation options, or whole glass facades or conservatories. It is preferable, however, to create glazed roofs with the ROOF function, as these separate the volume (important for volume calculations for rooms).
Workshop
Create glass element
START GLASS ELEMENT function.
![]()
Set the entry mode in the property bar to "Draw roof contour manually".
![]()
Now draw the glass element's axis. Later you will define whether this is the outer or inner side.
To end entry, click again on the last point.

Now define the direction in which the glass element should be drawn. Move the mouse from one side to the other. One you have reached the correct position, confirm by left-clicking.
Keep in mind that the glass element thickness is always modified from the axis outwards.
Contour exterior

Contour inside

Confirm the position by left-clicking

Once the direction is confirmed, the glass element is created and a dialog window opens for the window division of the first part.
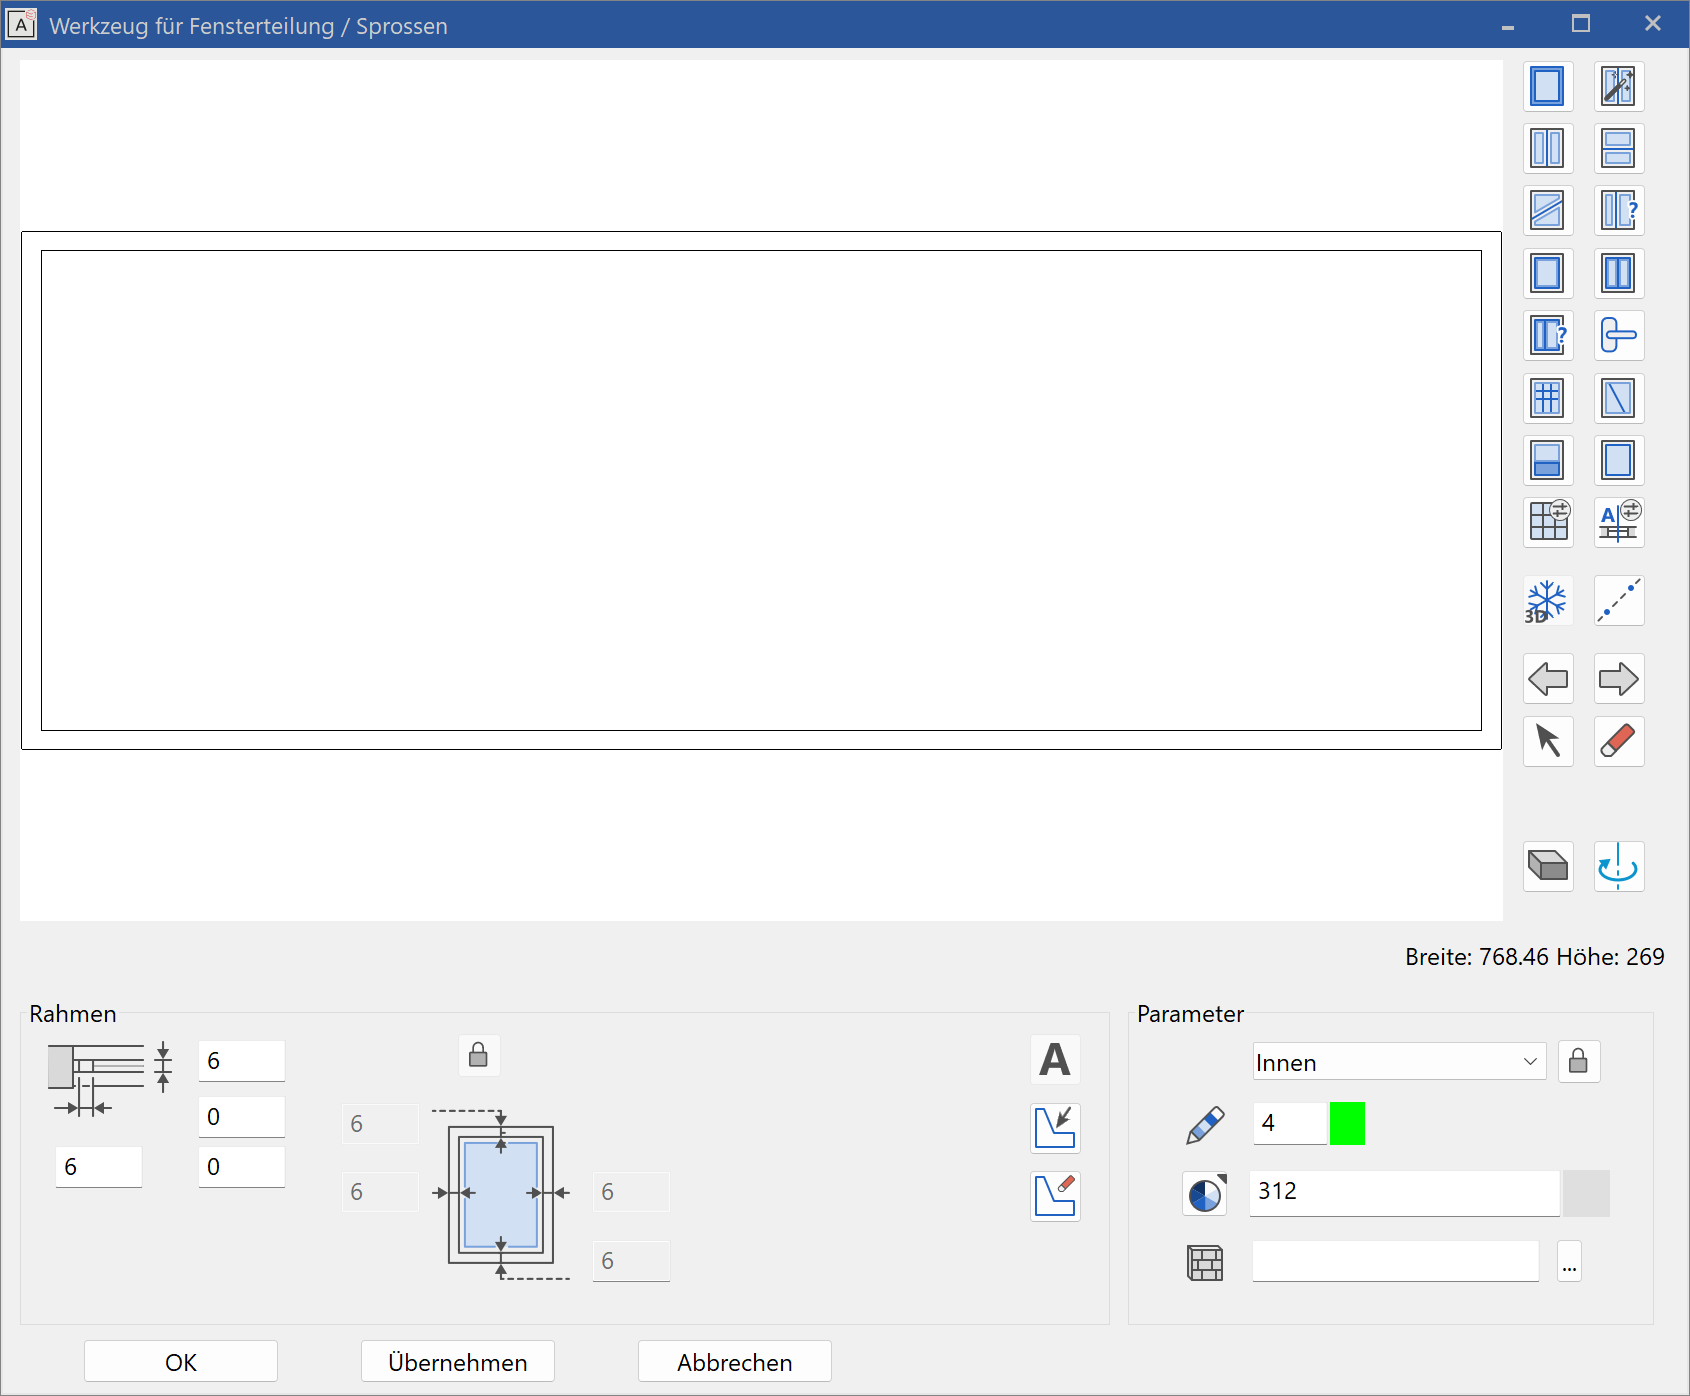
Enter the properties for the frame: dimensions, colour properties. You can also make adjustments by clicking on the glass parameter ( ![]() ). You can return to the frame properties with the control arrows (
). You can return to the frame properties with the control arrows ( ![]()
![]() ).
).
In each case, do not forget to click the  button to adopt the settings.
Alternatives to glass element
Window
For perpendicular, rectangular constructions, the window can have advantages over the glass element in many areas.
A wall must be drawn with the length, height and thickness of the frame. Then a window without a stop is set with depth 0.
Advantages:
Roll blinds and window sills can also be set.
The corner window also has additional settings options in corner areas.
Roof
The roof construction can also be used for glass construction by setting transparency for the 3D colour. The position of the supporting construction can be more precisely determined with the truss elements (rafters, etc.).
Glass element property bar

The property bar is visible as soon as the CREATE GLASS ELEMENT function is launched or if an existing glass element is edited.
You can manipulate the main values in the glass element's property bar.


Entry mode
Draw roof contour manually
![]()
The Input Assistant offers the drawing options LINE, POLYGON, RECTANGLE, ARC, CIRCLE, ELLIPSE and SPLINE. The circle is always a lying glass element.
Define using existing contour
![]()
First, you must draw a contour that follows the desired shape, with a circle always generating a lying glass element. After setting the contour, you must define the position of the axis with the cursor.
Height reference
Choosing the correct height reference simplifies entry and has advantages for later modifications to the structure settings.
Height reference – Lying
![]()
The glass element is created as lying and requires a closed contour.
This height reference is used automatically if the work plane does not correspond to the storey plane.
Height reference – Free height reference
![]()
The lower edge and height of this glass element can be freely defined.
Height reference – From floor to ceiling
![]()
The glass element begins at the top side of the slab and goes up to the underside of the ceiling. You can save the effort of entering heights, as this glass element is always oriented to the structure settings.
Height reference – From underside floor to ceiling
![]()
The glass element begins at the underside of the slab and goes up to the underside of the ceiling. You can save the effort of entering heights, as this glass element is always oriented to the structure settings.
Height reference – To ceiling
![]()
The glass element is oriented with its top edge to the storey ceiling. The bottom edge can be freely configured and references the top edge of the slab.
Height reference – From floor
![]()
The glass element starts from the upper edge of the slab and is defined with any height starting at that marker.
Height reference – From floor underside
![]()
The glass element starts from the lower edge of the slab and is defined with any height starting at that marker.
Edit glass element
Glass elements can be edited and modified at any time by double-clicking them. All detail settings can be modified at a later point.
Tip
After selecting the glass element, click on a handle or gripper of the contour to access manipulation functions directly in a toolbar or by using Tab with the cursor.