Room
|
|
Construction parts toolbar |
| AR Objects menu > Room |
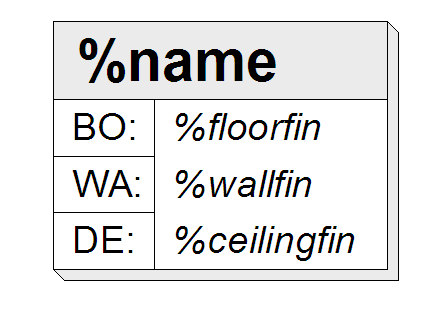
The room label creates the room label block in the floor plan, but also a floor and the materials for walls, floors and ceilings for the report.
In order for the room to be placed automatically, there must be a surrounding room-limiting area. Walls with doors and windows, glass elements, columns, chimneys and room separators are room-dividing borders.
Room property bar

The property bar is visible as soon as the ROOM function is launched or if an existing room is edited.


Room parameters


General parameters
 Renovation planning state
 Freeze
 Type
Type Layer
Layer
The general parameters for architectural objects are described in chapter Architecture objects.
Name
Name of the room
Unit
Several rooms are compiled into one unit. In residential construction, this unit would be a flat, and in the commercial sector, a rental unit.
Section
A combination of several accommodation units within a structure or a separation of different uses e.g. office, production, sales, residential
Number
Room number
Util. type (Switzerland/Austria) Area type (Germany)
Areas according to standard (e.g. MUA main usage area)
Austria: ÖNORM B1800 (Austrian Standards Institute), Section 4.3 Net surface area
Switzerland: SIA 416, Section 2.1 Net storey area and section 3.1 Exterior net storey area
Germany: DIN 277-2, table 1 (net floor areas) (e.g. NF1)
Area type (Switzerland/Austria) Range (Germany)
Boundary type of the rooms for the report.
For Austria, the field "Area type" of the range according to ÖNORM B 1800, section 4.1.1 (a, b or c) is used.
Germany: according to DIN 277, section 3.1.1 (a, b or c)
Usage type (only Germany)
According to DIN 277-2, up to 3 places
Area type
In addition to the "normal areas", there are special areas, which must be declared for a correct report. This includes an air space, exterior room, courtyard, stairwell, or whether the plane counts as a construction surface according to ÖNORM B 1800, DIN 277, SIA 416.
Infill hatch
In order to show the assignment (unit 1, 2, etc. or use of wet rooms) of rooms in different colours in the plan, an infill hatch can be assigned from the room property bar.
Room infill hatches can also be switched on or off as desired when using the views. The Room hatches check box in the Modify view function in the context menu for the specific view allows for the hatch to be set individually per view.
Max. room height
Room height, according to the standards ÖNORM B 1800, DIN 277 and SIA416, which is definitive for the net volume. A 3D surface is created at this height using the QUANTIFY function.
Proportion of living space
The field is provided for verifying the living space. The permissible proportion of the surface is entered in percent, which includes the surface for living space according to the standard. Germany: Living spaces ordinance (WoFIV).
If no value is entered, 100 % living space is assumed for the report.
Deduction for plaster (only Germany)
The deduction for plaster in % is no longer permissible according to the living spaces ordinance (WoFlV), but can be used for comparative purposes.
Apply free contour
![]()
A previously drawn 2D contour can be defined as a room contour. Walls or room separators do not necessarily need to be present. This function is used if the basis is a 2D plan, but the room areas should be calculated.
Modify free contour
![]()
If an individual contour is used as a room contour, the room has grippers and handles along the contour during editing. The contour can be modified with polygon manipulations, or the function MODIFY FREE CONTOUR is used at the end of the property bar, which reduces the room back to a 2D contour, which can be edited. To complete the function, you must click the ROOM CONTOUR READY button. This appears on the dialog window at the top right.

Materials
The names of materials are always directly "connected" to the respective component for the dimension report. The "dimension" of a wall can therefore be identified by its geometric data and its material label.
However, the report of plaster surfaces, for example, cannot simply be linked with a wall component, as surfaces must be deducted from abutting walls. Therefore, the "room skin", i.e. all material layers, which are shown in the room (namely the difference from bare construction to extension) are assigned to the room.
The name "TILES" can be assigned to the material for the floor, and e.g. "PLASTER" for the walls and ceiling with its respective thickness. For the surface of a drywall, "PAINTED" will suffice with thickness "0", as the plasterboard layer belongs to the wall and should not be included in the calculation.
Tip
The names of materials entered can be saved individually or deleted again.
![]()
![]()
Colour mode/material mode
![]()
![]()
This switch allows you to toggle between colour mode and material mode. For more details, see the Colours and Materials chapters.
Explanation
For the construction parts wall, column and slab, for the colour or material selection there is a button which specifies whether the material for room label is shown or not.

If the lock is not set (open lock), the material configured in the room parameters takes precedence. However, if the lock is set (lock closed), the material of the respective construction part is displayed and not that of the room label. This setting has no effect on the report.
Floor thickness
The thickness of the floor can also be controlled using the height reference.
Height reference active
![]()
If the height reference is active, the thickness of the floor is calculated from the height section of the structure settings and cannot be adjusted in this dialog window. In general, this option should be selected, as this is the only way to make a global modification in the structure settings.
Height reference free
![]()
The free height reference is used if a floor of the storey has another composition (e.g. cement layer instead of a subfloor/screed).
Tip
The floor thickness, which can be defined in the room dialog window, influences the parapet heights/lintel heights of windows and doors insofar as these have been entered as a finished parapet, finished clearance or lintel (gross) from FFL. The higher floor composition is always used for doors (not the opening side!). If no room name is available when placing, the (finished) floor level defined in the structure settings is taken into account.
In the case of library parts defined as furniture, the 3D information about the height of the floor composition is moved in the Z-direction.
Parameters for floor construction
![]()
The floor construction with its own layers can be specified in the parameter.
Thickness of wall covering

The thickness of the wall finish can be defined. This layer is not shown in the design model, but is only relevant in the report (wall finish, living spaces). In active linkage (red lock), each wall side of the room is checked for the substructure material, and if the material is stored in the report database, use the corresponding thickness from the database. For walls without a substructure material in the database, the thickness entered in the dialog window is used. The thickness from the database is only taken into account in living space verification. This is not taken into account for the wall covers.
Ceiling covering thickness
![]()
Thickness of ceiling covering
Suspended ceiling
Improved · 16 R1 · Improvements

This switch activates the suspended ceiling.
Parameters for ceiling construction
![]()
The ceiling construction with its individual layers can be specified in the parameters.
Distance
![]()
The distance of the suspended ceiling can set here or by using the height reference.
Height reference active
![]()
If the height reference is active, the distance is calculated from the height section of the structure settings and cannot be adjusted in this dialog window. In general, this option should be selected, as this is the only way to make a global modification in the structure settings.
Height reference free
![]()
The free height reference allows for the entry of free/differing values.
Additional covers
If an existing room is edited, additional room covers can be added.

Definition of an additional covering
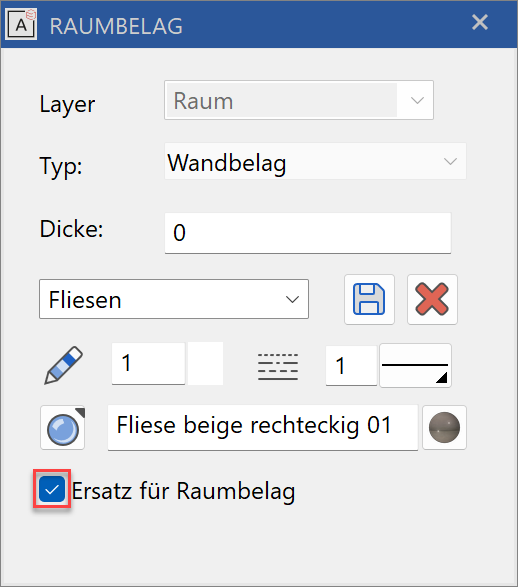
There are three different types:
| Addition | Replacement | Deduction |
|---|---|---|
 |
 |
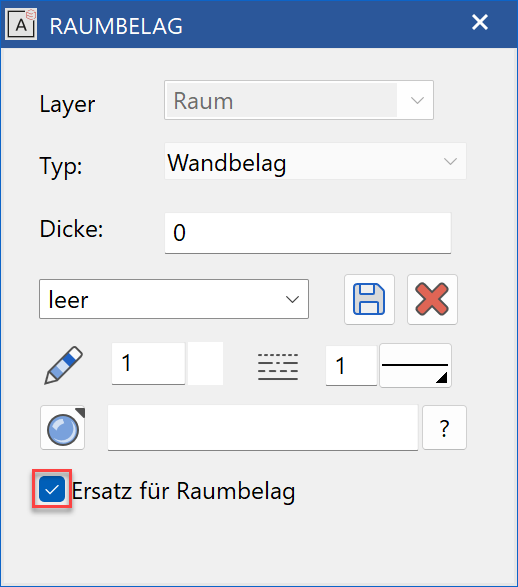 |
For the Additional type, the plane is quantified twice, for the basic material and for the additional material. If the basic material is replaced, only the new covering is quantified. The material and texture field is empty for the Deduction type. The plane is not quantified. This type is used, for example, for a fitted cupboard, which is not cleaned behind, or if there is no floor covering under the bathtub.
All of the drawing functions are available in the Input Assistant for creating the planes. The work plane does not need to be set on a wall, but rather the system notices independently which wall should be added.
An existing, additional room finish can be selected and manipulated with the handles and grippers; the value settings of the material can be seen in the property bar or the marked covering can be deleted.

Parameters for ceiling construction
![]()
The individual layers of the suspended ceiling can be defined and materialised. The functionality is identical to the floor construction, except the layers cannot be created with an inclination.
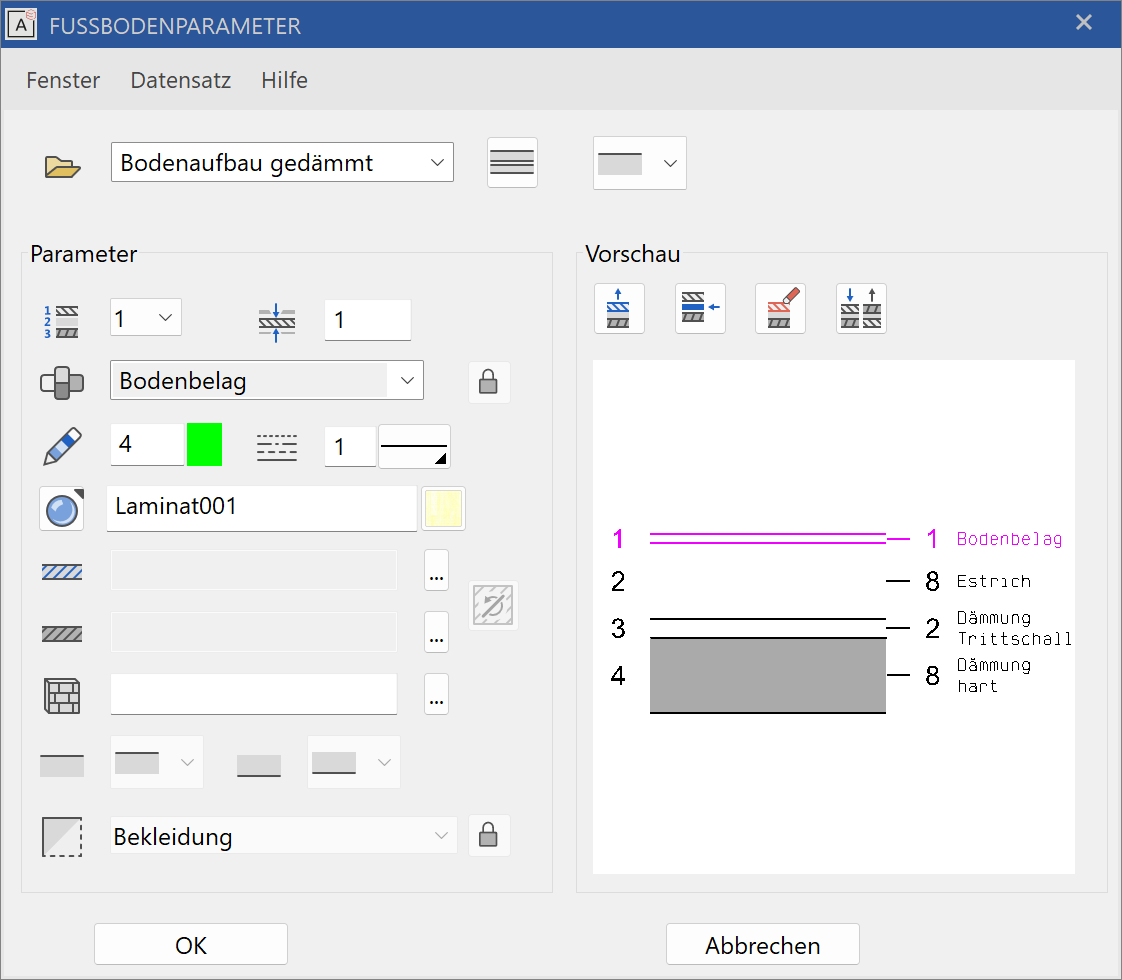
Parameters for floor construction
![]()
The individual layers of the floor can be defined and materialised. The layers can be created with an inclination.
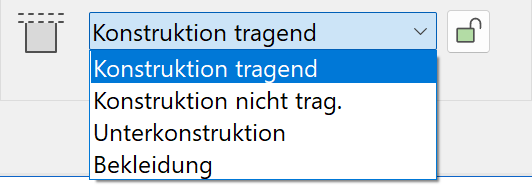
Type
See details in chapter Architecture Objects.
Floor (covering) type
| straight | Slanted above and below | Slanted above |
|---|---|---|
| No incline settings | Incline settings active | Incline settings active |
Incline settings
Improved · 16 R1 · Improvements
These settings are only visible with a sloping floor.
There are four definition types:
| Slope | Incline | Define by 3 points | Slope by drain |
|---|---|---|---|
 |
|
height |
The floor is defined by 2 points for the Slope and Incline definition types. The position of the drain is queried for the definition type slope over drain. A slab opening can also be specified here.
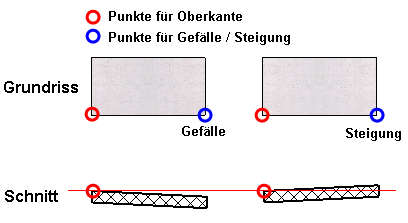
The Define by 3 points definition type determines the inclination via 3 points.
When creating the floor, the point is always queried first then the associated height must be entered. An imaginary plane is defined through the three height points, which is then moved in parallel until the layer has the defined minimum or maximum value.
Layer thickness minimum or maximum value
| Maximum value | Minimum value |
|---|---|
The layer thickness is measured on the thickest cross section or on the thinnest cross section. For the maximum value, it must be ensured that the layer does not approach zero.
Parameters
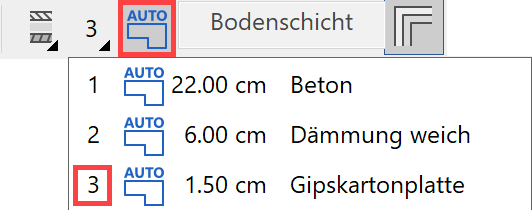
Number of active layer
![]()
For multi-layered floors, you can select the desired layer in order to configure its settings. Instead of selecting the number, you can click directly on the layer in the preview.
Thickness of active layer
![]()
Material and its linkage
The materials and their corresponding settings are saved in the representation level. When linkage to the representation level is selected (recommended), the pen and hatch settings are adopted and cannot be manipulated ("greyed out").
Pen and Hatching parameters
![]()


When the linkage of the material is active, only the line type can be modified.
![]()

If you unlink the materials, the pen type and hatches can be modified. The settings are described in chapter Representation level > Materials management.
Colour mode/material mode
![]()
![]()
This switch allows you to toggle between colour mode and material mode. For more details, see the Colours and Materials chapters.
3D hatch

The floor layer can be assigned a line hatch that appears in the calculated hidden line views.
Layer slope

This option is only active for a sloping floor.
You can specify for each layer border, whether it is on the incline.
A floor may only have one inclination, but be horizontal overall when you consider both the top and bottom surfaces.
Examples:

Layer type
For the report to be correct, a layer type must be assigned to the layer.
If the linkage to the material is detached, you can make the assignment independently.
If the linkage is active, the layer type is read from the report database using the material name.
Preview
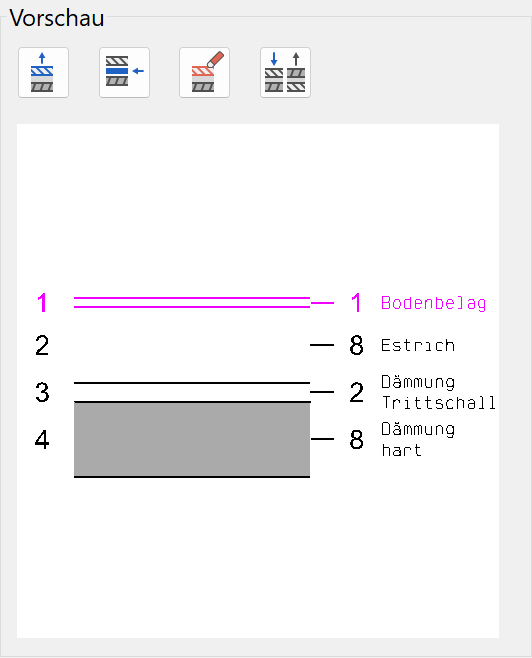
The current construction is depicted in the preview. Layers can be added, deleted or replaced. If you click on a layer in the preview, its parameters are displayed.
Add layer
![]()
The function adds a new layer to the last layer. This layer has the same settings as the current layer.
Insert layer
![]()
The function adds a new layer above the active layer.
Delete layer
![]()
Deletes the active layer.
Mirror layers
![]()
This function rotates the group of layers by 180 degrees.
Switch between main contour/layer contour
![]()
Both room ceilings and floors may be created with multiple layers as described above. This function gives access to a list of the individual layers so that you can modify them independently of the main room contour's geometry.
The function toggles from the main settings of the room, to the edititing of the inividual layers of the floor assembly, with a further click to the inidvidual layers of the ceiling and finally back to the main settings of the room.
Main room settings → Floor layers → Ceiling layers
Change layer contour manually
The room has a main contour. If the main room contour is modified (i.e. by moving a wall), all layers automatically adjust with it. To modify an individual layer, the AUTO-switch must be turned off.
Select the layer, switch the AUTO switch off and then this change is shown in the list.
At the same time, the layer in solid mode is highlighted in colour and the remaining layers are displayed as transparent.

In this state, the handles and grippers only react to the selected layer. You can change the contour in any way as long as it remains inside the main room contour. It is also possible to cut holes from the layer.
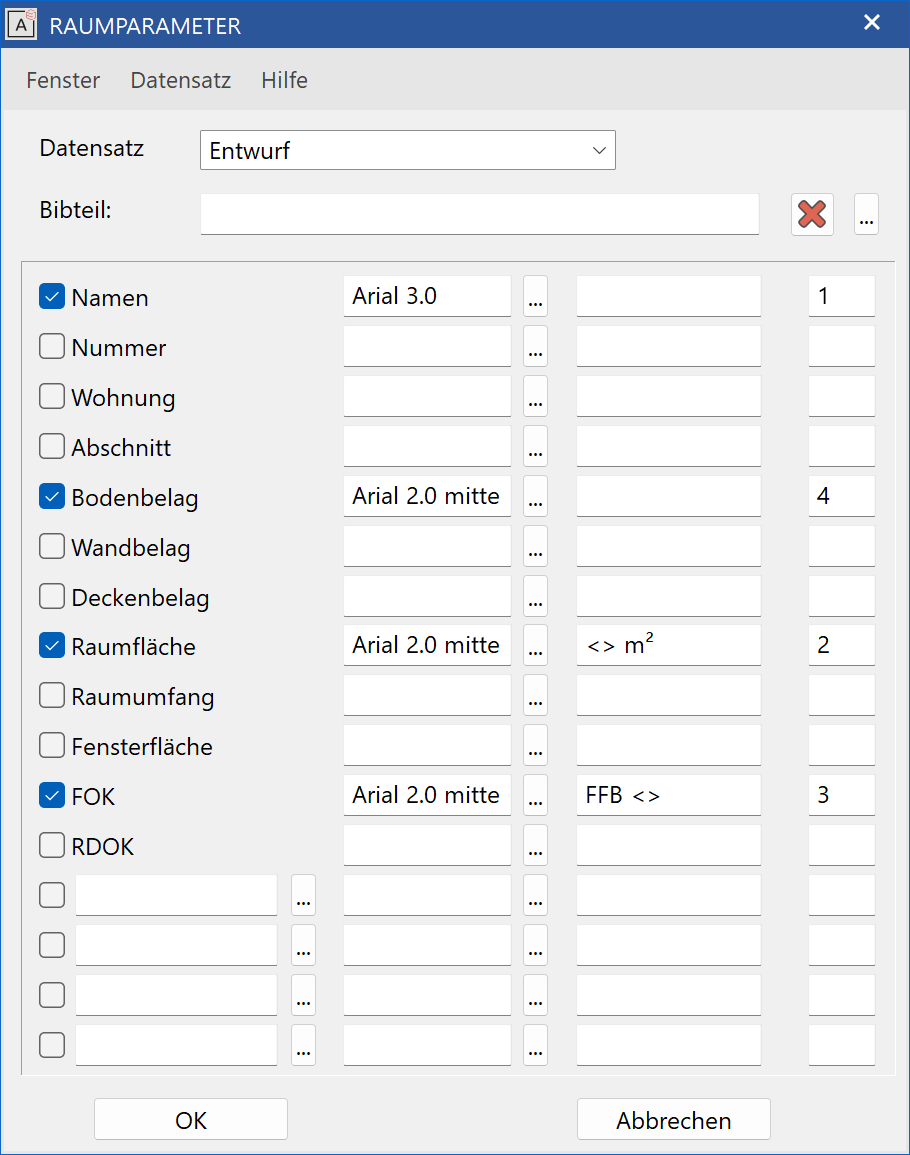
Label
![]()
The room label style can be set individually for each representation level. In the permission planning, only the room name and the square metre surface are shown; the (finished) floor heights and the materials should also be labelled in the execution planning.
Type
See details in chapter Architecture Objects.
Label options
Each row has a check box, which is used to activate the label attribute.
Text parameters
A text parameter must be entered for each entry.
Formatting option
The formatting option allows pre-texts and post-texts to be generated. If the calculated room area is provided with the post-text "m²", the formatting "<> m²" must be entered. The sequence of "greater than" and "less than" signs are placeholders for the value which is being calculated.
The room area is set to have two decimal places by default. If you want to use a different rounding algorithm, you can control this with additional entry between the placeholder symbols.
If only one decimal place should appear, the entry must be "<:1> m²".
For rounding to a half square meter, it must be "<:05> m²".
![]() Two-line
Two-line
Improved · 16 R1 · Improvements
This switch activates the line break for two-line text.
Numbering
The numbering of the values sets the order of the texts. The text with the lowest number (here "1") begins at the height of the room model ("small blue line"), all other texts are generated under it.
Additional label options
At the bottom of the dialog window, there are four free rows available, which can be used for each attribute, which is connected to the room label object. However, some attributes are added to the room name first by the function SUMMARY TO PROJECT BOOK.
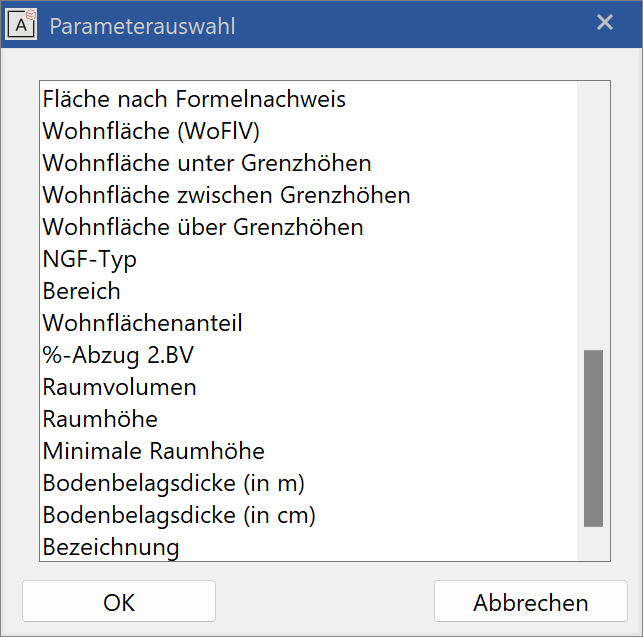
| Parameter selection | |
|---|---|
| areanorm | Room areas incl. height check and percentage deduction for plaster |
| areanormnew | Room areas incl. height check and effective deduction for plaster |
| areanorm1 | Room area under limit height (DIN 277: 1.50 m) |
| areanorm2 | Room area over limit height (DIN 277: 1.50 m) |
| areanorm0 | Area from living space calculation below limit height 1 |
| areanorm50 | Area from living space calculation between limit height 1 and limit height 2 |
| areanorm100 | Area from living space calculation above limit height 2 |
| use | NSA-type (Net Storey Area) |
| areatype | Area (a, b or c in accordance with DIN 277 and ÖNORM B 1800) |
| areapercent | Percentage of living space |
| plaster deduction | Percentage deduction for plaster in living space calculation (in accordance with the old Second German Calculation Ordinance) |
| roomheight | Room height |
| minroomheight | Minimal net clearance |
For more information about setting the limitation values for living space calculation, please refer to the Quantities chapter, "Deduction limits, height specification and formula settings" section.
Simplified input of additional room labels
When activating a room label automatically a default value is set as text parameter and the room label is numbered.
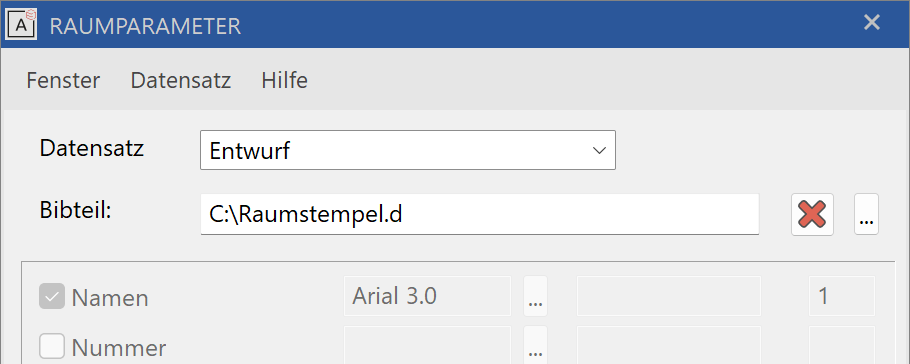
Library part
The room label graphics can also be controlled by a library part. This library part can include lines, hatches, fixed texts and autotexts. The room label should, preferably, be drawn in the centre of the page, as this reference point will later also be the placing point of the library part.
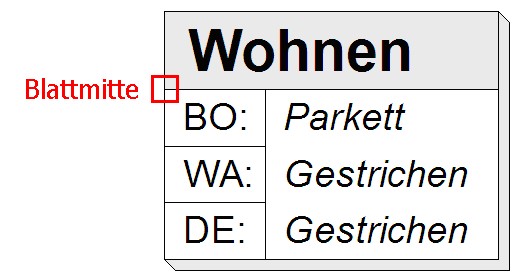
The library part can be saved to a parameter record and is therefore dependent on the representation levels. If a library part is selected, the attributes have a grey background, as the autotexts in the library part already determine which attributes are displayed, and how and where.
In the room label group, all attributes with the most common rounding variants are included in the autotext.

If the desired rounding is not available, the autotext can be adjusted manually.
"@format(%floortop,+zm.2)@"
'+' means with a sign in all cases.
'z' means '±' for value 0.
'm.2' means AT LEAST two decimal places.

Room report
Only contours of the construction parts wall, lintel, chimney, vertical glass elements and the room separators are used for the room report. These 2D geometries must be on the work plane of the current storey (bare ceiling level). Construction parts of other structures are not taken into account. Bordering rooms (provided, that walls are only defined in one structure) are completed with room separators.
The must not be any crossover of bordering walls. Equally, for walls lying one above another, only one wall in each case may be definitive for the room contour (room-dividing).
Room modifications
Move
If you move a room name, the room data is immediately recalculated when it is set back down. The blue placing cross must always be inside the room to be calculated.
Tip
If the text should be outside of a room, it can be moved after clicking the handle. The blue placing cross stays inside the room here.
Copy
You can copy a room name as an object at any time. All changes (such as a change of storey) are refreshed immediately. However, please note that it may be difficult for you to differentiate between two rooms with the same name in the same storey (the unit label stays the same when copied) in the list output. You should therefore edit your room names as soon as you have copied them. Otherwise, you can easily forget to do this!
Edit
Clicking on the room label opens the property bar where you can make modifications or you can open the room parameters window for more detailed settings. Please do not use the MODIFY TEXT function to modify the room names, otherwise the room name will not be able to determine dimensions automatically!
Refresh
If the dimensions of the room are manipulated, i.e. by shifting walls, stretching room separating lines or whole rooms, the room name is refreshed automatically. If you delete walls and lintels or add new ones to a room, the room name must be refreshed using the function REFRESH ROOMS from the LAY-OUT menu. This also applies for the window and glass elements. If this is changed, the room label must be refreshed, so that the window area is correctly indicated.