Wall Opening
|
|
Construction parts toolbar |
| AR Objects menu > Create wall opening |
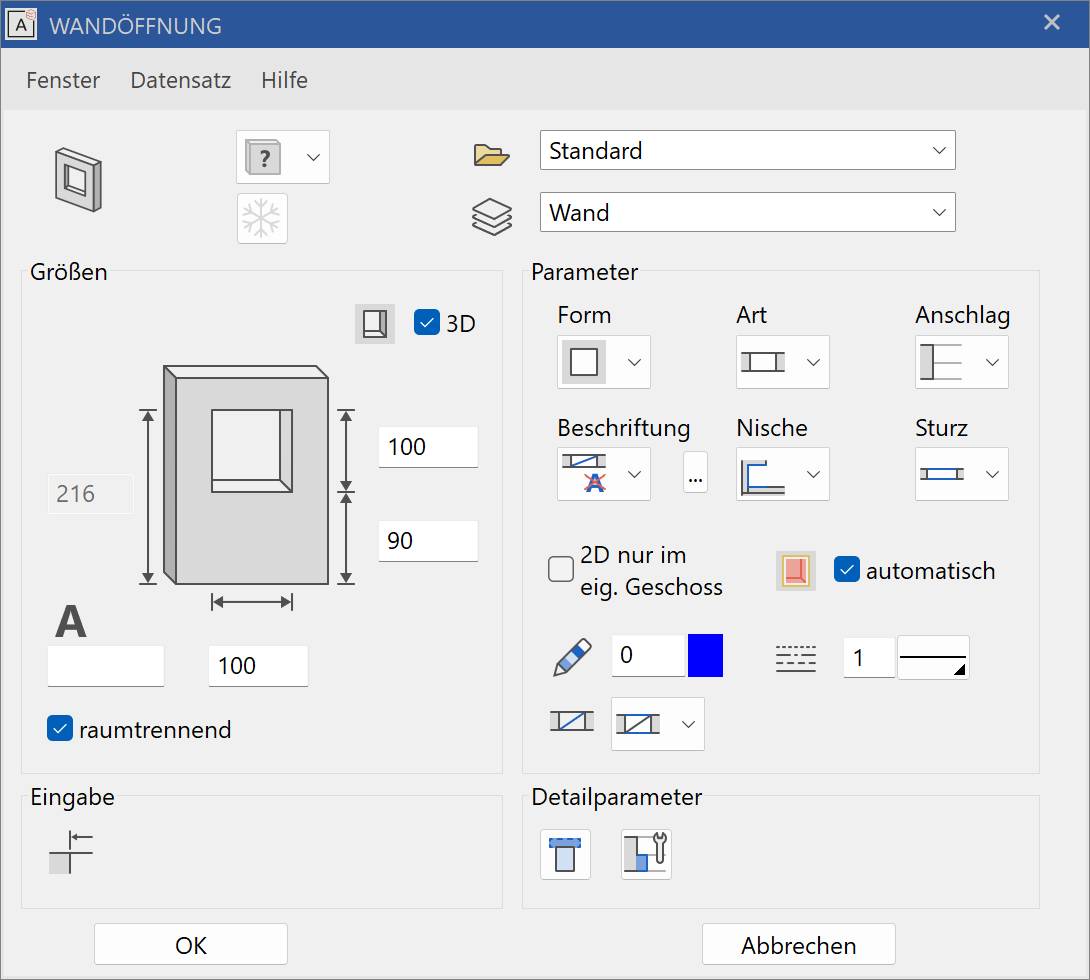
Click on the CREATE WALL OPENING function to enable the settings for the most recently placed wall opening. The wall opening can now be placed. The Position of opening query appears in the entry line.
Wall opening property bar

The property bar is visible as soon as the CREATE WALL OPENING function is launched or if an existing wall opening is edited. You can manipulate the main values in the wall opening's property bar.
| Function | Description |
|---|---|
| Wall opening parameters | |
 |
Type |
| Renovation planning state | |
| Opening shape | |
| Opening type | |
| Wall opening width | |
| Wall opening height | |
| Wall opening bottom | |
| Wall opening depth | |
| Labelling | |
| Close openings automatically (renovation planning) | |
| Lintel line depiction | |
| Diagonals | |
 |
Wall opening properties (depiction) |
Wall opening parameters
![]()
You can open the wall opening parameters from the property bar or by double-clicking the wall opening to be modified.
General parameters
 Renovation planning state
 Freeze
 Type
Type Layer
Layer
The general parameters for architectural objects are described in chapter Architecture objects.
Dimensions
Wall opening height
Enters the height of the opening from the underside to the lintel.
Wall opening width
Enters the width of the opening.
Wall opening bottom
The height of the bottom edge is entered from the "raw slab".
Wall opening text
If the text symbol is switched on in the parameters, the text entered here is add to the symbol.
Wall opening depth
If the trench is selected as the wall opening type, the depth of the opening can be manipulated with this value.
Opening in 3D

This setting is generally active. An opening into the 3D wall can, however, be deactivated. In that case, only a 2D depiction of a wall opening is generated in the wall.
Room-dividing

If a wall opening is not room dividing, it does not divide surfaces when calculating room area.
Selection
Shape
![]() - Rectangle
- Rectangle
![]() - Circle
- Circle
![]() - Semi-circle
- Semi-circle
![]() - Round-arch
- Round-arch
![]() - Segment curve
- Segment curve
![]() - Pointed arch
- Pointed arch
![]() Diamond
Diamond
![]() - half triangle right
- half triangle right
![]() - half triangle left
- half triangle left
![]() - Isosceles triangle
- Isosceles triangle
![]() - Select free contour
- Select free contour
![]() - Rectangle by diagonal
- Rectangle by diagonal
![]() - Use free volume
- Use free volume
There are 13 different shape types available for selection. The first 10 of these shapes are standard shapes, which have a clearly defined outer contour (shape of the reveal).
![]()
The select free contour shape allows you to define a free wall opening contour. This contour should lie "on the wall". i.e. The work plane is positioned on the wall surface. A closed polygon can be drawn there.
![]()
The rectangle by diagonal shape is a simple tool for entering rectangular wall openings in 3D. Position the work plane on the wall. When launching the function, only the bottom left and top right corner of the opening are queried. All further representation variants result from the parameters set.
![]()
The use free volume shape offers the option to generate an opening by defining a "deduction" beforehand. This can be a 3D box which is "embedded in the wall", which by definition means that a "hole in the wall" appears by taking the deduction away.
After activating the function, the volume, which is to be removed must be selected, and then the wall in which the process is to take place
.
Tip
The volume of the deduction cannot be even with the top bottom edges of the wall. Always leave some free space, even if it just a millimetre.
Type
![]() - Opening
- Opening
![]() - Slot/recess
- Slot/recess
The style of wall opening determines whether it is a wall opening or a wall slot/recess.
If the wall slot is selected, the field for entering the wall opening depth appears in the dialog window.
Stop
![]() - Without stop
- Without stop
![]() - Free stop
- Free stop
If the free stop is selected, the field for entering the wall opening depth appears in the dialog window.
Parameters
Floor
![]() - Floor runs into niche
- Floor runs into niche
![]() - Floor is limited with wall
- Floor is limited with wall
Text symbol
![]() - Symbol is switched off
- Symbol is switched off
![]() - Symbol is switched on
- Symbol is switched on
Selection of library part

Here, you can select a specific Lib part for the symbol. The standard symbols are stored under <ELITECAD installation directory>\u\<version>\ar\glob\symbol.
Tip
If you would like to create a symbol of your own, it is best to load a template from the path listed above (wd_text.d or wd_text_new.d). Adapt the symbol as you wish, and save it under a new name. Make sure the placement point of the symbol is in the centre.
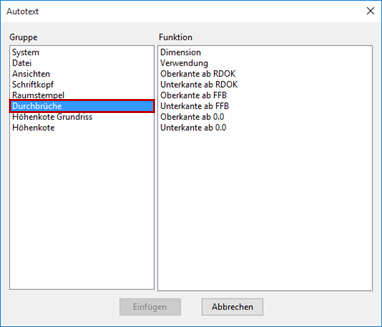
Entries in auto text
Lintel line depiction
![]() - Type 1
- Type 1
![]() - Type 2
- Type 2
![]() - Without lintel
- Without lintel
![]() - Not visible
- Not visible
The lintel line depiction in the floor plan is set using this button. There are two different types of lintel lines, which can be specified. The types are set in the representation levels for windows: The top selection option here is type 1, the middle type 2. Type 1 is dashed by default and type 2 is a solid line. The third selection switches the lintel line depiction off, and the fourth shows no wall opening at all.
2D only in active storey

The 2D depiction for multi-storey windows can be either in one specific storey or in multiple storeys.
Renovation planning – fill automatically
If the status of a door is changed to demolition, the automatic generation of a wall that fills the hole can be triggered with this option.
Pen and line type
![]()
![]()
Here you can select the pen/line type for the 2D depiction.
Floor plan depiction
![]() Only pen/line type
Only pen/line type
![]() Only pen/line type
Only pen/line type
![]()
 Additional colour selection
![]() Additional colour selection
Additional colour selection
![]() Additional colour selection
Additional colour selection
![]()
 Additional hatch selection
Detail parameters
Lintel parameters
![]()
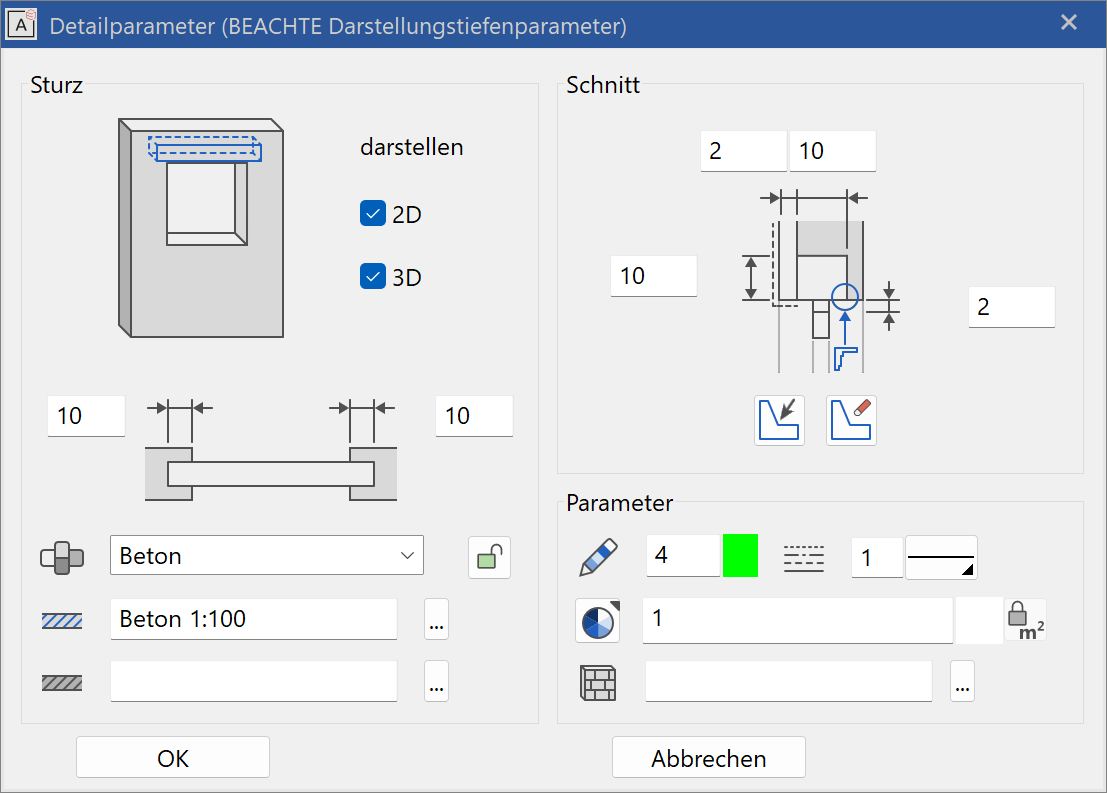
The lintel parameters for the wall opening are identical with the lintel parameters for windows. The lintel parameters are documented in the chapter windows.
Stop editor
![]()
The stop editor is identical to the window stop editor and documented in the window chapter.
Modification functions
Placement points
If a pre-existing wall opening is edited, its original placement point is indicated. Now if you modify the wall opening width, the modification always takes effect from this point. The point can be moved to the reference points on the left, right and in the centre using the mouse.

Move the placement point with the mouse.
Tip
After selecting the wall opening, click on a handle or gripper of the contour to access manipulation functions directly in a toolbar or by using Tab with the cursor.