Slab Property Bar

The property bar is visible as soon as the CREATE SLAB function is started or if an existing slab is edited.
You can select the slab's main values in the property bar.


Slab parameters
![]()
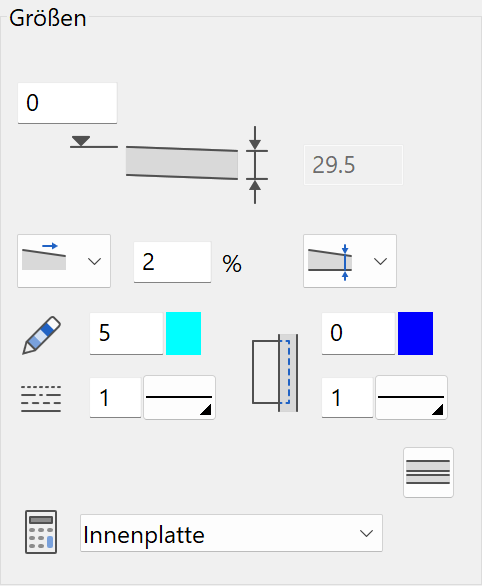
You can open the slab parameters from the property bar or by double-clicking the slab to be modified. The parameters window has three columns. First, the General Settings including the dimensions and entry method, then the settings of each layer and finally the layer preview.

General parameters
 Renovation planning state
 Freeze
 Type
Type Layer
Layer
The general parameters for architectural objects are described in chapter Architecture objects.
Dimensions

Use this field to specify general values such as thickness, height situation, incline settings, floor plan depiction and the side view depiction.
Incline settings
Improved · 16 R1 · Improvements
These settings are only visible with a sloping slab.
There are 4 definition types
| Slope | Incline | Define by 3 points | Slope by drain |
|---|---|---|---|
 |
|
height |
The slab is defined by 2 points for the Slope and Incline definition types. The position of the drain is queried for the definition type slope over drain. A slab opening can also be specified here.
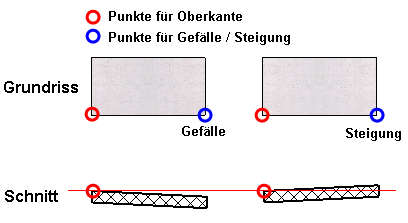
First point: Point for top side
This point is used to measure the height situation of the slab.
Second point: Point for slope/incline direction
This point specifies the direction of the slope or incline.
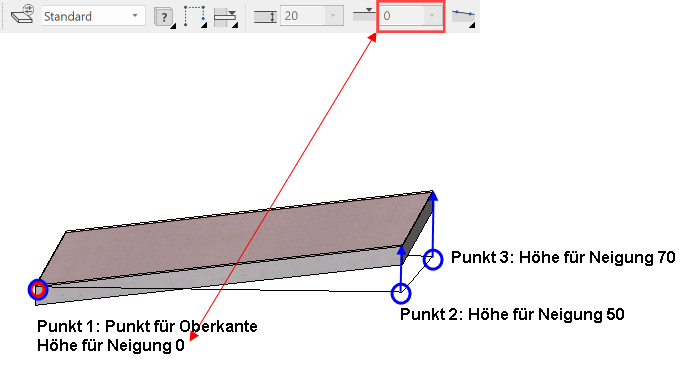
The Define by 3 points definition type determines the inclination with 3 points.
When you create the slab, the first point sets the height of the slab. You must also specify the height for the inclination to start then the other two points follow with a query for the respective inclination height. The three height points situate an imaginary surface, which moves in parallel until the surface leads to the point for the upper edge.

If you enter the same value for the first point's inclination height as for the height situation field, the slab passes directly through the 3 points.
Layer thickness for tapered slab
![]()
![]()
If the slab's upper edge is not parallel to its lower edge (configurable in the individual layers), you must specify whether the layer thickness is the maximum or minimum value.

Floor plan depiction

The two values are for the depiction of the slab in the floor plan. The floor plan contour always matches the main drawn contour. Individual layer changes are not displayed. The left column is for freely lying edges of the slab, while the right column is for the edges under a wall.
View enveloping body
![]()
![]()
For multi-layered slabs, it may make sense only to display the enveloping body. This example shows a section through a stairwell with a view of a multi-layered slab.

Cross section through the stair
Reported as
This SLAB function can be used for various construction parts. For the construction parts to appear in the correct reporting lists when quantifying a model, their applications must be defined.

Entry
Entry mode
There are two entry types available for selection:
Entry directly by polygon
Entry by a predefined contour
Draw contour manually
![]()
The Input Assistant offers the drawing options of POLYGON, RECTANGLE, CIRCLE, ELLIPSE and SPLINE.
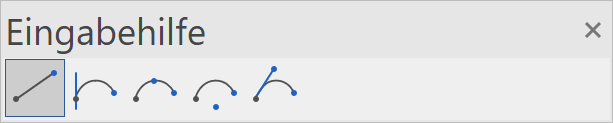
If you use Polygon, make sure to close it.
Create slab from existing contour
![]()
Before starting the SLAB function, you must draw an outline using the drawing functions. A query appears in the input line asking you to Select contour for slab. The slab is generated from this outline upon selection.
Height reference
The height reference determines the relationship to the design model. The references "Free slab", "Storey floor" and "Level floor" are available as options.
Free slab
![]()
A free slab is represented as an independent slab. It does not section any walls, and floors are not accounted for.
Possible application: Representing hanging ceilings, landings, foundations (if no separate foundation storey has been defined)
Storey floor according to height section
![]()
The thickness and height situation of the storey floor is determined by the storey list. For that reason, the thickness and upper edge entry fields are "greyed out". The storey floor is always the raw slab of the active storey. All storey walls of the active storey begin at the storey floor or a level floor of the storey.
Level floor for shifted storeys
![]()
The height and thickness of the level floor can be freely defined. All storey walls of the active storey begin at the storey floor or at a level floor of the storey. If a storey floor and level floor are positioned over each other, the storey walls always begin at the higher-up floor.
Slab type
![]()
![]()
You can choose between a horizontal and a sloping slab.
Parameter
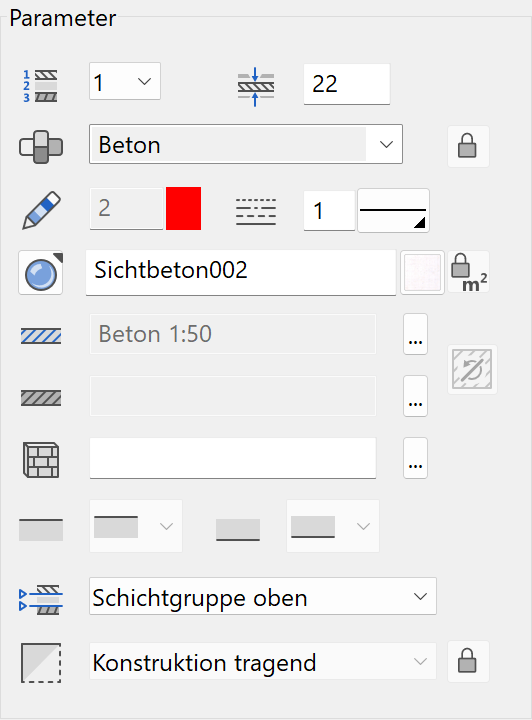
The parameter section includes the settings of the active slab layer.
Number of active layer
![]()
For multi-layered slabs, you can select the desired layer in order to configure its settings. Instead of selecting the number, you can click directly on the layer in the preview.
Thickness of active layer
![]()
Material and its linkage

![]()
Details in Wall > Property bar.
Pen and hatching parameters


Details in Wall > Property bar.
Colour mode/material mode


Details in Wall > Property bar.
Material for room label
![]()
3D hatch

Details in Wall > Property bar.
Layer slope

This option is only active for a sloping slab.
You can specify for each layer border whether it is on the incline.
A slab may only have one inclination, but be horizontal overall when you consider both the top and bottom surfaces.
Examples

Layer group

The layers are divided into layer groups. Three layer groups are available: upper, middle and lower. The layer groups govern sectioning with the wall's layers. The sectioning is performed by assigning which wall layers should lead to which layer groups. For the assignment of a layer group, the entire construction with the wall must be accounted for.
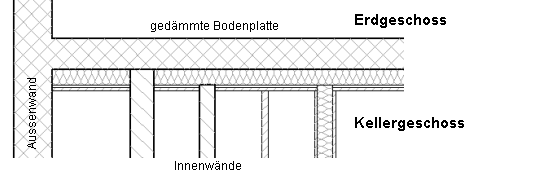
Example section through basement ceiling:
Situation
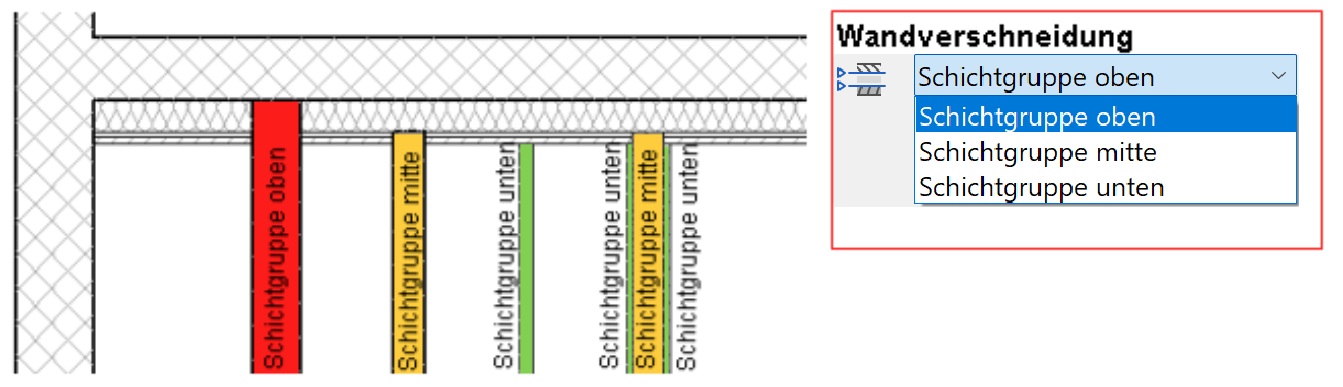
Assign each slab layer to a layer group.

For the individual wall layers, use the WALL LIMITATION TOP setting to assign the layer group of the slab they should lead up to.
Layer type

Details in Wall > Property bar.
Preview
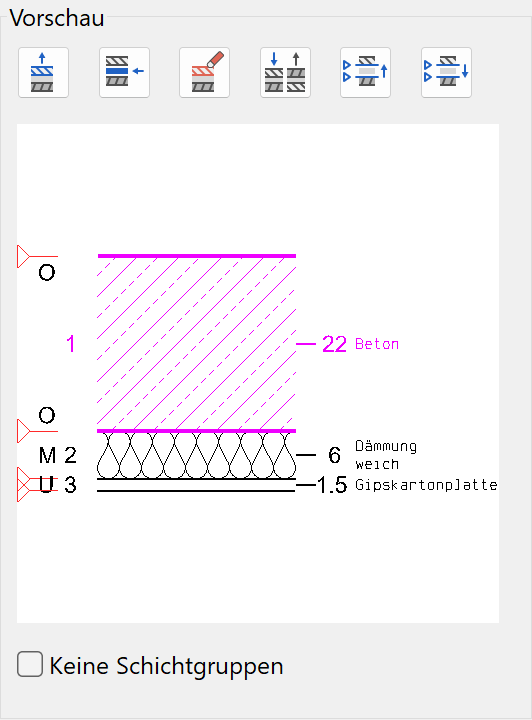
The current construction is displayed in the preview. Layers can be added, deleted or replaced. Each layer must be assigned to a layer group. The layer group is labelled with T, C and B (top, centre and bottom). If you click on a layer in the preview, its parameters are displayed.
Add floor layer
![]() Details in Wall > Property bar.
Details in Wall > Property bar.
Insert floor layer
![]() Details in Wall > Property bar.
Details in Wall > Property bar.
Delete floor layer
![]() Details in Wall > Property bar.
Details in Wall > Property bar.
Swap slab layers
![]() Details in Wall > Property bar.
Details in Wall > Property bar.
Extend layer group up/down
![]()
![]()
The layer group of the active layer is extended one layer up or down.
No layer groups
The layer groups are removed. The walls will only account for the slab's height reference or manually modified layer contours.