Modification Functions

When a wall is being edited, modification functions are available at the end of the property bar, or you can call up the functions under the MODIFY menu > WALL.
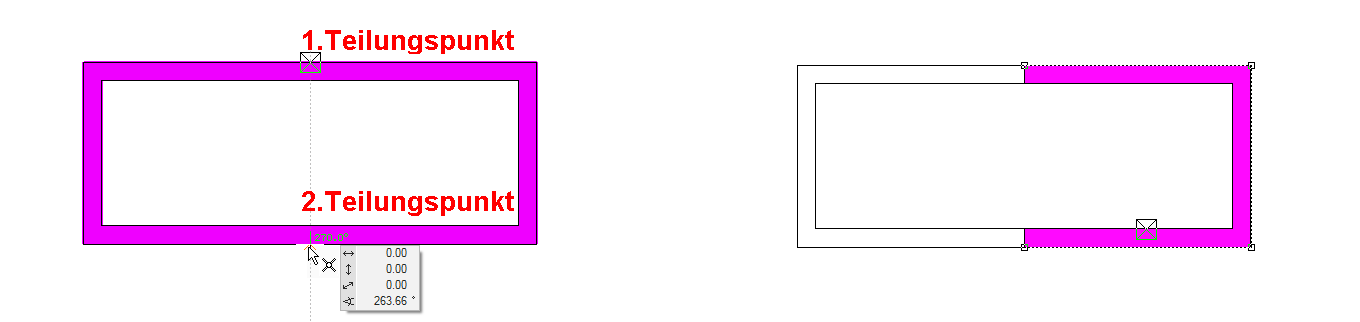
Divide wall
![]()
The DIVIDE WALL function divides a wall into two parts.
For a closed wall, you are prompted for two partition points.
If you place the partition point on a corner of a wall that has a right angle, the program offers two possible partition lines. You can select the desired one.
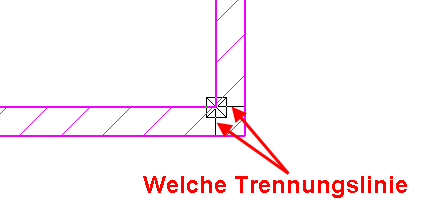
If you place the partition point on a wall corner that does not have a right angle, the wall is divided by a line that splits the angle in half.
Workshop
You would like to give an area of wall a different construction. To do so, the wall must be divided. Click on the wall, select the DIVIDE WALL modification function, and set the partition point.
 |
 |
Divide the longer wall section. To do so, move the cursor to the beginning of the wall and hover it until the cross appears. Then move the cursor in the direction where the division is to be made, enter the distance and confirm with Enter .
 |
 |
Now you can delete the middle wall section or simply convert it to another wall type.
Join wall
![]()
Joins two divided walls of the same thickness into one wall. If the two walls have different properties, such as height, material, pen, etc., the settings for the wall you clicked are adopted.
You can only click on walls that belong to the same storey and structure. It is also only possible to join two walls that are touching and have their wall axis on the same side. If that is not the case, you can use the MOVE WALL AXIS function to change the position.
Modify wall axis
![]()
The function enables you to modify the contour of an existing wall. The function completely rebuilds the wall from the wall axis.
After the function is launched, the wall is reduced to the wall axis. The wall axis can be modified using the DRAWING function. Make sure that the wall axis produces a complete polygon. To finalize the function, you must click the WALL AXIS READY button. This appears in the top left of the work area.
Tip
If you click a contour handle or gripper after selecting the wall, a variety of manipulation functions is available in the input assistant.
Workshop
Example:
After you have selected the function, the 3D is hidden for the wall and the wall axis becomes visible.
 |
 |
Now you can modify this axis as you wish. You can fillet the corner of a wall, for example. To do so, use the FILLET function. To finalize the function, click WALL AXIS READY.
|
|
|---|---|
 |
 |
Move wall axis
![]()
When you modify the thickness of a wall, the position of the wall axis is important, as it determines the direction of the thickness modification. Normally, wall axis display is switched off (see SETTINGS > OPTIONS > DEPICTION). While this function is selected, the wall axis is displayed and can be moved using the flip cursor.
Modify wall contour
![]()
You can modify the contour of a single-layered wall. The wall can be assigned to any outline.
After launching the function, the wall is reduced to the outline. You can use the 2D drawing functions to edit the outline. Make sure that the new contour produces a closed polygon again. To finalize the function, you must click the WALL CONTOUR READY button. This appears in the top left of the work area.
After the contour modification, the wall has a free contour and not all of the editing functions are available.
Tip
The wall should be divided in the area of the modification so that only part of the wall has a free contour.
Workshop
After you call up the function, you can draw the new wall path using the normal drawing functions. Afterwards, you should edit the wall polygon to produce a closed polygon again (Delete segment, etc.).
|
|
|---|---|
 |
 |
End the function using WALL CONTOUR READY. The wall is drawn. Make sure that the wall has become a free contour. There should no longer be all of the editing options available.
Switch between main contour/layer contour

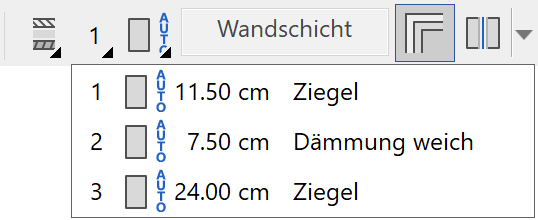
This selection box gives access to the individual layers so that you can modify them independently of the main wall's geometry. To make a horizontal change, the layer must be independent. To make a vertical change, the "Auto" selection box must be switched to any height reference.
Control height of single layers
You can change individual layer's heights independently of the wall's height reference. To do so, switch to the layer contours on the property bar.

All the individual layers are listed. Currently, all of them still have the wall's global height reference.

In this example, the wood panelling should not go up to the lower edge of the wall.
In this example, the wood panelling should not go up to the lower edge of the wall".
The layer's behaviour can now be modified individually, separate from that of the wall.


The individually configured layer will no longer react to changes to the wall.
Control single layers in floor plan
If multi-layered walls intersect each other or have independent wall layers, the display of the handles can be switched between the main axis and the local axes.
| Main axis | Local axes |
|---|---|
 |
|
| Select the desired layer | |
 |
 |